Israeli Couscous Salad with Cherries & Pistachios

Israeli Couscous with Cherries & Pistachios | Image: Laura Messersmith

Israeli Couscous with Cherries & Pistachios | Image: Laura Messersmith

There’s been a lot of cooking lately, not that you could tell by the sporadic posts around these parts. The trouble with cooking is that a recipe that looks amazing on Pinterest turns out to be a dud. Case in point: the overly salty falafel I made earlier this week. Sometimes it’s me though, and I discover that fish tacos were never meant to be eaten like nachos. That there is a reason you don’t see them on menus, genius. Sigh.

All that is to say – there is quality control around here, it just means that when I hit a rough patch like I have the past few weeks I post less frequently than I’d like while I fiddle around getting things just right. My goal is only to share recipes I’d be proud to serve, or pass along to my friends, like this one here.

Israeli Couscous with Cherries & Pistachios | Image: Laura Messersmith

Israeli Couscous with Cherries & Pistachios | Image: Laura Messersmith

This essentially a pasta salad made a little fancy with additions like crumbled goat cheese and toasted pistachios. It also offers a little bit of a departure from the classic vinaigrette or mayonnaise-based dressings by incorporating pomegranate molasses.

If you’re wondering where on earth you’ll get pomegranate molasses the way I did when I first saw it in the ingredient list, let me reassure you. It’s easy to make it yourself by simmering plain pomegranate juice with a little sugar and fresh lemon juice until it reduces and thickens. I actually did it a few weeks ago following this recipe from Fine Cooking and it works perfectly, I bet it would also work with plain cranberry juice too if pomegranate isn’t available.

Israeli Couscous with Cherries & Pistachios | Image: Laura Messersmith

Israeli Couscous with Cherries & Pistachios | Image: Laura Messersmith

Israeli Couscous Salad with Cherries & Pistachios (serves 6-8 as a side)

Ingredients:
2 cups Israeli couscous (pearl pasta)
1/4 cup Pomegranate Molasses
2 1/2 teaspoons champagne vinegar
1/2 teaspoon raspberry vinegar
1/3 cup olive oil
2 tablespoons lemon juice
1/2 teaspoon salt
1/2 teaspoon turbinado sugar (aka Sugar in the Raw)
2 cups dried cherries
1/2 cup toasted pistachios
1 1/2 cups, packed fresh parsley and mint leaves
2 ounces crumbled plain goat cheese
4 ounces fresh baby spinach leaves

Instructions:
In a medium sauce pan, bring two cups of salted water to a low boil, then add the couscous and simmer on medium heat for 5-7 minutes, or according to the package directions until al dente.

While the couscous is cooking, whisk together the pomegranate molasses, champagne vinegar, raspberry vinegar, olive oil, lemon juice, sugar and salt.

When the couscous is done, drain through a fine mesh sieve and place in a large mixing bowl. Pour the vinaigrette over while the pasta is still warm and stir together. Set aside to cool.

Meanwhile, toast the pistachios in a dry skillet over low heat, chop the herbs and crumble the goat cheese. When the couscous is cooled to room temperature, stir in the prepped ingredients. Add the baby spinach just before serving.

Rewritten and adapted from Couscous Salad with Fresh Cherries by Ashley Rodriguez of Not Without Salt.

Small Kitchen Friendly?
Yes! I needed a medium sauce pan, mesh sieve, medium bowl, and a small sauté pan. A cutting board, chef’s knife, measuring spoons, a liquid measuring cup, and a large mixing spoon. That’s it!

The Verdict:
I made a few changes to the original to reflect our preferences, a slight softening of the vinegar bite with a touch of raw sugar. A sprinkle of toasted pistachios to continue the Middle Eastern flavors, a generous crumble of goat cheese to balance against the tart cherries, a handful or so of baby spinach to bring the dish more firmly into the realm of salad. All told, this is a great side to serve during the final grilling parties of the summer and is simple to whip up in just a few minutes. My kind of recipe!

Israeli Couscous with Cherries & Pistachios | Image: Laura Messersmith

Israeli Couscous with Cherries & Pistachios | Image: Laura Messersmith

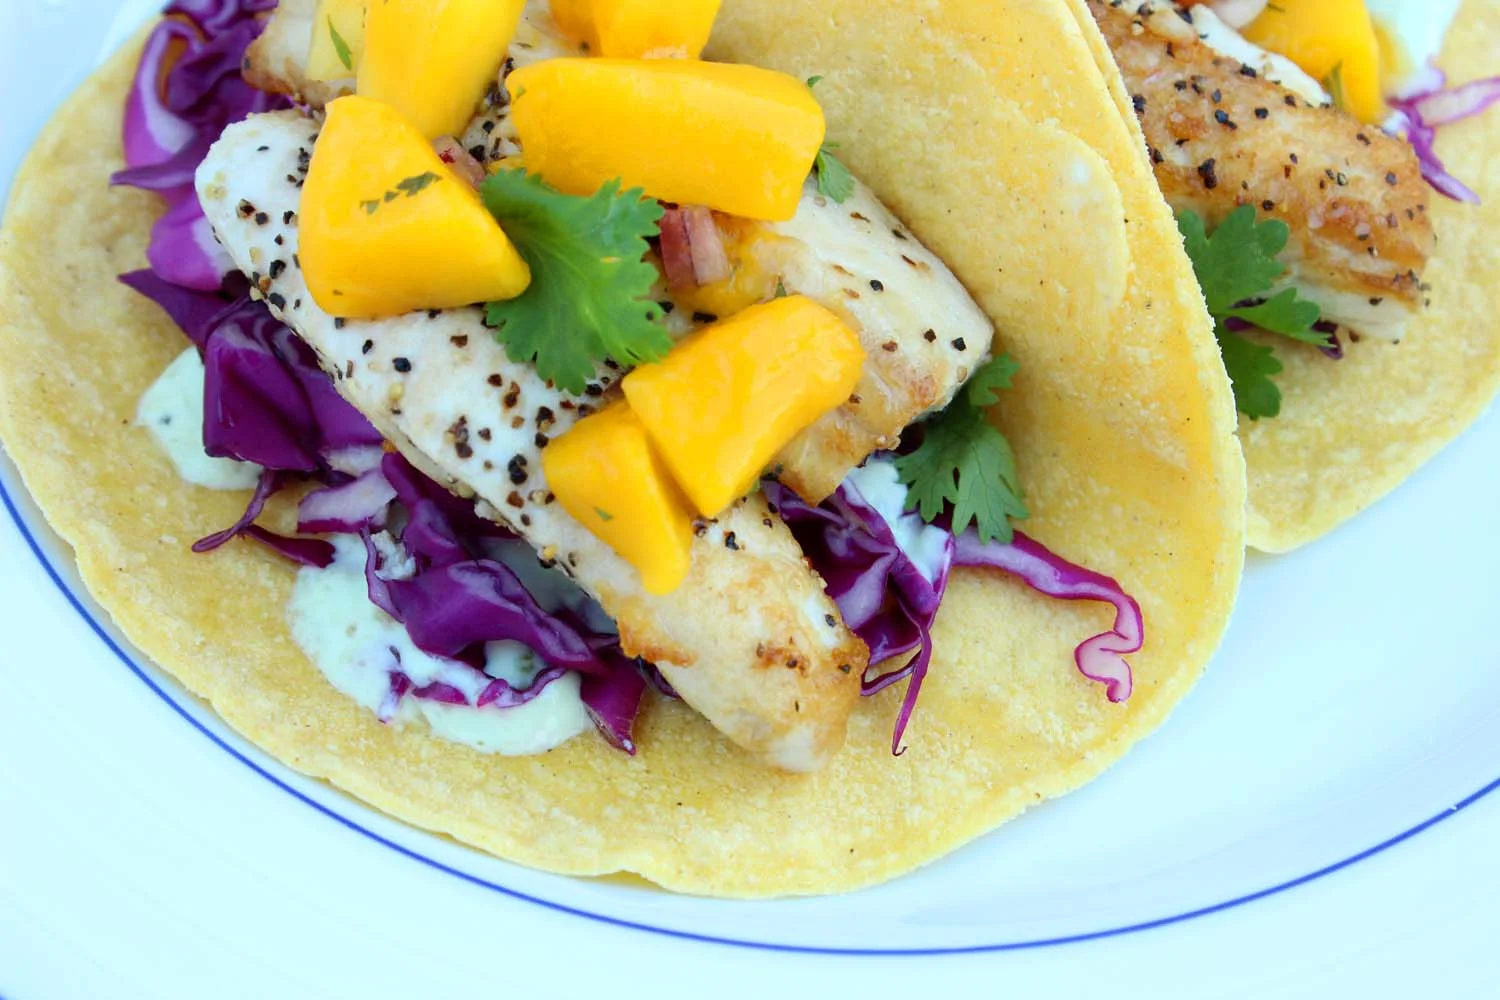
Mahi Mahi Fish Tacos with Mango Salsa

Mahi Mahi Fish Tacos with Mango Salsa | Image: Laura Messersmith

Mahi Mahi Fish Tacos with Mango Salsa | Image: Laura Messersmith

If you had asked me, say 10 years ago, whether I’d be eating, let alone recommend making fish tacos I’d have said you were nuts. Before I lived in Texas I had a weird, Taco Bell-informed concept of Tex-Mex where I assumed everything would be (should be?) spicy, melted-cheese covered, and possibly involving pinto beans. None of those words, perhaps with the exception of spicy, was anything I wanted anywhere near fish. Eww. No way.

And so, I avoided the fish tacos on every menu like the plague until one fine day shortly after we moved to Dallas we stopped at a roadside taco stand housed in a converted gas station called Rusty Taco. The menu was a revelation to this Yankee that things other than ground beef and a ton of shredded jack cheese could be contained in a soft tortilla. Mike and I ordered a variety of their offerings, pork with pineapple, brisket, and you guessed it: fish.

Another revelation. I loved the bright freshness of the white fish topped with a squeeze of lime, layered over a bed of crunchy thinly sliced red cabbage, and lightly drizzled with spicy crema. I was a new convert to the dish and psyched by the realization that stopping for a taco (or 2 or 3) didn’t have to mean a queso-induced food coma.

The recipe below isn’t a direct interpretation of Rusty’s version, just my personal preferences drawn from the many variations I’ve eaten since. But I’ll still remember and tip my cap to that first bite sitting under the whirling fan, just out of the hot Texas sun with a cold margarita to keep me company.

Mahi Mahi Fish Tacos with Mango Salsa | Image: Laura Messersmith

Mahi Mahi Fish Tacos with Mango Salsa | Image: Laura Messersmith

Mahi Mahi Fish Tacos with Mango Salsa (serves 4)

Ingredients:
2 pounds fresh mahi mahi, skin removed
1 package small soft tacos, 8 flour or 16 corn (plan to double up if using corn)
2 cups shredded red cabbage
2 cups (2 medium) diced ripe mangos
1/4 cup finely diced red onion
4 limes, divided
3 tablespoons minced cilantro, divided
5 ounces lime yogurt
2 tablespoons olive oil
Kosher salt
Ground black pepper

Instructions:
Zest and juice three of the four limes. Cut the fourth lime into 8 wedges and reserve. Next, peel and dice the mangos into 1/3 inch pieces and place in a medium mixing bowl. Add the red onion, cilantro, 1 teaspoon kosher salt, and 2-3 tablespoons lime juice according to taste. Mix the ingredients together until evenly combined and set aside in the refrigerator.

Next, in a small bowl mix the lime yogurt with 1 tablespoon lime zest, 1 tablespoon lime juice, 1/2 teaspoon kosher salt and set aside in the refrigerator.

To cook the fish, heat the olive oil in a medium skillet over medium-high heat until it shimmers and just begins to smoke. While the oil heats, pat the mahi mahi dry with paper towels and cut into 1/2 inch wide strips. Sprinkle one side generously with kosher salt and ground black pepper just before adding to the pan placing the seasoned side down.

Cook in batches if necessary to give the fish plenty of room, and don’t try to move or turn them until 3-4 minutes have passed and the edges have begun to turn golden brown. If the pieces begin to curl up, or aren’t getting enough contact with the pan, gently press the fish down with a spatula. While the first side is cooking, sprinkle the unseasoned side with kosher salt and pepper.

When you’re ready to turn, use a spatula to gently nudge the edges, they should come away from the pan with minimal effort. Flip and cook another 3 minutes on the other side until the fish is just opaque. Same rules apply – no fiddling, give them room.

When all the fish has been cooked, assemble the tacos by layering 2 corn tortillas, then topping with a drizzle of the lime cilantro crema, shredded red cabbage, and 2-3 pieces of mahi mahi. Add a spoonful of the mango salsa and serve immediately with the lime wedges.

Salsa adapted from Bon Appétit’s Mango Salsa. Need more advice on handling mangoes? Real Simple has a great video tutorial! What about your fish pan-frying game? Saveur and Fine Cooking both have excellent advice on the subject.

Mahi Mahi Fish Tacos with Mango Salsa | Image: Laura Messersmith

Mahi Mahi Fish Tacos with Mango Salsa | Image: Laura Messersmith

Small Kitchen Friendly?

Yes! I used a medium mixing bowl, small bowl, and 12” sauté pan along with a Y-shaped peeler, chef’s knife, microplane grater, a rubber spatula and a metal spatula. (A flexible fish spatula would be ideal, but I don’t own one at the moment!) You’ll also want a liquid measuring cup, measuring spoons, and some paper towels.

And, depending on your ventilation situation a small fan placed in the kitchen window is a useful addition.

The Verdict:
To me, this dish just sings of summer whether that’s in a breezy coastal location or punishingly hot North Texas and is the perfect dinner to make when it’s too hot to cook, but not quite too hot to eat. The mahi mahi is tender underneath it’s thin golden exterior, red cabbage gives the taco a crisp texture, and the whole package is jubilant with it’s punchy lime-spiked crema and fragrant mango salsa dressings. Simple and perfect.

Mahi Mahi Fish Tacos with Mango Salsa | Image: Laura Messersmith

Mahi Mahi Fish Tacos with Mango Salsa | Image: Laura Messersmith

Bourbon & Brown Sugar Marinated Steak

Bourbon & Brown Sugar Marinated Steak | Image: Laura Messersmith

Bourbon & Brown Sugar Marinated Steak | Image: Laura Messersmith

Every once in a while I’ll be paging through a cooking magazine and a recipe will reach out; grabbing me by the lapels, just begging to be made (proverbially of course.) That was the case with this Bourbon and Brown Sugar Marinated Steak. I found it in a compilation issue of Fine Cooking’s best summer recipes and the name alone summoned mental images of spicy sweet steak consumed on a summer evening somewhere in Kentucky blue grass country.

Wheels were set in motion and a few days later we were channeling a back porch pace up here on the twelfth floor complete thanks to a little urban grilling and some fragrant, ripe peaches. Because what goes better with bourbon than stone fruit?

The humidity has loosened its grip on New York giving way to blessedly fresh mornings and warm afternoons when laying on your back in a lawn of clover while the bumblebees buzz seems like the best possible way to spend an hour or two. This recipe perfectly captures that vibe – gingery warmth, minimal effort.

Bourbon & Brown Sugar Marinated Steak | Image: Laura Messersmith

Bourbon & Brown Sugar Marinated Steak | Image: Laura Messersmith

Bourbon and Brown Sugar Marinated Steak (serves 4) 

Ingredients:
1/2 cup low-sodium soy sauce
1/3 cup bourbon or other whiskey
1/3 cup firmly packed brown sugar, preferably dark
1 tablespoon Dijon mustard
1 1/2 teaspoons finely grated fresh ginger root
1 1/2 to 2 pounds flank steak, or 1 1/2-inch-thick New York strip steaks 

Instructions:
Use a paring knife to peel the ginger and then a microplane to finely grate into a medium liquid measuring cup. Add the soy sauce, bourbon, brown sugar, and Dijon mustard to the cup. Whisk together to combine the ingredients and dissolve the sugar.

Place the steak in a large zip top bag and pour the marinade over the meat. Seal the bag and massage to cover the steaks with marinade, and set aside for 15 to 20 minutes at room temperature, or up to 2 hours in the refrigerator. Flip the bag occasionally and if refrigerating bring the steaks back to room temperature before grilling.

Heat a grill pan over medium-high flame for 3-4 minutes. When the pan is hot, remove the steak from the marinade and shake off any excess, but don’t pat it dry. Reserve the marinade.

Grill the steak until good sear marks appear, 3 to 4 minutes. With tongs, rotate the steak 90 degrees (to get a crosshatch of grill marks) and continue grilling until grill marks form and the edges are a little crisp, another 3 to 4 minutes.

Flip the steak and grill the other side in the same way until the exterior is nicely seared and the steak is cooked to your liking, 10 to 12 minutes total cooking time for medium rare. Let the steaks rest for about 5 minutes.

Meanwhile, pour the reserved marinade into a small saucepan and boil over medium-high heat until syrupy, about 5 minutes. Stir occasionally and watch carefully to prevent burning.

When the sauce is thickened and the meat has rested, slice the flank steak thinly across the grain. For strip steaks, slice thickly or serve in chunks. Serve with a drizzle of the sauce

Re-written and slightly adapted from Molly Steven’s Bourbon and Brown Sugar Marinated Steak in Fine Cooking magazine.

Bourbon & Brown Sugar Marinated Steak | Image: Laura Messersmith

Bourbon & Brown Sugar Marinated Steak | Image: Laura Messersmith

Small Kitchen Friendly?
Yes, indeed! I used a two-burner cast iron grill pan, tongs, microplane grater, paring knife, and medium cutting board. I also needed a large liquid measuring cup, dry measuring cups/spoons, and a dinner fork, a large zip top bag (1 gallon size) and aluminum foil.

The Verdict:
We loved the Bourbon and Brown Sugar Marinated Steak preparation – savory soy sauce, the alcoholic sharpness of the bourbon, all balanced against smoky sticky caramelized sugar. I served the flank steak along with a fresh salad of baby spinach topped with blueberries and a few slivered almonds – special shout out from Mike for the accompanying grilled peaches as a way to bridge the gap. This recipe is incredibly easy and the results are excellent.

Bourbon & Brown Sugar Marinated Steak | Image: Laura Messersmith

Bourbon & Brown Sugar Marinated Steak | Image: Laura Messersmith

Strawberry Rhubarb Pecan Crisps

Strawberry Rhubarb Pecan Crisps | Image: Laura Messersmith

Strawberry Rhubarb Pecan Crisps | Image: Laura Messersmith

It’s suuuummmeeeeerrrr! (Did you hear that in an Oprah voice? Yeah, that’s how it sounded in my head too.) I know it's definitely summer - no backsliding into chilly spring this time - because the berries are out of hand ripe, we hit 90 degrees in New York last week, and my neighborhood ice cream shops are jumping with families out for a post-dinner treat. All the more reason to turn on the oven right? Umm, no. Unless you’re making something with all those delicious berries, like these crisps. Then definitely proceed!

I know I’ve been focusing on pie this year, but that doesn’t mean I’ve changed my tune on crisps and crumbles. All the delicious summer fruit and a la mode possibilities with 85% less effort, and as I discovered when I made blueberry pie the other week things come together a whole heck of a lot faster when there’s no peeling (still love you apples & pears!) and minimal chopping. Meaning: these crisps from Fine Cooking Magazine featuring the classic strawberry-rhubarb combination can be in the oven with only about 25-30 minutes of effort. Meaning: a homemade dessert can be yours tonight! Are you sold yet?

Strawberry Rhubarb Pecan Crisps | Image: Laura Messersmith

Strawberry Rhubarb Pecan Crisps | Image: Laura Messersmith

Strawberry Rhubarb Pecan Crisps (yield: 6 crisps)

Ingredients:
1/2 cup all-purpose flour
1/2 cup, plus 2 tablespoons granulated sugar
1/4 cup rolled oats
1/4 cup finely chopped pecans
1/2 teaspoon kosher salt
5 tablespoons cold unsalted butter, cut into small pieces
1 1/2 pounds strawberries, hulled and quartered
1/2 pound rhubarb, cut into 1/2-inch dice
3 tablespoons cornstarch

Instructions:
Position a rack in the lower third of the oven and heat the oven to 400°F.

In a small bowl, combine the flour with 1/4 cup of the sugar, and the oats, chopped pecans, and salt. Add the diced butter and rub into the dry ingredients between your fingers until the mixture has mostly pea-size pieces (don’t worry if it’s not uniform). Set aside, in the refrigerator if it’s a warm day.

In a large bowl, toss the sliced strawberries, diced rhubarb, cornstarch, and the remaining 6 tablespoons sugar. Divide the mixture among six 6-oz. ramekins and top with the oat mixture. It’s easiest to hold the ramekins over the bowl as you spoon in the fruit and topping. The ramekins will be very full but the filling will cook down.

Transfer the ramekins to a large foil-lined rimmed baking sheet and bake until golden brown and bubbling around the edges, 30 to 40 minutes. Transfer to a rack to cool for at least 10 minutes before serving, preferably with vanilla ice cream or a bit of whipped cream.

Slightly re-written from Fine Cooking magazine’s Strawberry Rhubarb Pecan Crisps.

Strawberry Rhubarb Pecan Crisps | Image: Laura Messersmith

Strawberry Rhubarb Pecan Crisps | Image: Laura Messersmith

Small Kitchen Friendly?
Yes! I used a small bowl, large mixing bowl, medium cutting board, chef’s knife, and large spoon. I also needed measuring cups and spoons, 6 ramekins (if yours are 7 ounces like mine, then add a little more fruit to the mix), a baking sheet, and aluminum foil. Resist the urge to skip the baking sheet & foil – they will save you a ton of clean up time since these crisps are 99% guaranteed to bubble over.

The Verdict:
Rhubarb captured my attention about a year ago and now if I see it on a menu I have to order it. I’ve been waiting semi-patiently for it to arrive in the produce section since about March so that I could cook with it myself. These crisps made the wait well worth it – sweet, tart, just a hint of nutty crunch – delectable with a generous scoop of vanilla ice cream on top. Please make them before rhubarb disappears for the season!

Strawberry Rhubarb Pecan Crisps | Image: Laura Messersmith

Strawberry Rhubarb Pecan Crisps | Image: Laura Messersmith