Challah Cinnamon Rolls

Challah Cinnamon Rolls | Image: Laura Messersmith

Challah Cinnamon Rolls | Image: Laura Messersmith

One of the (many) benefits of marriage is experiencing familiar holidays through a different lens, trying on traditions that have been built over years, and at times contributing my own twist. Mike’s family has a long-standing tradition of marking special occasions with sticky buns acquired from a local, family-owned farm stand and bakery.

After I saw this recipe for No Knead Challah Cinnamon Rolls on the wonderful site Apt 2B Baking Co. written by the very talented Yossy Arefi (who else is super excited for her cookbook to be released in the spring!?) I started to wonder if I could replicate our usual breakfast treat, but one formed by my own hands. And what better time to make something special than for Christmas morning when a little extra effort is worth it?

Challah Cinnamon Rolls | Image: Laura Messersmith

Challah Cinnamon Rolls | Image: Laura Messersmith

I made challah during my bread baking class last winter and with a successful try at Deb Perelman’s Better Chocolate Babka earlier this fall I was feeling confident in my abilities. The simplicity of the ingredients – nearly everything listed is probably in your refrigerator or pantry right now – and the no-knead (aka no stand mixer) process means that this recipe truly requires very little other than the ability to measure, mix, and fold a little dough. There are zero fancy techniques or unusual pieces of equipment required. Perfect for cooking in an unfamiliar kitchen and a great starter recipe for the inexperienced bread baker.

But, I’m burying the lede: these cinnamon rolls are DELICIOUS and I can’t think of a more heavenly way to start the day, especially while they’re still warm out of the oven. I know Christmas is over, but the New Year is coming and with these cinnamon rolls 2016 would be off to a pretty spectacular start...

Challah Cinnamon Rolls | Image: Laura Messersmith

Challah Cinnamon Rolls | Image: Laura Messersmith

No-Knead Challah Cinnamon Rolls (yield: 12 cinnamon rolls)

Dough Ingredients:
4 cups bread flour
1 1/2 teaspoons active dry yeast
2 teaspoons fine sea salt
2 large eggs plus 1 large egg yolk at room temperature
1 egg white for egg wash
3/4 cup warm water
1/3 cup olive oil
1/4 cup honey

Filling Ingredients:
4 tablespoons unsalted butter, melted
1/3 cup granulated sugar
2 tablespoons ground cinnamon
pinch salt
Non-stick spray, for prepping the baking dish

Glaze Ingredients:
2 cups confectioner's sugar
1/3 cup sour cream
1 teaspoon vanilla extract
pinch salt
2-3 teaspoons whole milk, as needed

Mid-Day or Afternoon Before: Mixing & Folding the Dough
In a large bowl, whisk together the bread flour and sea salt. In a separate smaller bowl whisk together the eggs, honey, and olive oil. Set both aside while you proof the yeast. Place the warm water and active dry yeast in a measuring cup and stir together gently. Allow the yeast and water to sit at room temperature for 5-10 minutes until you see a foamy layer form on the top of the water, then the yeast is ready.

Stir both the yeast and honey mixtures into the flour with a rubber spatula until a wet, sticky dough forms. Cover the bowl with plastic wrap and rest at room temperature for 10 minutes.

Now begins the folding process, which you will perform five times at 30 minute intervals. Folding develops the gluten in the bread and gives it structure which allows it to trap air and rise when baked.

To fold the dough, peel back the plastic wrap and take hold of an edge folding it into the center and pressing down lightly with your fingers. Turn the bowl and repeat folding small pieces of the dough into the center for eight turns and folds total. It will look like a messy origami star. Then flip the dough so that the folds and seams are on the bottom. Cover the bowl tightly with the plastic, and let sit for 30 minutes at room temperature.

Repeat the all-around folding, flipping, covering, and resting four more times. Setting a timer in between and writing the steps on the plastic wrap, checking off each one as you go, will help keep the process moving and make sure you don’t miss a step or wait too long between folds.

The dough is sticky and doesn’t hold its shape especially well in the first stages, but trust that it will become firmer and more elastic allowing you to make proper folds in the later turns. By the final fold, the dough will be stretchy and you’ll see some small air bubbles.

After the fifth and final fold, reseal the plastic and place the bowl in the refrigerator overnight. Between 16-24 hours is ideal, any longer risks over-proofing the dough and will lead to flat, dense rolls. The over night resting time allows the yeast to slowly develop flavor in the dough and the volume will nearly double in size.

Early the Next Morning: Forming & Filling
Prepare a 9 x 13-inch baking dish with a light layer of non-stick spray.

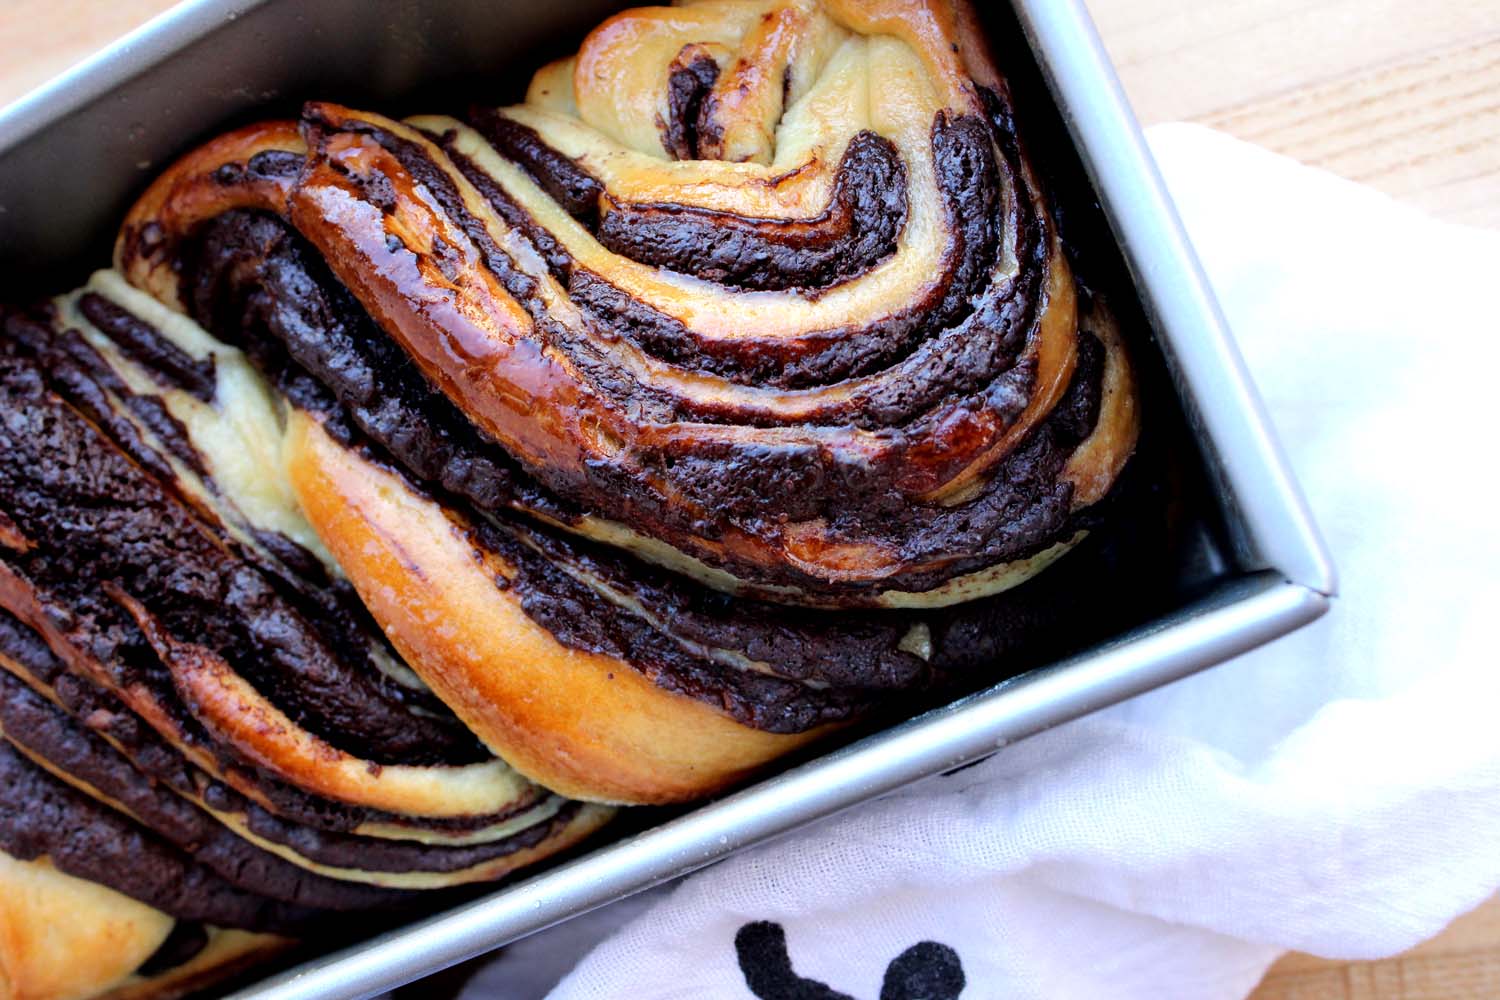
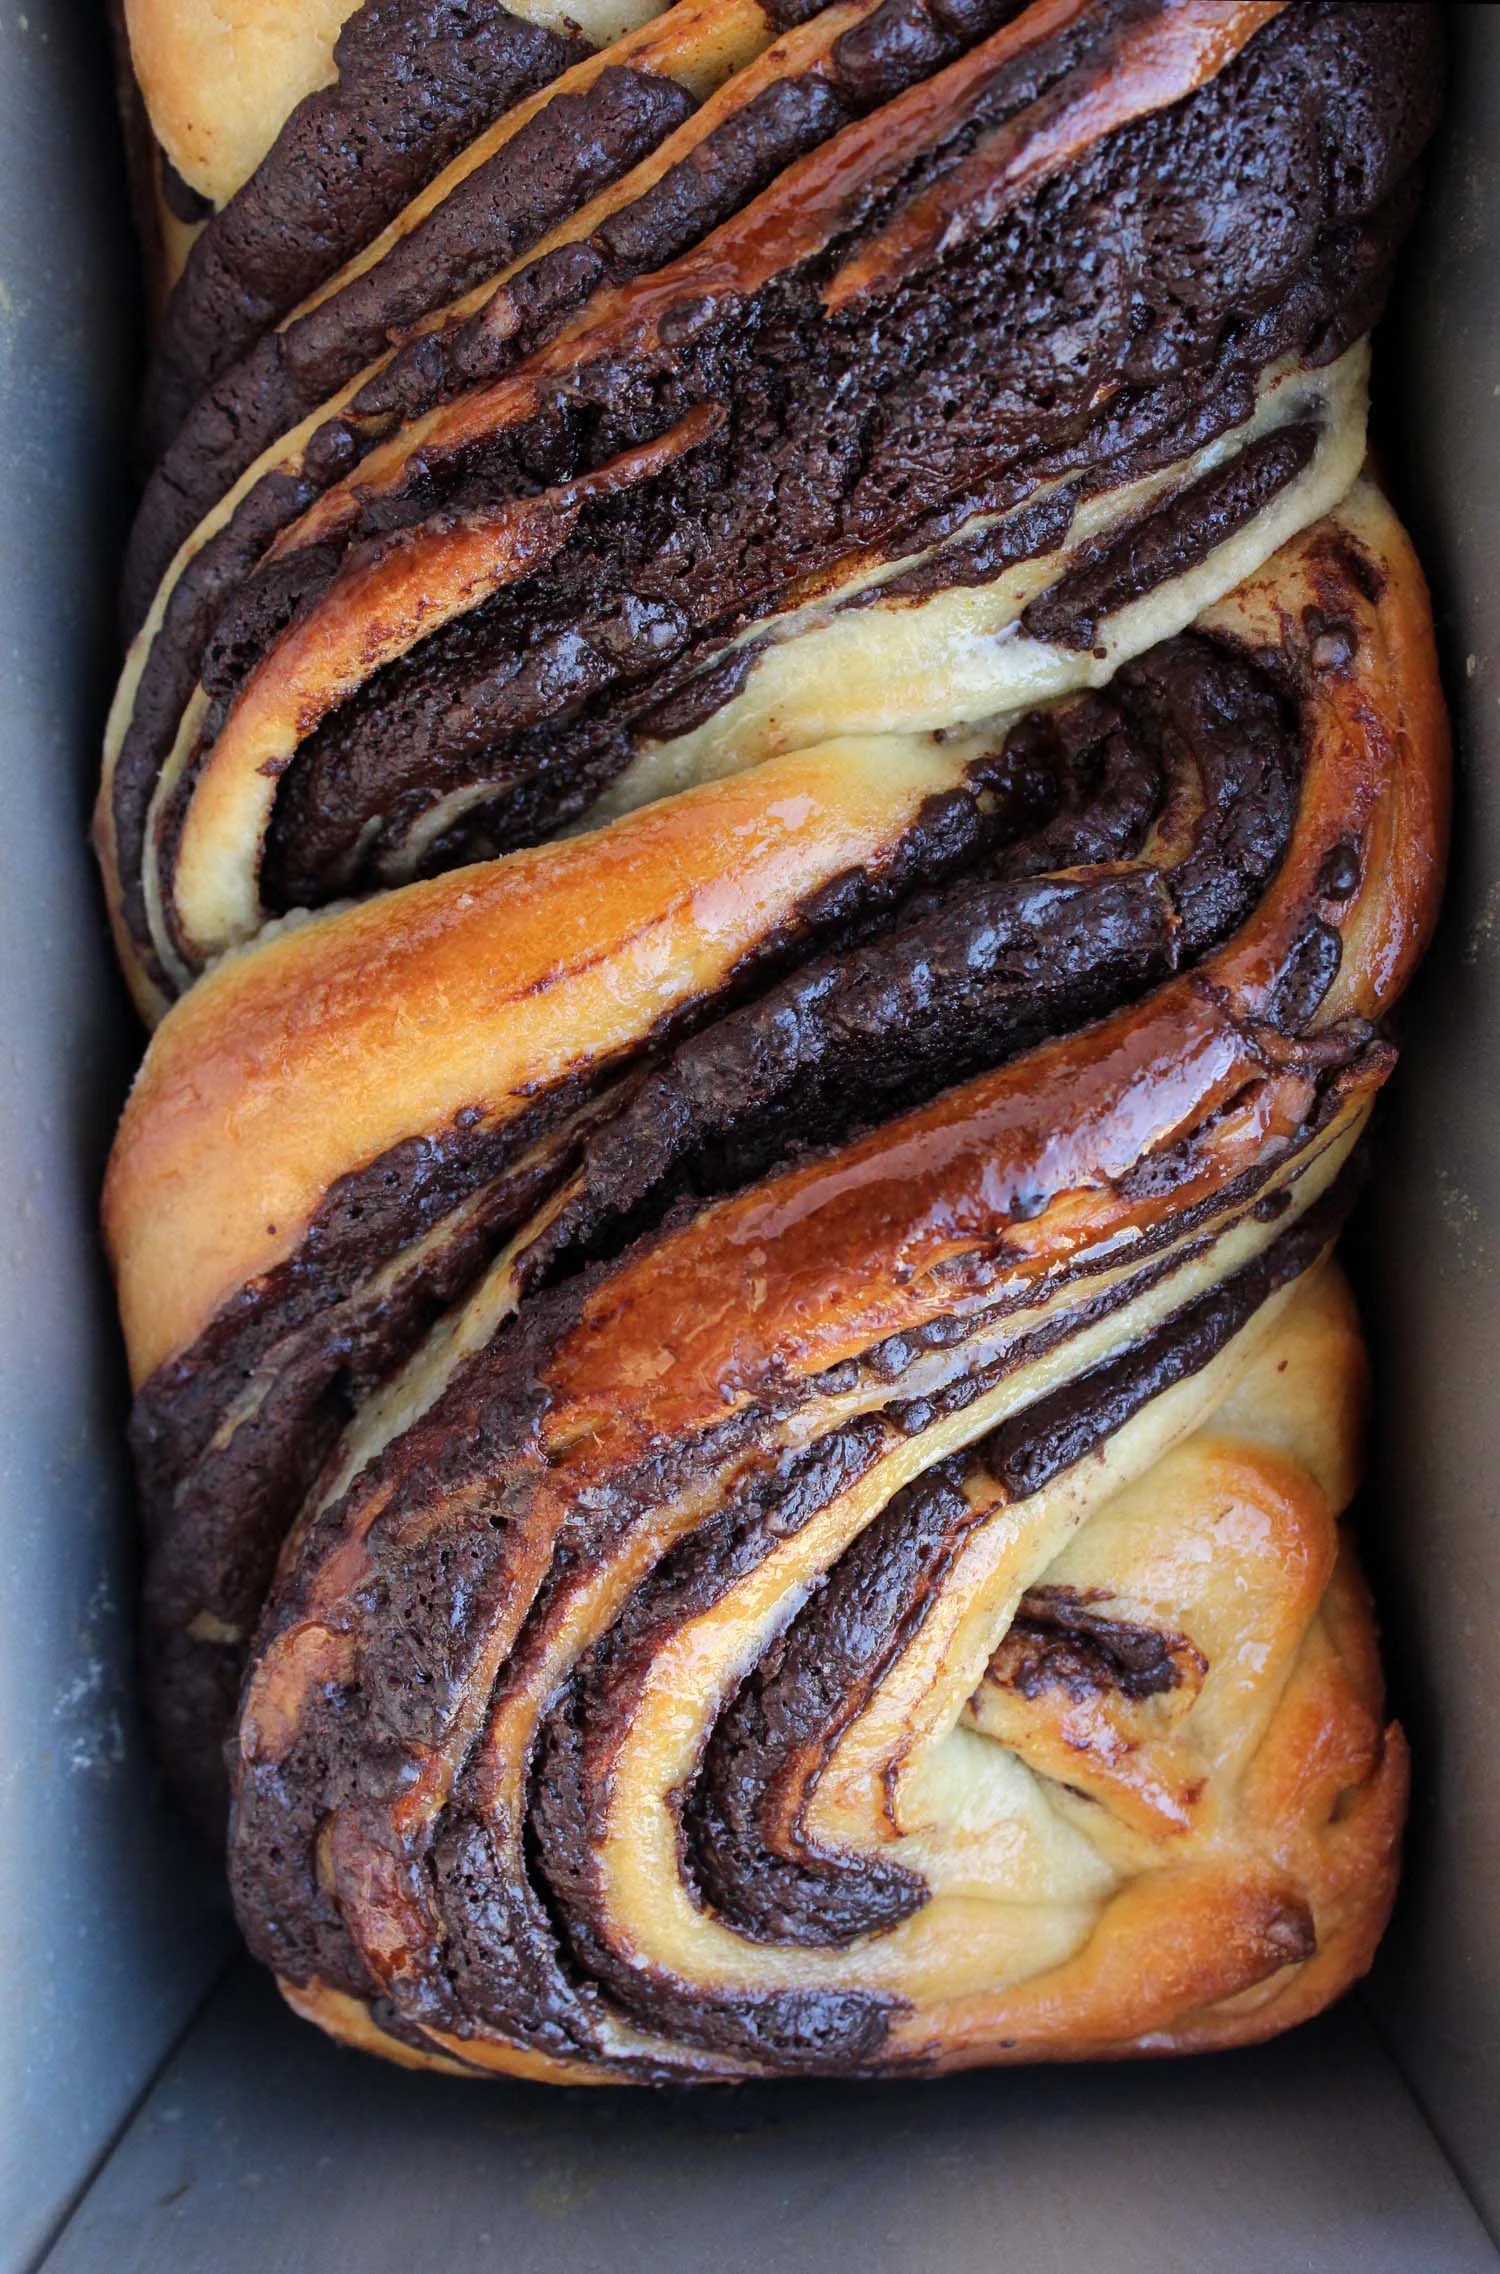
Stir the sugar, cinnamon, and salt together in a small bowl. On a lightly floured surface roll the dough into an 18 x 12 inch rectangle about 1/2 inch thick. Leave a 1/2 inch border along one of the longer sides of the dough (this will be the outside seal of the roll) and brush the melted butter over the rest of the surface all the way to the edges. Sprinkle the cinnamon sugar over the butter.

Brush the 1/2 inch border left bare with a small amount of egg wash from the reserved egg white. Then roll the dough up into a tight log starting from the opposite long side toward the egg wash border. When the log is formed, lightly press the egg washed edge down and turn the log so that the seam is resting on the board.

Use a sharp knife to slice the log into 12 pieces about 1 1/2 inches wide and arrange them in the baking dish cut sides up spacing them evenly in the dish so that each has room to rise and spread.

Cover the baking dish with a dry kitchen towel and let the rolls rise at room temperature until puffy and almost doubled in size, about 2 hours.

Mid-Morning: Baking & Glazing
Position a rack in the center of the oven and preheat to 350 degrees F. Bake the rolls until golden and cooked through, about 25-30 minutes.

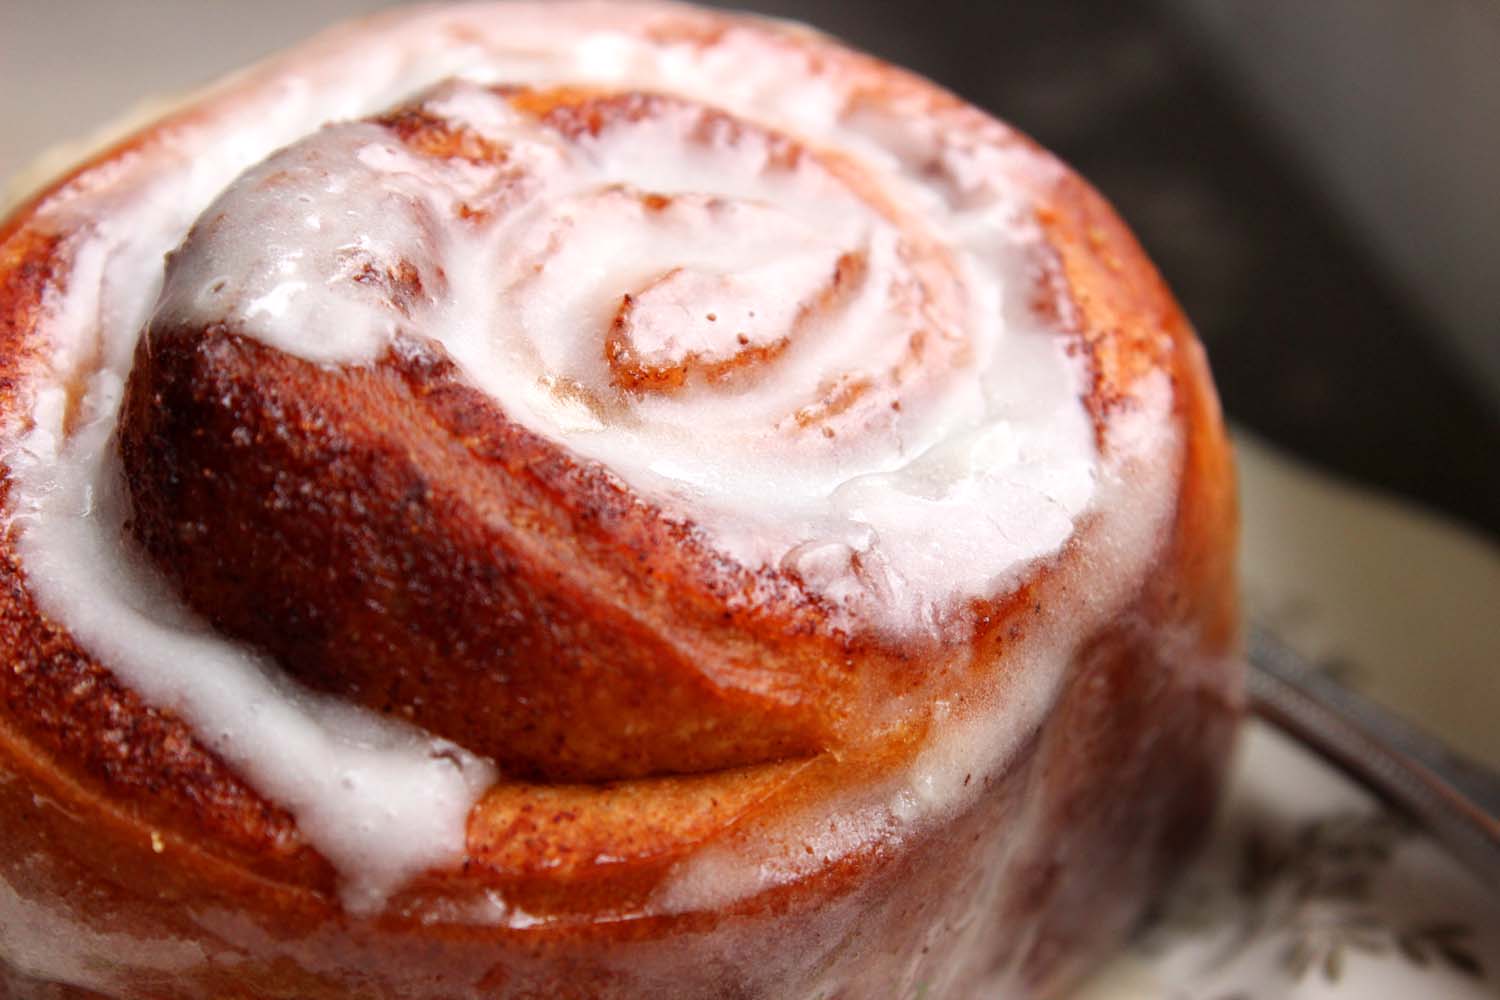
While the rolls are cooling, whisk the confectioner’s sugar, sour cream, vanilla extract, and salt in a medium bowl. Add the milk one teaspoon at a time until the glaze reaches your desired consistency, you’re looking for thick but pourable.

Drizzle the glaze over the warm cinnamon rolls and enjoy immediately.

Very lightly adapted from Apt 2B Baking Co.’s No Knead Challah Cinnamon Rolls by Yossy Arefi, which is adapted from Jessica Fechtor’s Five Fold Challah recipe in her book Stir.

Challah Cinnamon Rolls | Image: Laura Messersmith

Challah Cinnamon Rolls | Image: Laura Messersmith

Small Kitchen Friendly?
100% which is amazing. I used a large mixing bowl, medium mixing bowl, liquid measuring cup, dry measuring cups and spoons, and a rubber spatula to mix the dough. To bake and glaze I used a rolling pin, small bowl, pastry brush, bench scraper (or chef’s knife), 9 x 13 inch baking dish, and small spoon. Plastic wrap, a permanent marker, and a clean kitchen towel round out your kit. Use a ruler too if you want to be precise with your rolling and cutting.

The Verdict:
When I took the cinnamon rolls out of the oven all thoughts of food photography flew out of my head, and frankly I’m lucky there were any left by the time we were finished with breakfast. I had to abscond with the one cinnamon bun in these photos to snap some quick photos or risk having no evidence except a few crumbs and traces of glaze in the baking dish, which would have been an accurate statement about their deliciousness. The dough bakes up to a gentle crunch on the outside while maintaining that fluffy stretch inside; the cinnamon is warm but not too spicy, and the glaze, kept in check by its sour cream base, sweetens the whole concoction. Incredible.

Challah Cinnamon Rolls | Image: Laura Messersmith

Challah Cinnamon Rolls | Image: Laura Messersmith

Better Chocolate Babka

Better Chocolate Babka | Image: Laura Messersmith

Better Chocolate Babka | Image: Laura Messersmith

If Ina Garten is my spirit guide, then Deb Perelman of the wonderful blog (and cookbook!) Smitten Kitchen is my favorite tenured professor, the Department Chair of Food Blogging. Her writing voice speaks to me in soothing tones – reminding me that it’s just cooking – no lives hang in the balance. If the outcome is delicious then it’s cause for celebration, if the results are less than amazing, then hopefully you learned something and the recipe is one step closer to the dish you dreamed. Cooking is about trial and error, experimentation. The fact that her recipes are so well written and specific inspires confidence, which brings me to the point: Better Chocolate Babka.

I took a 5 day bread baking class last February at the International Culinary Center where we learned the ins and outs of yeast, temperature, rising time, shaping, and baking all under the guidance of bread expert Chef Johnson. You would think that once we made our way through the dozens of loaves I brought home after class the scent of freshly baked bread would constantly waft from our apartment. Um, not so much. I’d like to blame it on hot summer weather, but it’s not like I didn’t use the oven for other things. Really, I was still intimidated. Frightened to go out on my own and tackle a yeast-based recipe without a net. Except, I have a secret weapon: Deb and her coterie of dedicate commenters to see me through.

In the grand scheme of things nothing will get me into the kitchen like the promise of a decadent baked good. Naturally, I chose a bread recipe that involved deep, dark, bittersweet chocolate – why go the healthy route with a loaf liberally loaded with pepitas and flax seed when what really motivates me is sweets! I’ve presented Deb’s recipe faithfully with just a few of my own observations and recommendations. I hope you’ll find it inspires you to tackle yeasted dough, but be forewarned: one taste of this and you’ll find yourself scheming new reasons to make it again and again. There's a reason Jerry and Elaine wanted that babka!

Better Chocolate Babka | Image: Laura Messersmith

Better Chocolate Babka | Image: Laura Messersmith

Deb Perelman’s Better Chocolate Babka (yield: 2 loaves)

Dough Ingredients:
4 1/4 cups (530 grams) all-purpose flour, plus extra for dusting
1/2 cup (100 grams) granulated sugar
2 teaspoons instant yeast*
Grated zest of half an orange
3 large eggs
1/2 cup warm water, plus 1 to 2 tablespoons extra, if needed
3/4 teaspoon fine sea or table salt
2/3 cup unsalted butter (150 grams or 5.3 ounces) at room temperature
Sunflower or other neutral oil, for greasing

Filling Ingredients:
4 1/2 ounces (130 grams) dark chocolate, recommend semi or bittersweet
1/2 cup (120 grams) unsalted butter
1/2 cup (50 grams) powdered sugar
1/3 cup (30 grams) cocoa powder
1/4 teaspoon cinnamon [optional]

Syrup Ingredients:
1/3 cup water
6 tablespoons (75 grams) granulated sugar

Instructions:
Mix the Dough: Combine the flour, sugar, yeast and zest in the bottom of the bowl of a stand mixer. Add the eggs and 1/2 cup warm water, mixing with the dough hook until it comes together; this may take a couple minutes. It’s okay if it’s on the dry side, but if it doesn’t come together at all, add the extra water, 1 tablespoon at a time, until the dough forms a mass.

With the mixer on lowest speed, add the salt, then the butter, a spoonful at a time, mixing until it’s incorporated into the dough. Then, mix on medium speed for 10 minutes until dough is completely smooth; scraping the bowl down periodically with a rubber spatula. If after 10 minutes, the dough doesn’t begin to pull away from the sides of the bowl add 1 tablespoon extra flour to help this along.

Before removing the dough, check the gluten development by taking a small piece of the mixed dough and spreading it apart gently with your fingertips. If it stretches without tearing and forms a thin, translucent membrane (think bubblegum) it’s ready.

When the dough is developed, coat a large bowl with oil (or turn the dough out onto the counter and oil the mixing bowl) and place dough inside, cover with plastic and refrigerate. Leave in fridge for at least half a day, preferably overnight. (Dough will not fully double, so don’t worry if it doesn’t look like it grew by more than half.)

Prepare Filling & Shape Loaves: Melt butter and chocolate together until smooth. Stir in powdered sugar and cocoa; mixture should form a spreadable paste. Add cinnamon, if desired.

Next, brush the bottom and sides of two 9-by-4-inch (2 1/4 or 1kg) loaf pans with oil or butter, and line the bottom of each with a rectangle of parchment paper.

Divide the dough in half, leaving the half you aren’t working with in the fridge. Roll out the first portion of dough on a well-floured surface to about a 10-inch width (the side closest to you) and as long in length (away from you) as you can when rolling it thin, likely 10 to 12 inches.

Spread half the chocolate filling evenly over the dough, leaving a 1/4-inch border all around. Brush the end farthest away from you with water. Starting with the edge closest to you, roll the dough up into a long, tight cigar and seal the dampened end onto the log. Transfer the log to a lightly floured baking tray in the freezer for 10 to 15 minutes to make it easier to cut cleanly in half. Repeat the steps with second portion of dough and filling.

Final Assembly: Gently cut the log in half lengthwise and lay the halves next to each other on the tray, cut sides up. Pinch the top ends gently together to form a V. Lift one side over the next, forming a twist – think braiding – and try to keep the cut sides facing out so they’ll be visible when the loaf is baked. This might be a little messy, but just transfer the twist as best as you can into the prepared loaf pan. The dough will fill in any gaps by the time it’s done rising and baking, so don’t worry if there is extra room in the pan.

Cover with a damp tea towel and leave to rise another 1 to 1 1/2 hours at room temperature. Repeat process with second loaf.

Bake and Finish: Pre-heat the oven to 375 degrees F. Remove towels, place the pans on the middle rack of your oven. Bake for 30 minutes, checking for doneness at 25 minutes. A wooden skewer inserted into an underbaked babka will feel stretchy/rubbery inside and may come back with dough on it. When fully baked, you’ll feel almost no resistance. If you babka needs more time, put it back and re-test at 5 minute intervals. If the top is browning too quickly, cover it with foil.

While babkas are baking, make the finishing syrup. Bring the sugar and water to a simmer until sugar dissolves. Remove from heat and set aside to cool a little. As soon as the babkas leave the oven, brush the syrup all over each. It will seem like too much, but will taste just right — glossy and moist. Let the babkas cool about halfway in pan, then turn out to finish cooling on a wire rack.

Note from Deb: Babkas keep for a few days at room temperature, but will freeze and defrost really well.

*Note on Yeast from Laura: Active Dry Yeast and Instant Yeast are two different ingredients, so read the packages in the store carefully. If you can only get Active Dry Yeast, then “proof” it by adding 2 ¼ teaspoons (1 packet) to the 1/2 cup warm water (80-90 degrees) called for in the recipe with a small pinch of sugar. Allow the mixture to sit for 5-10 minutes at room temperature then add it at the same time you add the eggs to the flour mixture. The rest of the recipe remains the same.

Rewritten from Smitten Kitchen’s Better Chocolate Babka, which is adapted from the Chocolate Krantz Cakes in Jerusalem: A Cookbook by Yotam Ottolenghi and Sami Tamimi

Better Chocolate Babka | Image: Laura Messersmith

Better Chocolate Babka | Image: Laura Messersmith

Small Kitchen Friendly?
Yes and no. Yes, if you have a stand mixer fitted with a dough hook capable of handling bread dough, or if you are up to the physical challenge of mixing and kneading dough by hand. You’ll also need a medium mixing bowl, scale, liquid measuring cup, rubber spatula, two 9x5” metal loaf pans, one sheet pan, a rolling pin, and sharp knife or bench scraper. Parchment paper and a pastry brush for preparing the pans round out the list.

The Verdict:
Deb is a genius.

I could just leave it at that, but for the sake of posterity I’ll continue. If you like brioche and pain au chocolate then Better Chocolate Babka is a glorious combination of the two. The baked dough is lovely and soft, rich with butter and just a hint of orange zest. The chocolate swirls so elegantly revealed are deep and dark taking this bread out of sticky-sweet breakfast loaf territory and into a more elegant realm. Bring it as a hostess gift to your favorite friends, have a slice with morning coffee, or a piece after dinner with a spoonful of whipped cream for dessert, this bread is welcome on my table at any time of the day.

Better Chocolate Babka | Image: Laura Messersmith

Better Chocolate Babka | Image: Laura Messersmith