Peanut Butter Marbled Bars

Peanut Butter Marbled Bars | Image: Laura Messersmith

Peanut Butter Marbled Bars | Image: Laura Messersmith

I’m guessing I first had a Peanut Butter Marbled Bar in seventh grade or so. My dear friend Kate’s mom used to send them in her lunch from time to time and at some point I must have requested the recipe (even then I knew a good thing when I tasted it.) The original, wide ruled piece of notebook paper with Kate’s neat handwriting is still in the highly organized pile of recipes at my parent’s house; evidence of heavy use in its creased, crumpled and smudged state.

There’s a reason that recipe is so well worn; it’s absolutely delicious, requires no special equipment, no special ingredients, and, truthfully, not a lot of baking expertise. Peanut butter lovers take note this is a direct line to a dense peanut butter cookie swirled with melted chocolate – the perfect balance of salty and sweet – and it all gets baked in a 9x13 pan.

I made these for our holiday party a few weeks ago, and based on the lack of leftovers I can promise you that they will be popular for any Super Bowl gathering or bake sale on your horizon. Maybe pull out a few sheets of notebook paper for recipe requests and make thirteen-year old me proud.

Peanut Butter Marbled Bars | Image: Laura Messersmith

Peanut Butter Marbled Bars | Image: Laura Messersmith

Peanut Butter Marbled Bars (yield: 1 dozen 3 inch bars)

Ingredients:
1/2 cup (1 stick) butter, room temperature
3/4 cup light brown sugar
3/4 cup granulated sugar
1/2 cup peanut butter (smooth or crunchy, baker’s choice!)
2 eggs, room temperature
2 teaspoons vanilla
1 teaspoon baking powder
1 cup all purpose flour
1/4 teaspoon kosher salt
12 ounces (1 bag) semi-sweet chocolate chips
Non-stick spray

Instructions:
Pre heat the oven to 350 degrees.

In a medium bowl, cream together the softened butter, sugar, and brown sugar until light and fluffy. The butter should be softened to room temperature - not melted, definitely not cold. A hand mixer will help, but isn’t necessary. Next mix in the peanut butter until well combined. Stir in the eggs and vanilla, don’t over mix.

In a separate small bowl, sift together the all purpose flour, baking powder, and salt. Stir the dry ingredients into the peanut butter mixture until combined.

Spread the batter in a greased 9x13 inch pan. Sprinkle the semi sweet chocolate chips evenly across the top of the batter. Place the pan in 350° oven for 3-5 minutes until the chocolate chips are softened and beginning to melt.

Remove the pan from oven and run a knife through the softened chocolate chips create a marble pattern of thick swirls. Less is more here - the point is not to mix the chocolate in, but to have ribbons through each bar.

Return to the pan to oven and bake for another 20-25 minutes until a toothpick comes out clean. Cool thoroughly and cut into bars.

Adapted and rewritten from Nestle Toll House

Peanut Butter Marbled Bars | Image: Laura Messersmith

Peanut Butter Marbled Bars | Image: Laura Messersmith

Small Kitchen Friendly?
Yes! I used a glass 9x13 inch pan, 1 medium mixing bowl, 1 small bowl, dry measuring cups and spoons. I also used a wooden spoon, rubber spatula, and a butter knife.

The Verdict:
I have Mike’s permission to make Peanut Butter Marbled Bars anytime, no seriously anytime. When I put out the platter of these as a dessert option for our party they went like proverbial hotcakes. And why wouldn’t they? Peanut butter and chocolate is a classic combination for a reason.

Peanut Butter Marbled Bars | Image: Laura Messersmith

Peanut Butter Marbled Bars | Image: Laura Messersmith

Peanut Butter Marbled Bars | Image: Laura Messersmith

Peanut Butter Marbled Bars | Image: Laura Messersmith

Modern Meatloaf

Modern Meatloaf | Image: Laura Messersmith
Modern Meatloaf | Image: Laura Messersmith

I love trying new restaurants and experiencing new flavor combinations, but sometimes you just want something really simple and down-home. Tangent alert: where does that phrase ‘down-home’ come from? What’s more straightforward and Better Homes & Gardens-esque than meatloaf? There’s a reason that people (including me) love meatloaf and I think it goes back to family dinner and wanting to channel that un-fussy, deliciousness “just like Mom used to make.”

That said, I also like to cook in a way that still trends healthy and incorporates great flavor. So, when I first saw this recipe in Cooking Light I was really excited to try a version of meatloaf that includes vegetables and is made with lean ground beef.

I started with the original, but then as I’ve made these mini-meatloaves over and over again I’ve adapted them to our taste and worked out what I think is the perfect balance of flavor, fat, and binding agent. I’m confident that these truly bring an American classic up to date with delicious results.

Extra bonus: you can easily reduce the recipe by half if you have a smaller group, or make the mixture ahead of time, keep it in the refrigerator, and bake the meatloaf just before you’re ready to serve. 

Modern Meatloaf | Image: Laura Messersmith

Modern Meatloaf | Image: Laura Messersmith

Modern Mini-Meatloaf (yield: 12 meatloaves; serves: 6)

Ingredients:
1 cup (1 medium) finely chopped onion
1/2 cup (1 medium) finely chopped carrot
1/4 cup (1 stalk) finely chopped celery
1 1/2 teaspoon (2 cloves) garlic, minced
1 tablespoon olive oil
1 cup ketchup, divided
2 tablespoons spicy brown mustard
2 teaspoon Worcestershire sauce, divided
1 teaspoon dried oregano
1 teaspoon kosher salt
1/4 teaspoon freshly ground black pepper
1 1/2 pounds lean ground beef (I like 90% or 93% lean)
2 large eggs
1 1/4 – 1 1/2 cups unseasoned panko bread flakes
Non-stick spray

Instructions:
Pre-heat the oven to 350 degrees.

Mince the onion, carrot, celery, and garlic finely. Heat the olive oil in a large non-stick sauté pan over medium-high heat. Add the onion, carrot, celery and 1 teaspoon kosher salt to the pan and reduce the heat to medium. Rub the dried oregano between your hands and add to the pan. Sauté for about 4 minutes until the vegetables begin to soften. Next, add the minced garlic and cook for one more minute.

Turn off the heat and stir in 1/2 cup ketchup, the spicy brown mustard, Worcestershire sauce, and black pepper into the vegetables. Allow the mixture to cool. In a small bowl whisk the eggs and set aside.

Place the ground beef in a medium mixing bowl and add the sautéed vegetables and sauce to the bowl. Use a fork to mix the sauce into the ground beef until well mixed. Add the whisked eggs and continue to mix with the fork until well combined.

Finally, stir in the panko bread crumbs starting with 1 1/4 cups, if using 93% lean ground beef, and adding up to 1 1/2 cups if using 85% or 90% lean ground beef. In a separate small bowl stir together the remaining 1/2 cup ketchup with 1 teaspoon Worcestershire sauce.

Lightly coat two muffin tins with non-stick spray. Divide the ground beef mixture into 12 equal portions and roll into balls (about the size of a racquetball) - don’t over pack the mixture. Gently press each portion into the muffin tins and spread each mini-meatloaf with 1 teaspoon of the ketchup Worcestershire mixture.

Bake at 350 degrees for 20-25 minutes until lightly browned, or until an instant-read meat thermometer registers 160 degrees. Let stand for 5 minutes.

Adapted and re-written from Cooking Light.

Modern Meatloaf | Image: Laura Messersmith

Modern Meatloaf | Image: Laura Messersmith

Small Kitchen Friendly?
Yes. I used a medium non-stick sauté pan, two muffin tins, one medium mixing bowl, and one small bowl. I also used a medium cutting board, chef’s knife, measuring cups and spoons, a rubber spatula, and a fork.

The Verdict:
This is one of our favorite comfort food meals – perfect with a little mashed potato and roasted Brussels sprouts or green peas. The flavor of the meatloaf is deeply savory – hello Worcestershire sauce and onions. But he best part in Mike’s book is the extra surface area means that each portion gets its own helping of the tangy ketchup topping and gently browned edges.

Modern Meatloaf | Image: Laura Messersmith

Modern Meatloaf | Image: Laura Messersmith

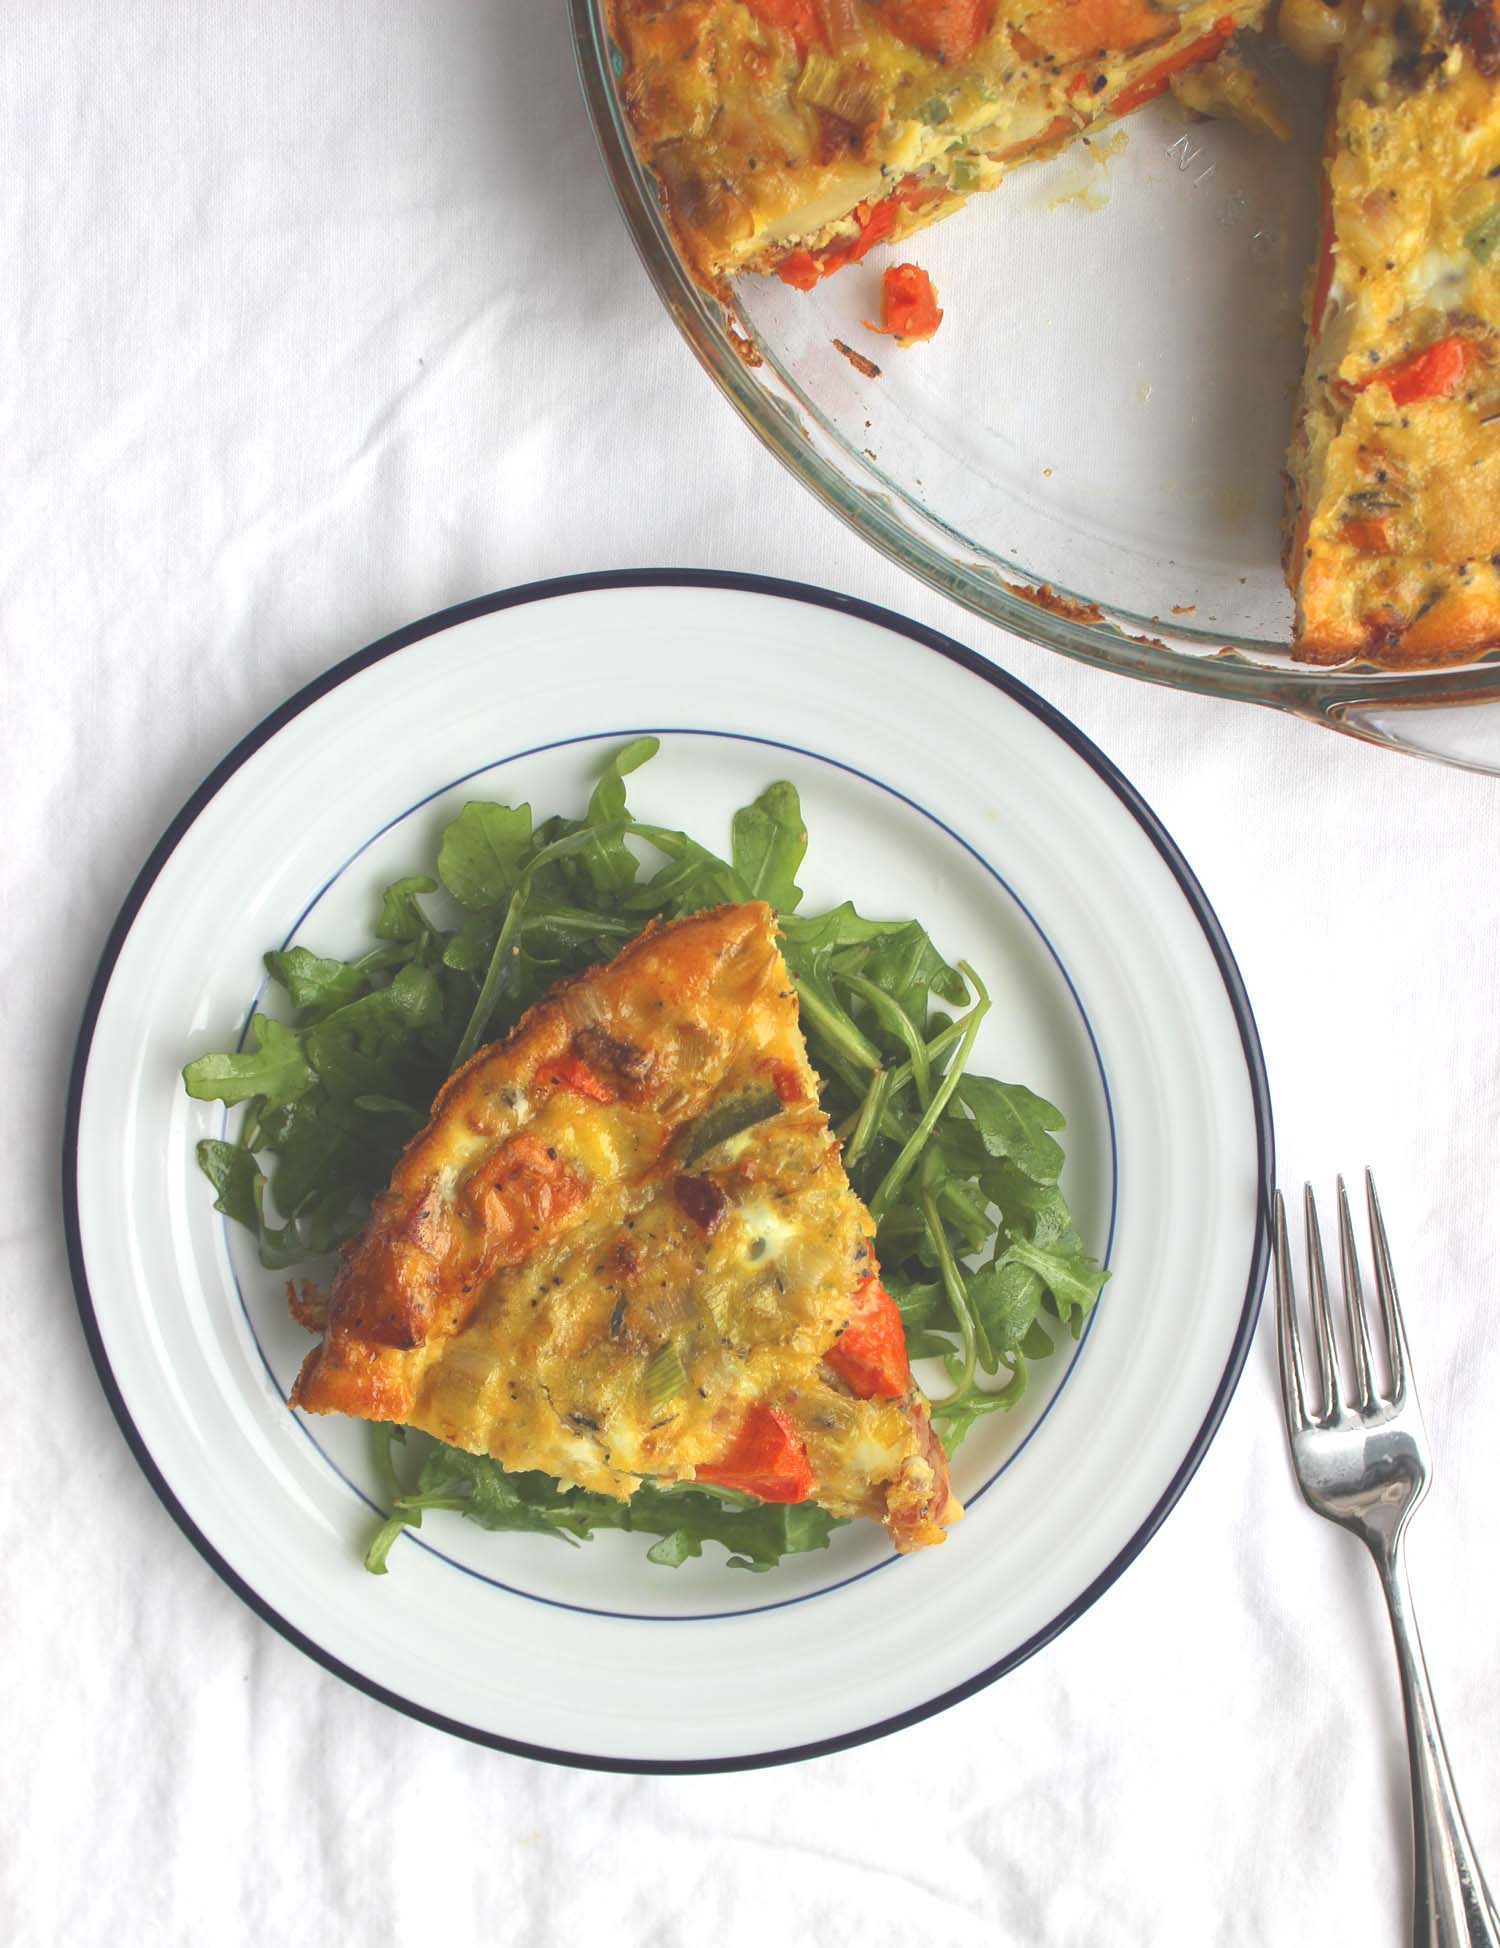
Roasted Root Vegetable, Leek and Bacon Frittata

Roasted Root Vegetable, Leek, & Bacon Frittata | Image: Laura Messersmith

Roasted Root Vegetable, Leek, & Bacon Frittata | Image: Laura Messersmith

Well, it’s January again, 2015 is underway, and resolutions are in full effect. Mike and I took advantage of our four-hour drive back to the city from Upstate after Christmas to talk through the coming year and think about what we’d like to accomplish. We both resolved to be healthier this year, so I’ve been thinking about ways to incorporate more vegetables into our meals.

I’ve also been in the mood for warm, cozy recipes and to me there’s pretty much nothing cozier or more perfect for grey winter days than roasted root vegetables. Frittata is one of my all-time favorite things to make for both brunch and dinner (other examples here and here) and this one uses a mixture of carrots, parsnips, and sweet potatoes lightly caramelized in the oven. The root vegetables are then pared with sautéed leeks, onions and thyme to combine the rich savoriness of the vegetables with fresh green flavors. A sprinkle of salty, crispy bacon balances everything out. Yum!

This recipe is the best of both worlds – it tastes so good and doesn’t leave me with a sense of deprivation – healthy eating I can get behind. And, you know it's good when I offer Mike a taste and he goes back for a second bite.

Roasted Root Vegetable, Leek, & Bacon Frittata | Image: Laura Messersmith

Roasted Root Vegetable, Leek, & Bacon Frittata | Image: Laura Messersmith

Roasted Root Vegetable, Leek and Bacon Frittata (serves 6-8)

Ingredients:
1/2 cup (1 medium) parsnips
3/4 cup (2 medium) carrots
1 1/4 cups (2 small) sweet potatoes
1 cup (2 small) yellow onions
1 1/2 cups (3 medium) leeks
8 large eggs
1/3 cup 2% milk
2 strips thick cut bacon
1 1/2 teaspoons minced fresh thyme leaves
3 tablespoons kosher salt, divided
1 tablespoon freshly ground black pepper, divided
1/4 cup olive oil, divided
Non-stick spray (optional)

Instructions:
Pre-heat the oven to 400 degrees.

Peel and dice the parsnips, carrots, and sweet potatoes into 1 inch pieces to make about 2 generous cups of root vegetables. Spread evenly on a parchment paper-lined baking sheet and toss with 1 1/2 tablespoons olive oil, 2 teaspoons kosher salt, and 3/4 teaspoon freshly ground black pepper. Roast at 400 degrees for 25-35 minutes, or until easily pierced with a fork, turning halfway through the cooking time. Set aside.

After the root vegetables are cooked, reduce the oven temperature to 350 degrees. Place the two strips of thick-cut bacon on a baking sheet and bake for 20 minutes, turning midway, until crisp. Drain the bacon on a paper towel and allow to cool slightly before mincing into 1/4 inch pieces - this will make about 1/3 cup of bacon.

While the bacon cooks, prep the onions and leeks. Remove the tough, dark green ends and the root from the leeks and cut the remaining white and light green stalk in half lengthwise. Rinse thoroughly with water to remove any sand. Dice the leeks into 1/4 inch strips and the onions into 1/4 inch pieces. In a large sauté pan or non-stick skillet, heat 3 tablespoons of olive oil over medium-low heat and cook the leeks, onions, 1 1/2 teaspoons minced fresh thyme, 1 teaspoon kosher salt, and 1/2 teaspoon black pepper until translucent, about 10 minutes.

Once the onions and leeks are softened, add the roasted root vegetables and minced bacon to the sauté pan and stir to evenly combine. Spread the vegetable mixture in a 9 inch glass pie plate that has been coated in a light layer of non-stick spray.

Beat the eggs, 2% milk, 1/4 teaspoon kosher salt, and 1/4 teaspoon black pepper in a medium mixing bowl. Pour the eggs over the vegetable mixture in the pie plate. The vegetables should be nearly, but not entirely covered.

Bake at 350 degrees for 35-40 minutes, or until the eggs are set and the top of the frittata is lightly browned. Jiggle the pie plate slightly to check – if nothing moves the frittata is done. Allow to cool about 5 minutes before serving.

Roasted Root Vegetable, Leek, & Bacon Frittata | Image: Laura Messersmith

Roasted Root Vegetable, Leek, & Bacon Frittata | Image: Laura Messersmith

Small Kitchen Friendly?
Fairly. I used two baking sheets, one large sauté pan, one medium mixing bowl, a medium cutting board and a 9 inch pie plate. I also used a chef’s knife, wooden spatula, whisk, vegetable peeler, liquid measuring cups and measuring spoons. Lining the baking sheets with parchment paper will also be helpful with clean up.

The Verdict:
Honestly, I surprised myself with this recipe - to be honest, I was a little nervous about how it would turn out. Mike and I both really liked the balance of sweetness from the root vegetables with the savory flavors of the bacon and leeks. Mike says he’d eat frittata all the time, and we would both absolutely eat this frittata again. I served it with vinaigrette dressed arugula leaves and the combination makes this frittata a strong contender for brunch or for dinner.

Roasted Root Vegetable, Leek, & Bacon Frittata | Image: Laura Messersmith

Roasted Root Vegetable, Leek, & Bacon Frittata | Image: Laura Messersmith

Granny Smith Cheddar Handpies

Granny Smith & Cheddar Hand Pies with Spicy Mustard | Image: Laura Messersmith

Granny Smith & Cheddar Hand Pies with Spicy Mustard | Image: Laura Messersmith

You know I'm a fan of simple recipes, but no more so than when I'm expecting guests and as our annual holiday party approached I was racking my brain for ideas that would be easy, something I could make ahead of time, and would offer some variety to the menu.

As I was scanning through old posts I remembered this Ham and Cheese in Puff Pastry from a few weeks ago and if it's good enough for Ina it's good enough for me, but I wanted to try something new... It's a New England tradition to pair a slice of sharp Cheddar cheese with apple pie - something my grandfather used to love - so when I decided make my own version I knew the bite of the Cheddar would pair beautifully with the tart sweetness of Granny Smith apples.

My original version used Maille Old Style Whole Grain Dijon, which is delicious, but the finishing touch came when I visited the Maille boutique (more on that later…) and tasted their Mustard with White Wine, Apricots & Curry Spices. I was excited to branch out and try something new and since curry, apples and cheddar are a classic combination I was confident that this would be a great alternate.

I decided to make these in individual servings, but if you don't have the patience or extra time to make the hand pies I can attest that it still works beautifully in the original form.

Granny Smith & Cheddar Hand Pies with Spicy Mustard | Image: Laura Messersmith

Granny Smith & Cheddar Hand Pies with Spicy Mustard | Image: Laura Messersmith

Granny Smith and Cheddar Hand Pies with Spicy Mustard (yield: 8 hand pies)

Ingredients:
1 package puff pastry (2 sheets), defrosted
1 medium granny smith apple, thinly sliced
1/4 cup spicy mustard (I used Maille Mustard with White Wine, Apricots & Curry Spices)
4-6 ounces sharp white cheddar cheese, thinly sliced
1/4 cup flour
1 egg

Instructions:
Preheat the oven to 400 degrees.

Quarter, core, and thinly slice the apple into approximately 20 pieces. Next, slice the block of sharp white cheddar cheese into 1/8 inch pieces. Set both the apples and cheddar aside while you prepare the puff pastry.

Lightly flour a piece of parchment paper and unfold the defrosted puff pastry onto it. Roll out the puff pastry from the center about 1 inch in each direction. Using a sharp knife, cut the puff pastry into 4 evenly sized squares.

Spread 1 teaspoon of mustard onto the lower triangle of each square of puff pastry leaving a 1/3 inch border. Layer 3-4 pieces of cheddar, followed by 2-3 slices of apple on top of the mustard. Brush the border of the pastry with egg wash.

Fold the top corner of the puff pastry diagonally across to the lower corner so that it covers the apples and cheese. In a small bowl, beat the egg with a 1/2 teaspoon of water to make the egg wash. Use a fork to press the edges together and seal the filling into the triangle. Brush the tops with egg wash and cut 2-3 steam vents in the top of each pie.

Once all the hand pies have been assembled shift the parchment paper to a baking sheet and place in the oven. Bake at 400 degrees for 15 minutes or until the tops have turned golden brown.

Cool for 3-5 minutes before serving. Serve warm with extra mustard.

Make Ahead:
If you want to make this ahead of time, assemble the hand pies and refrigerate on a baking sheet wrapped in plastic. Wait to brush the tops with egg wash until just before baking and cut the steam vents. Bake as directed above.

Granny Smith & Cheddar Hand Pies with Spicy Mustard | Image: Laura Messersmith

Granny Smith & Cheddar Hand Pies with Spicy Mustard | Image: Laura Messersmith

Small Kitchen Friendly?
Yes! I used one baking sheet, a small cutting board, a chef’s knife, small bowl, pastry brush, rolling pin, measuring spoon, and fork. Parchment paper will make life much easier - I highly recommend it for this recipe.

The Verdict
I made this for my family while I was home for the holidays and it made a perfect addition to our late afternoon cocktail hour snack options. My sister has declared it her new favorite thing to bring to parties or make when she has guests and I have a feeling you’ll agree.

Granny Smith & Cheddar Hand Pies with Spicy Mustard | Image: Laura Messersmith

Granny Smith & Cheddar Hand Pies with Spicy Mustard | Image: Laura Messersmith