Butter Braised Pork Chops with Blueberry Balsamic Sauce

Butter Braised Pork Chops with Blueberry Balsamic Sauce | Image: Laura Messersmith

Butter Braised Pork Chops with Blueberry Balsamic Sauce | Image: Laura Messersmith

After more than five years of marriage and many wonderful dinners out together I can predict with a high level of accuracy what Mike will order from a menu. Any cocktail involving bourbon, oysters on the half-shell, and a gloriously grilled pork chop will catch his attention without fail. So, when I spotted this recipe for Butter Braised Pork Chops with Pickled Blueberry Balsamic Sauce on Not Without Salt last week I knew it would be perfect for a special Friday night dinner.

To be honest, I don’t always have the best luck trying to cook pork. I like it just slightly pink in the middle, but I have a tough time gauging the time and it ends up too raw, or over-cooked and dry. Neither option is ideal, so I was excited to try Ashley’s method of pan-searing and basting with a little bit of butter. It seemed like a simple, sure-fire way to cook a juicy, flavorful, restaurant-style pork chop.

I have another confession: I adore dishes that pair fruit with a savory ingredient, so while the pork chop was geared toward Mike, the blueberry sauce was the element that really convinced me to try this recipe. Just the thought of the bright blueberries, tart with balsamic spooned over salty, meaty pork made my taste buds sing and the results more than lived up to my imagination.

Butter Braised Pork Chops with Blueberry Balsamic Sauce | Image: Laura Messersmith

Butter Braised Pork Chops with Blueberry Balsamic Sauce | Image: Laura Messersmith

Butter Braised Pork Chops with Blueberry Balsamic Sauce (serves 4)

A brief note on juniper berries. I was able to find them in the jarred spice section of my grocery store (they look like dark green peppercorns), but if they aren’t available I’d substitute a sprig or two of fresh rosemary to get the herbal, piney scent they add to the sauce.

Ingredients:
1 teaspoon juniper berries
1 whole garlic clove, peeled
3 thyme sprigs, divided
1/2 cup balsamic vinegar
1 tablespoon sugar
1 cup (6 ounces) fresh blueberries
4 bone-in pork chops
2 tablespoon olive oil, divided
6 tablespoons butter, divided
Kosher salt
Ground black pepper

Sauce Instructions:
In a small saucepan combine the juniper berries, garlic, two thyme sprigs, balsamic vinegar, sugar and 1/4 teaspoon kosher salt. Bring to a boil over medium high heat then reduce to low and simmer for 5 minutes. (Cook a few minutes longer if you want a thicker, reduced sauce.)

Place the fresh blueberries in a bowl then strain the balsamic mixture through a sieve over the fruit. Allow the berries to sit at room temperature for at least 15 minutes.

The sauce can be made up to a day in advance and refrigerated. Rewarm before serving.

Pork Chop Instructions:
Sprinkle the pork chops generously with kosher salt and ground black pepper.

Set a large stainless steel or cast iron skillet over high heat, then add 1 tablespoon olive oil and 3 tablespoons butter to the pan. When the oil shimmers and the butter sizzles carefully add the pork chops to the pan. Cook in batches if necessary to prevent crowding the pan.

Cook on one side undisturbed for 3 minutes, then flip the chops and again let the chops sear for 3 minutes.

Add the remaining 3 tablespoons butter and thyme sprig and with a large spoon start basting the chops with the butter. Flip the chops repeatedly and continue to baste. The chops are done when a thermometer inserted into the thickest part of the chop reads 135°F. This should take about 7-8 minutes.

Remove the chops from the pan, cover with foil and rest for 15 minutes. Serve with the pickled blueberry-balsamic sauce.

Slightly adapted and re-written from Butter Braised Pork Chops with Pickled Blueberry Balsamic Sauce by Ashley Rodriguez of Not Without Salt.

Butter Braised Pork Chops with Blueberry Balsamic Sauce | Image: Laura Messersmith

Butter Braised Pork Chops with Blueberry Balsamic Sauce | Image: Laura Messersmith

Small Kitchen Friendly?
Yes! I used a 8” cast iron skillet, tongs, and a long-handled spoon (key since the pan is hot!); along with a paring knife, small sauce pan, medium bowl, liquid measuring cup, measuring spoons, and a small sieve. A plate for resting and aluminum foil round out the necessary equipment.

The Verdict:
Mike was nervous about the post-sear flipping, but the tender, juicy results more than convinced him. The pork was perfectly cooked with a golden crust and deep flavor that worked beautifully with the herbal, fruity blueberries. I served the chops over wilted garlicky kale, with a handful of fresh blue berries, a few dabs of goat cheese, and a sprinkle of slivered almonds. Heaven. These pork chops are deceptively simple combining a relatively small number of ingredients with results that are far greater than the sum of the parts.  I can’t wait to try this cooking method with other fruit sauces. Peaches or cherries maybe?

Butter Braised Pork Chops with Blueberry Balsamic Sauce | Image: Laura Messersmith

Butter Braised Pork Chops with Blueberry Balsamic Sauce | Image: Laura Messersmith

Strawberry Shortcake Scones

Strawberry Shortcake Scone

If you’re a tennis fan, then you’re probably well aware that Wimbledon begins today. I enjoy watching from time to time, but with only the loosest grasp of the rules and a sketchy knowledge of the players involved I can’t really consider myself especially invested in the sport. What I am invested in is a sporting tournament that has a long-standing traditional dish. That part is definitely in my wheelhouse, and according to the Wimbledon librarian, strawberries and cream have been associated with the event since 1877.

Trust the British to make a genteel sport even more refined, and frankly what better way to celebrate summer than with time spent outside in the fresh air accompanied by a summery treat? And, can you think of a purer distillation of English cooking than a scone studded with bright red strawberries?

So, in honor of lawn tennis played on grass courts, and as part of my continued efforts to bring you an enormous amount of butter and fruit based baked goods this summer, may I present: Strawberry Shortcake Scones.

The more I bake, the more I realize what a difference a little buttermilk, yogurt, or cream can make toward a tender, moist crumb. In this case, slightly sweet ricotta cheese fills that role and helps these scones tip their cap at the American strawberry shortcake, while maintaining their cream-tea bonafides.

Strawberry Shortcake Scone

Strawberry Shortcake Scones (yield: 12 scones)

Ingredients:
1 cup chopped fresh strawberries
2 1/2 cups, plus 1 tablespoon all purpose flour
3 tablespoons granulated sugar
1 tablespoon baking powder
1/4 teaspoon salt
6 tablespoons cold butter, diced
1 large egg
3/4 cup whole milk ricotta, bought or homemade
1/4 cup, plus 3 tablespoons heavy cream
2 tablespoons turbinado sugar

Instructions:
Preheat oven to 400 degrees F. If it's a very hot day, chill the baking sheet and keep any ingredients in the refrigerator when they're not in use.

In a large bowl combine 2 1/2 cups all purpose flour, 3 tablespoons granulated sugar, baking powder, and salt. Lightly toss the diced butter in the flour mixture to coat, then using a pastry cutter, blend in the butter until the mixture resembles coarse crumbs. Set aside in the refrigerator.

In a large liquid measuring cup, combine the egg, ricotta, and 1/4 cup heavy cream. Make a well in center of the flour mixture and add egg mixture all at once, fork together until just combined. Some of the flour may not be fully incorporated. Chill the dough while you hull and dice the strawberries into 1/4" sized pieces.

In a small bowl, toss together strawberries and 1 tablespoon flour, then add to the chilled dough, again using a fork until the strawberries are evenly distributed.

Turn the dough out onto a lightly floured surface. Gently fold the dough 10 to 12 times, pressing it together until dough is nearly smooth. Pat into a rectangle about 1 inch thick and cut into 12 rectangles.

Place the scones 2 inches apart on a parchment paper-lined baking sheet. Brush with the additional 3 tablespoons of heavy cream and sprinkle with the turbinado sugar. Bake about 15-16 minutes or until golden brown. Slide the parchment and scones onto a cooling rack. Best when served warm.

Slightly re-written from Better Homes and Garden’s Strawberry Shortcake Scones.

Strawberry Shortcake Scone

Small Kitchen Friendly?
Actually, yes. I used a large mixing bowl, pastry cutter, 2 cup-size liquid measuring cup, dry measuring cups and spoons, a butter knife, and a dinner fork. I also needed a small bowl, small cutting board, paring knife, baking sheet, pastry brush and parchment paper.

The Verdict:
The scone itself is tender and gently fluffy with a slight crunch from the coarse sugar, while the ripe strawberries add a bright sweetness that sings against the richness. To me, these scones are the epitome of summery ease – the intentionally casual shape and simplicity of the ingredients conjure a lazy morning on the porch. Definitely worthy of any Sunday brunch table or an international tennis event.

Strawberry Shortcake Scone

The Goldmine, A Breakfast Sandwich

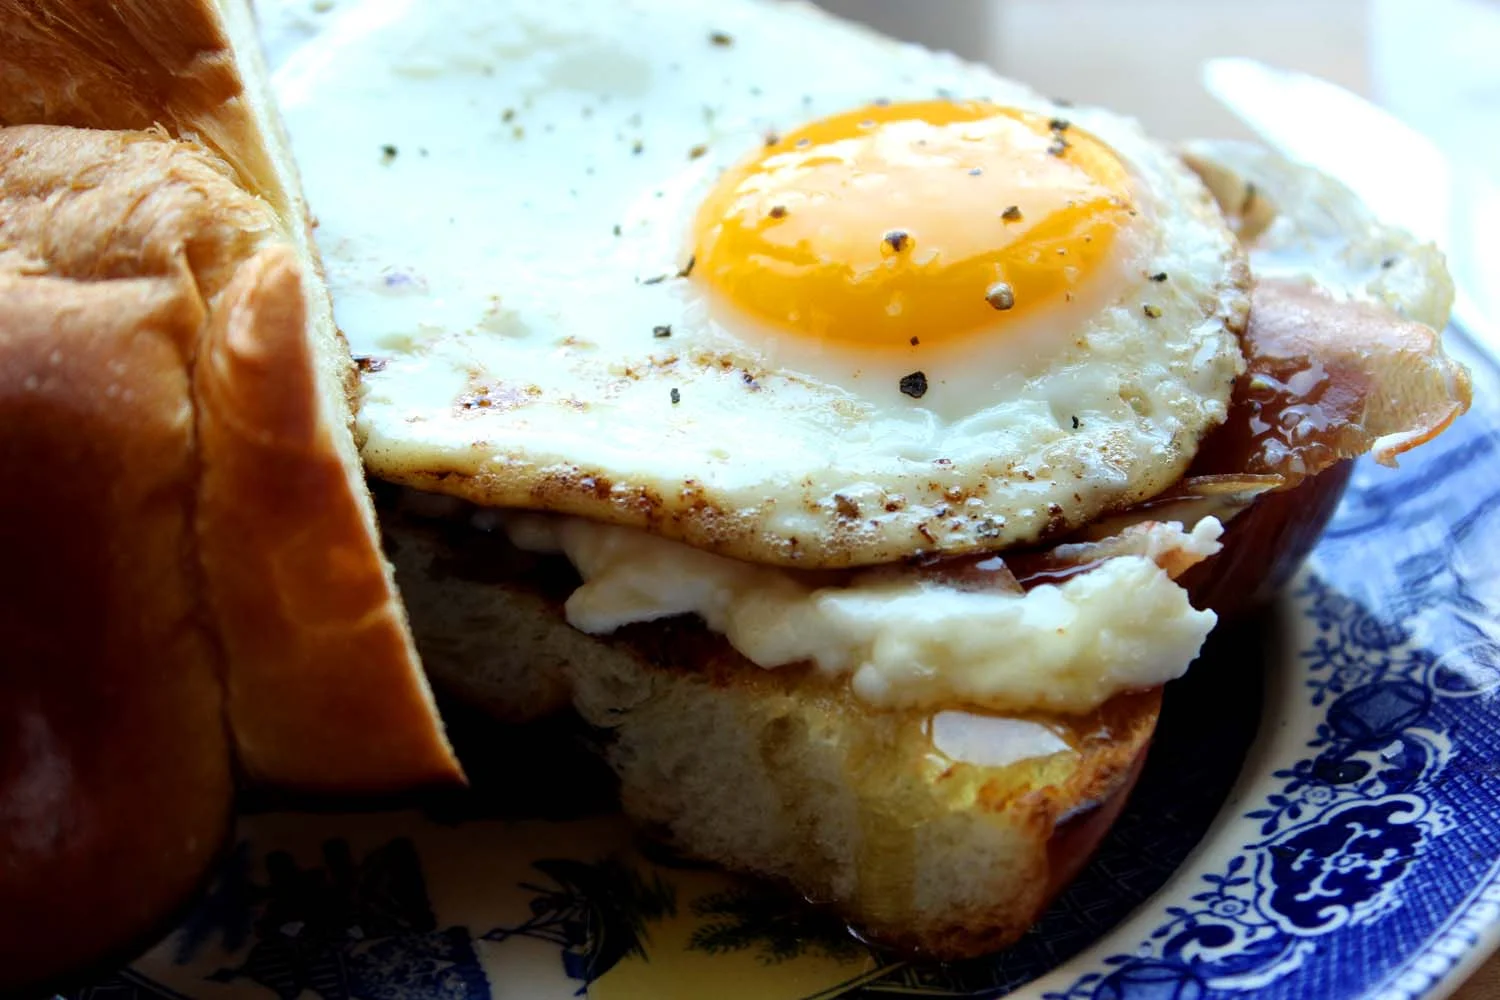
The Goldmine Breakfast Sandwich | Image: Laura Messersmith

The Goldmine Breakfast Sandwich | Image: Laura Messersmith

A few weeks ago Mike and I took the train north to Boston to celebrate his fifth business school reunion with a group of our dearest friends. It had been a few years since we were last there with time to wander and revisit some of our favorite places. Number One on Mike’s list: a trip to Mike & Patty’s.

He and several friends had breakfast there in the final days of their last semester and the memory of that tiny shop and delicious sandwiches lived on in legend ever since. I missed that inaugural meal and to be honest, I’ve always been a bit skeptical. The guys might be exaggerating, after all. How good could it really be?

Mike & Patty’s is in Bay Village, a pocket of Boston that manages to be in the middle of Back Bay, the South End, and Chinatown, but still feel like it’s off the beaten path. Cobblestone streets, old-fashioned lanterns, and the hope of discovering amazing food at the end of your journey just heighten the sense of a hidden gem. After one bite of my chosen sandwich - The Goldmine - I was convinced the early morning trek was well worth it.

On the surface The Goldmine is just a bacon, egg, and cheese made fancy, but dip below that run of the mill designation and it becomes clear that this sandwich is so much more. First of all, I assumed that the honey – a strange, but genius addition – was the gold in this mine, but actually it’s the fried egg (or egg over easy as you prefer) whose yolk permeates all the corners of this delicious sandwich.

The Goldmine inspires tales of food treasures, hunched-over eating, and plate mopping. Simple pleasures and well worth your efforts to make at home.

The Goldmine Breakfast Sandwich | Image: Laura Messersmith

The Goldmine Breakfast Sandwich | Image: Laura Messersmith

The Goldmine (serves: 4)

Ingredients:
4 large eggs
2/3 cup whole milk ricotta, bought or homemade
2 ounces (4 slices) prosciutto
4 tablespoons golden honey
3 tablespoons butter, softened
1/8 teaspoon kosher salt
1/8 teaspoon ground black pepper
1 loaf challah, brioche, or sourdough bread

Instructions:
Pre-heat the large sauté pan over medium heat and crisp the slices of prosciutto, about 5 minutes. Meanwhile, heat the medium sauté pan over medium-low heat spread a thin layer of butter over each slice of bread. Toast the bread in the medium pan until golden brown, about 4 minutes per side, in batches.

Remove the crisped prosciutto from the larger pan and set aside. Add 1 1/2 tablespoons of butter to the warm pan and melt. Once the bread is toasted, spread half of the pieces with 1-2 tablespoons of the whole milk ricotta on one side. Add a slice of crisped prosciutto, and drizzle with 2-3 teaspoons of honey. Reserve the sandwich tops until the eggs are cooked.

Crack the eggs one at a time into a small liquid measuring cup or bowl taking care not to break the yolk. Gently pour each egg into the large sauté pan allowing the white to just begin setting before adding the next egg. Once all the eggs are in the pan, cover with a lid (preferably glass, so you can monitor the situation) and cook over medium heat for another 2-3 minutes watching for an opaque white, but a soft, runny yolk.

Top each sandwich with a fried egg, sprinkle with kosher salt and ground black pepper to taste. Add the second piece of bread and serve immediately!

Need more advice on frying an egg? The Kitchn and Food Network have step by step instructions to get just the cook you're looking for.

Adapted from Mike and Patty’s The Goldmine breakfast sandwich.

The Goldmine Breakfast Sandwich | Image: Laura Messersmith

The Goldmine Breakfast Sandwich | Image: Laura Messersmith

Small Kitchen Friendly?
Yes, indeed! I used one large non-stick sauté pan with a cover, one medium non-stick sauté pan, a medium cutting board, bread knife, a liquid measuring cup, rubber spatula, dinner fork, butter knife, and teaspoon. That’s all!

The Verdict:
I’m obsessed with The Goldmine. Each component is relatively mild on it’s own, but together they balance each other beautifully. Creamy ricotta, crispy prosciutto, sweet sticky honey all tucked under a blanket of egg-y goodness. Sigh. It's also a great choose-your-own-adventure dish. Like lots of prosciutto? Add an extra slice. Want it a little gooier? Let the honey drizzle a little longer over the ricotta. My last piece of advice: please make this on a lazy weekend morning when a second cup of coffee and a nap are all that’s on the docket. You’ll thank me.

The Goldmine Breakfast Sandwich | Image: Laura Messersmith

The Goldmine Breakfast Sandwich | Image: Laura Messersmith

Mocha Hazelnut Granola Bars

Mocha Hazelnut Granola Bars | Image: Laura Messersmith

Mocha Hazelnut Granola Bars | Image: Laura Messersmith

My first taste of Nutella came in the mid-1980s when my parents brought back a jar from a trip to Europe. Their travels took them into Northern Italy where I suspect this particular jar of pasta gianduja was procured, and for me it was love at first bite. It made a strong impression on me and I’ve had it many times since then; memorably while visiting my sister in Australia over her study abroad semester when we began most mornings with an English muffin generously spread with a layer of chocolate-hazelnut deliciousness. Vacation breakfast at it's best.

The flavor combination is one of my favorites - deeply, but gently nutty, smooth, sweet, creamy, chocolate-y heaven. Great on fruit, a shortbread cookie, or right off the spoon. Even better with a cup of coffee, which leads me to the other Italian-ish component of this recipe: instant coffee. The mochas on espresso bar menus everywhere and the presence of coffee in chocolate cake recipes have ably proven that coffee and chocolate pair beautifully.

It's a classic combination, but one I haven't seen in pre-made granola bars, and since these three ingredients were just made for each other I had to find a way. The flavors compliment each other, and together are far greater than the sum of their parts. It also doesn’t hurt that these bars mix up quickly and are perfectly portable – a pick-me-up snack if I ever saw one!

Mocha Hazelnut Granola Bars | Image: Laura Messersmith

Mocha Hazelnut Granola Bars | Image: Laura Messersmith

Mocha Hazelnut Granola Bars (yield: 8 bars)

Ingredients:
3/4 cup chopped hazelnuts
2/3 cup semi sweet chocolate chips
1 1/4 cups Old-fashioned rolled oats
2 tablespoons whole wheat flour
1/4 cup vanilla whey protein powder
1/2 teaspoon kosher salt
1/4 cup olive oil
1/3 cup cashew or hazelnut butter
1/2 cup wildflower honey
3 teaspoons instant coffee
1/2 teaspoon vanilla extract
Non-stick spray

Instructions:
Pre-heat oven to 350 degrees F.

Spray the interior of an 8x8x2 inch pan or 9 inch pie plate with non-stick spray and line the bottom with parchment paper.

Roughly chop the hazelnuts and stir together with the semi-sweet chocolate chips, rolled oats, whole wheat flour, whey protein powder, and kosher salt in a medium bowl.

In a separate smaller mixing bowl, combine the olive oil, nut butter, honey, instant coffee powder, and vanilla extract until evenly combined. Note: measuring olive oil first will make it easier to remove the cashew butter and honey from the cup.

Pour the nut butter mixture over the dry ingredients and stir until all the chocolate chips, nuts, and oats are evenly coated. The granola mixture will be stiff, but should stick together. Add a touch more honey if the granola is too crumbly.

Spread the batter into the prepared baking pan and use a rubber spatula press the mixture into the pan in an even layer, don’t neglect the corners!

Bake at 350 degrees F for 20-25 minutes until the edges begin to brown and the top turns lightly golden. Cool the bars completely in the pan before turning out onto a cutting board. Slice the baked bars into squares.

Wrap the bars individually in plastic, or store in an airtight container with a piece of parchment paper or waxed paper between the layers.

Mocha Hazelnut Granola Bars | Image: Laura Messersmith

Mocha Hazelnut Granola Bars | Image: Laura Messersmith

Small Kitchen Friendly?
Yes, indeed! I used an 8 x 8 x 2 glass baking dish, one medium mixing bowl, one small mixing bowl, a small cutting board, chef’s knife, a rubber spatula, measuring cups and spoons. A sheet of parchment paper will help too.

The Verdict:
Oh Lord. These are crazy addictive, so make them at your own risk…. The coffee flavor comes through clearly and plays off the sweet (but not too sweet) chocolate and rich hazelnut. A smidgen of saltiness keeps it all in check. I made a batch to bring with us on a long trip and it was all I could do to resist finishing them before the end of the flight. We found ourselves pressing the crumbs out of the ziplock bag when the last bar was gone. If you like chocolate, hazelnut, and coffee you’ll loooove these granola bars.

Mocha Hazelnut Granola Bars | Image: Laura Messersmith

Mocha Hazelnut Granola Bars | Image: Laura Messersmith