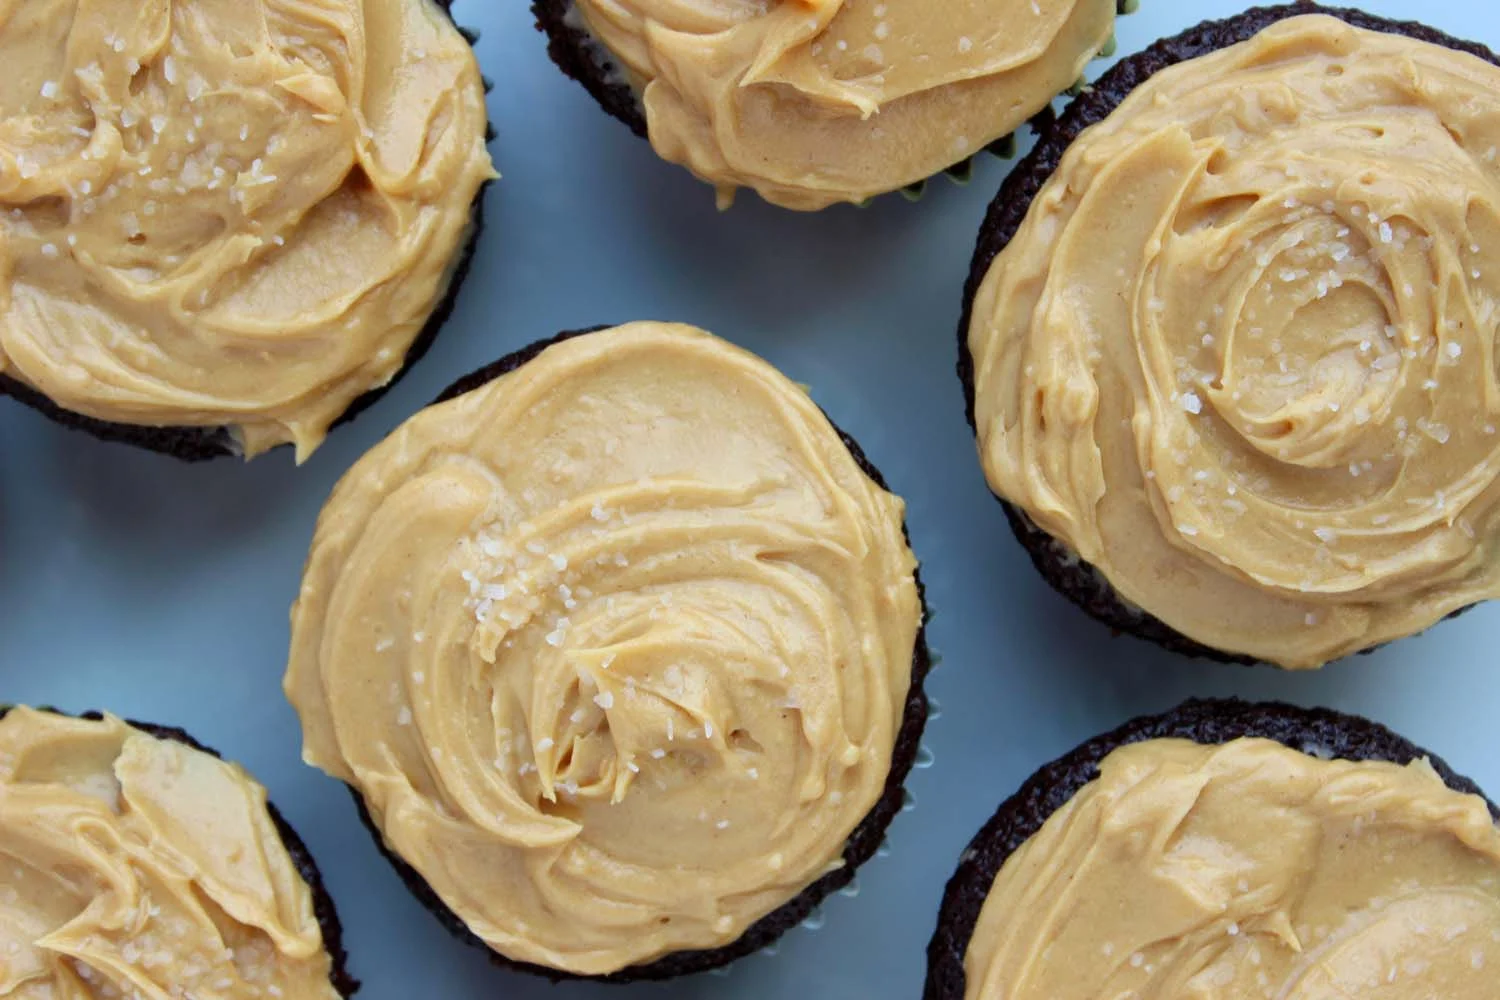
Salted Peanut Butter Cupcakes

Salted Peanut Butter Chocolate Cupcakes | Image: Laura Messersmith

Salted Peanut Butter Chocolate Cupcakes | Image: Laura Messersmith

Birthdays come but once a year and in my book they’re an opportunity to show the people we love what they mean to us. Literally a celebration of their existence in our lives. This year is a big one for both Mike and I – the benefits of being just 12 days apart in age – as we both hit one of those milestones divisible by 5. Oh, fine I’ll just tell you – it’s 35.

It seems like 35 doesn’t have quite the same dramatic meaning in our current culture as it once did, but even so I have noticed the passage of time. Despite my attentive viewership of Keeping up with the Kardashians, I’ve still only barely registered some of the recent pop culture moments and 11 pm on a school night is staying up 'late' these days. Accepting our fate, Mike and I have decided that even if we’re no longer cool (assuming we ever were) we can still be fun.

You know what’s fun? A glow in the dark ping-pong birthday party with your New York friend-family; complete with tiny lobster rolls and miniature cheeseburger sliders. You know what says, “I love you”? Making cupcakes in guest of honor’s favorite flavor combo: peanut butter + chocolate given an extra dose of awesome with a sprinkle of salt.

Salted Peanut Butter Chocolate Cupcakes | Image: Laura Messersmith

Salted Peanut Butter Chocolate Cupcakes | Image: Laura Messersmith

Salted Peanut Butter Chocolate Cupcakes (yield 24 cupcakes)

Cake Ingredients:
2 cups sugar
1 3/4 cups all-purpose flour
3/4 cup cocoa powder
1 1/2 teaspoons baking powder
1 1/2 teaspoons baking soda
1 teaspoon kosher salt, plus more for sprinkling
2 eggs, room temperature
1 cup milk
1/2 cup vegetable oil
2 teaspoons vanilla extract
1 cup boiling water
1 1/2 teaspoons instant coffee powder (ie. Maxwell House)

Cake Instructions:
Pre-heat oven to 350 degrees F.

In a large bowl, stir together the sugar, flour, cocoa powder, baking powder, baking soda and salt until evenly combined.

Next add the eggs, milk, oil and vanilla extract and beat together on medium speed using a hand-held mixer for 2 minutes.

Heat the water to boiling and stir together with the instant coffee powder to dissolve. Add the hot coffee mixture into the batter and stir carefully with a spatula until incorporated. The batter will be very thin and pourable.

Line muffin tins with paper cupcake wrappers and fill to about 2/3 full. Bake at 350 degrees F for 20-25 minutes. For best results bake one pan at a time, rotating about halfway through the total cooking time to ensure even baking. A tooth pick should come out clean.

Cool completely before frosting (recipe below) and finish with a sprinkle of coarse sea or kosher salt.

Variations:
Single Cake: Grease and flour 13x9x2-inch baking pan. Bake 35 to 40 minutes at 350 degrees F. Cool completely. Frost.

Two Layer Cake: Grease and flour two 9-inch round baking pans. Bake 30 to 35 minutes at 350 degrees F. Cool 10 minutes; remove from pans to wire racks. Cool completely. Frost.

Three Layer Cake: Grease and flour three 8-inch round baking pans. Bake 30 to 35 minutes at 350 degrees F. Cool 10 minutes; remove from pans to wire racks. Cool completely. Frost.

Bundt Cake: Grease and flour 12-cup fluted tube pan. Bake 50 to 55 minutes at 350 degrees F. Cool 15 minutes; remove from pan to wire rack. Cool completely. Frost.

Re-written and very slightly adapted from Hershey’s Perfectly Chocolate Chocolate Cake.

Peanut Butter Frosting (yield: frosting for 25 cupcakes)

Frosting Ingredients:
2 cups powdered sugar (aka 10x)
2 cups creamy peanut butter
8 tablespoons unsalted butter, at room temperature
1 1/2 teaspoons vanilla extract
1/2 teaspoon kosher salt
1/2 cup heavy cream

Frosting Instructions:
Measure the powdered sugar, peanut butter, butter, vanilla extract, and salt into a medium mixing bowl and beat together using an electric mixer. Mix on medium-low speed until creamy, scraping the bowl with a rubber spatula as you work.

Add the cream and beat on high speed until the mixture is light and smooth. Ice each cupcake with 1-2 tablespoons of frosting either by piping or with an offset spatula.

Finish each cupcake with a sprinkle of kosher salt or coarse sea salt.

Note: the frosting will set-up a little, but stays on the softer side.

Rewritten and slightly adapted from Kathleen’s Peanut Butter Icing via Ina Garten.

Salted Peanut Butter Chocolate Cupcakes | Image: Laura Messersmith

Salted Peanut Butter Chocolate Cupcakes | Image: Laura Messersmith

Small Kitchen Friendly?
Totally. I used one medium mixing bowl, a hand-held electric mixer, a rubber spatula, liquid and dry measuring cups/spoons, 2 standard size muffin tins, and a small offset spatula. Paper muffin liners will help keep the cake moist and minimized pan clean-up.

The Verdict:
This cake plus the frosting is re-donkulous. The cake is moist and light, the frosting is creamy and decadent, and the light sprinkling of salt keeps it from being too much of a good thing. If you make these cupcakes the scent of chocolate, peanut butter, and sugar will waft through the entire house guaranteeing that you will find it very difficult to save any for your guests. But try, because they will make you a hero with your friends. Just what the doctor ordered for a special celebration, or you know because it just tastes good and making cupcakes is fun.

Salted Peanut Butter Chocolate Cupcakes | Image: Laura Messersmith

Salted Peanut Butter Chocolate Cupcakes | Image: Laura Messersmith
Reading Material + Columbus Day

Maddie | Image: Laura Messermith

Maddie | Image: Laura Messermith

Columbus Day weekend is one of my all-time favorite holidays and after years of having a three-day weekend right in the most glorious moment of fall it was a rude awakening to discover that it’s not common across. People in Texas looked at me like I was nuts when I asked about it and it seems like there’s a slow creep to eliminate it from the list of company-recognized holidays.

Politics of its origin aside – seriously name it for someone worthy – it’s bliss to have a little window of calm after the whirlwind of back to school. And the timing at the peak of leaf peeping, apple picking, and bright Indian summer sunshine is perfection - as you can see, Maddie knows what's up. So, here’s hoping wherever you are the folks in charge see the wisdom of a little break at the top of the hill before the long downslope to the end of the year.


Reading Material:

Point 1: These S’mores Cupcakes posted on Smitten Kitchen look unreal. Point 2: thank goodness I’m not the only one who still loves cupcakes, regardless of their “cool” status. Point 3: this is relevant because there’s a cupcake post coming your way next week. Point 4: how many times can I say cupcake? Cupcake. Cupcake. Cupcake.

I adore these clever illustrations by Gretchen Röehrs – her eye for shape and detail is so inventive. I now wish I had a place to wear an elegant artichoke dress. (via Man Repeller)

This list of rules for success in the restaurant world on Medium was rather illuminating. Reminded me of the design “rules” - followed until you break them.

Food halls featuring street-style dining seem to be a trend and now The New York Times reports that Chef Anthony Bourdain is opening one on a pier in downtown Manhattan. Mark your calendars for 2017!

It’s a Messersmith family trait to give toasts early and often, and this piece on A Cup of Jo confirms it – a toast makes any occasion noteworthy. Here are some tips to help raise a glass with class.

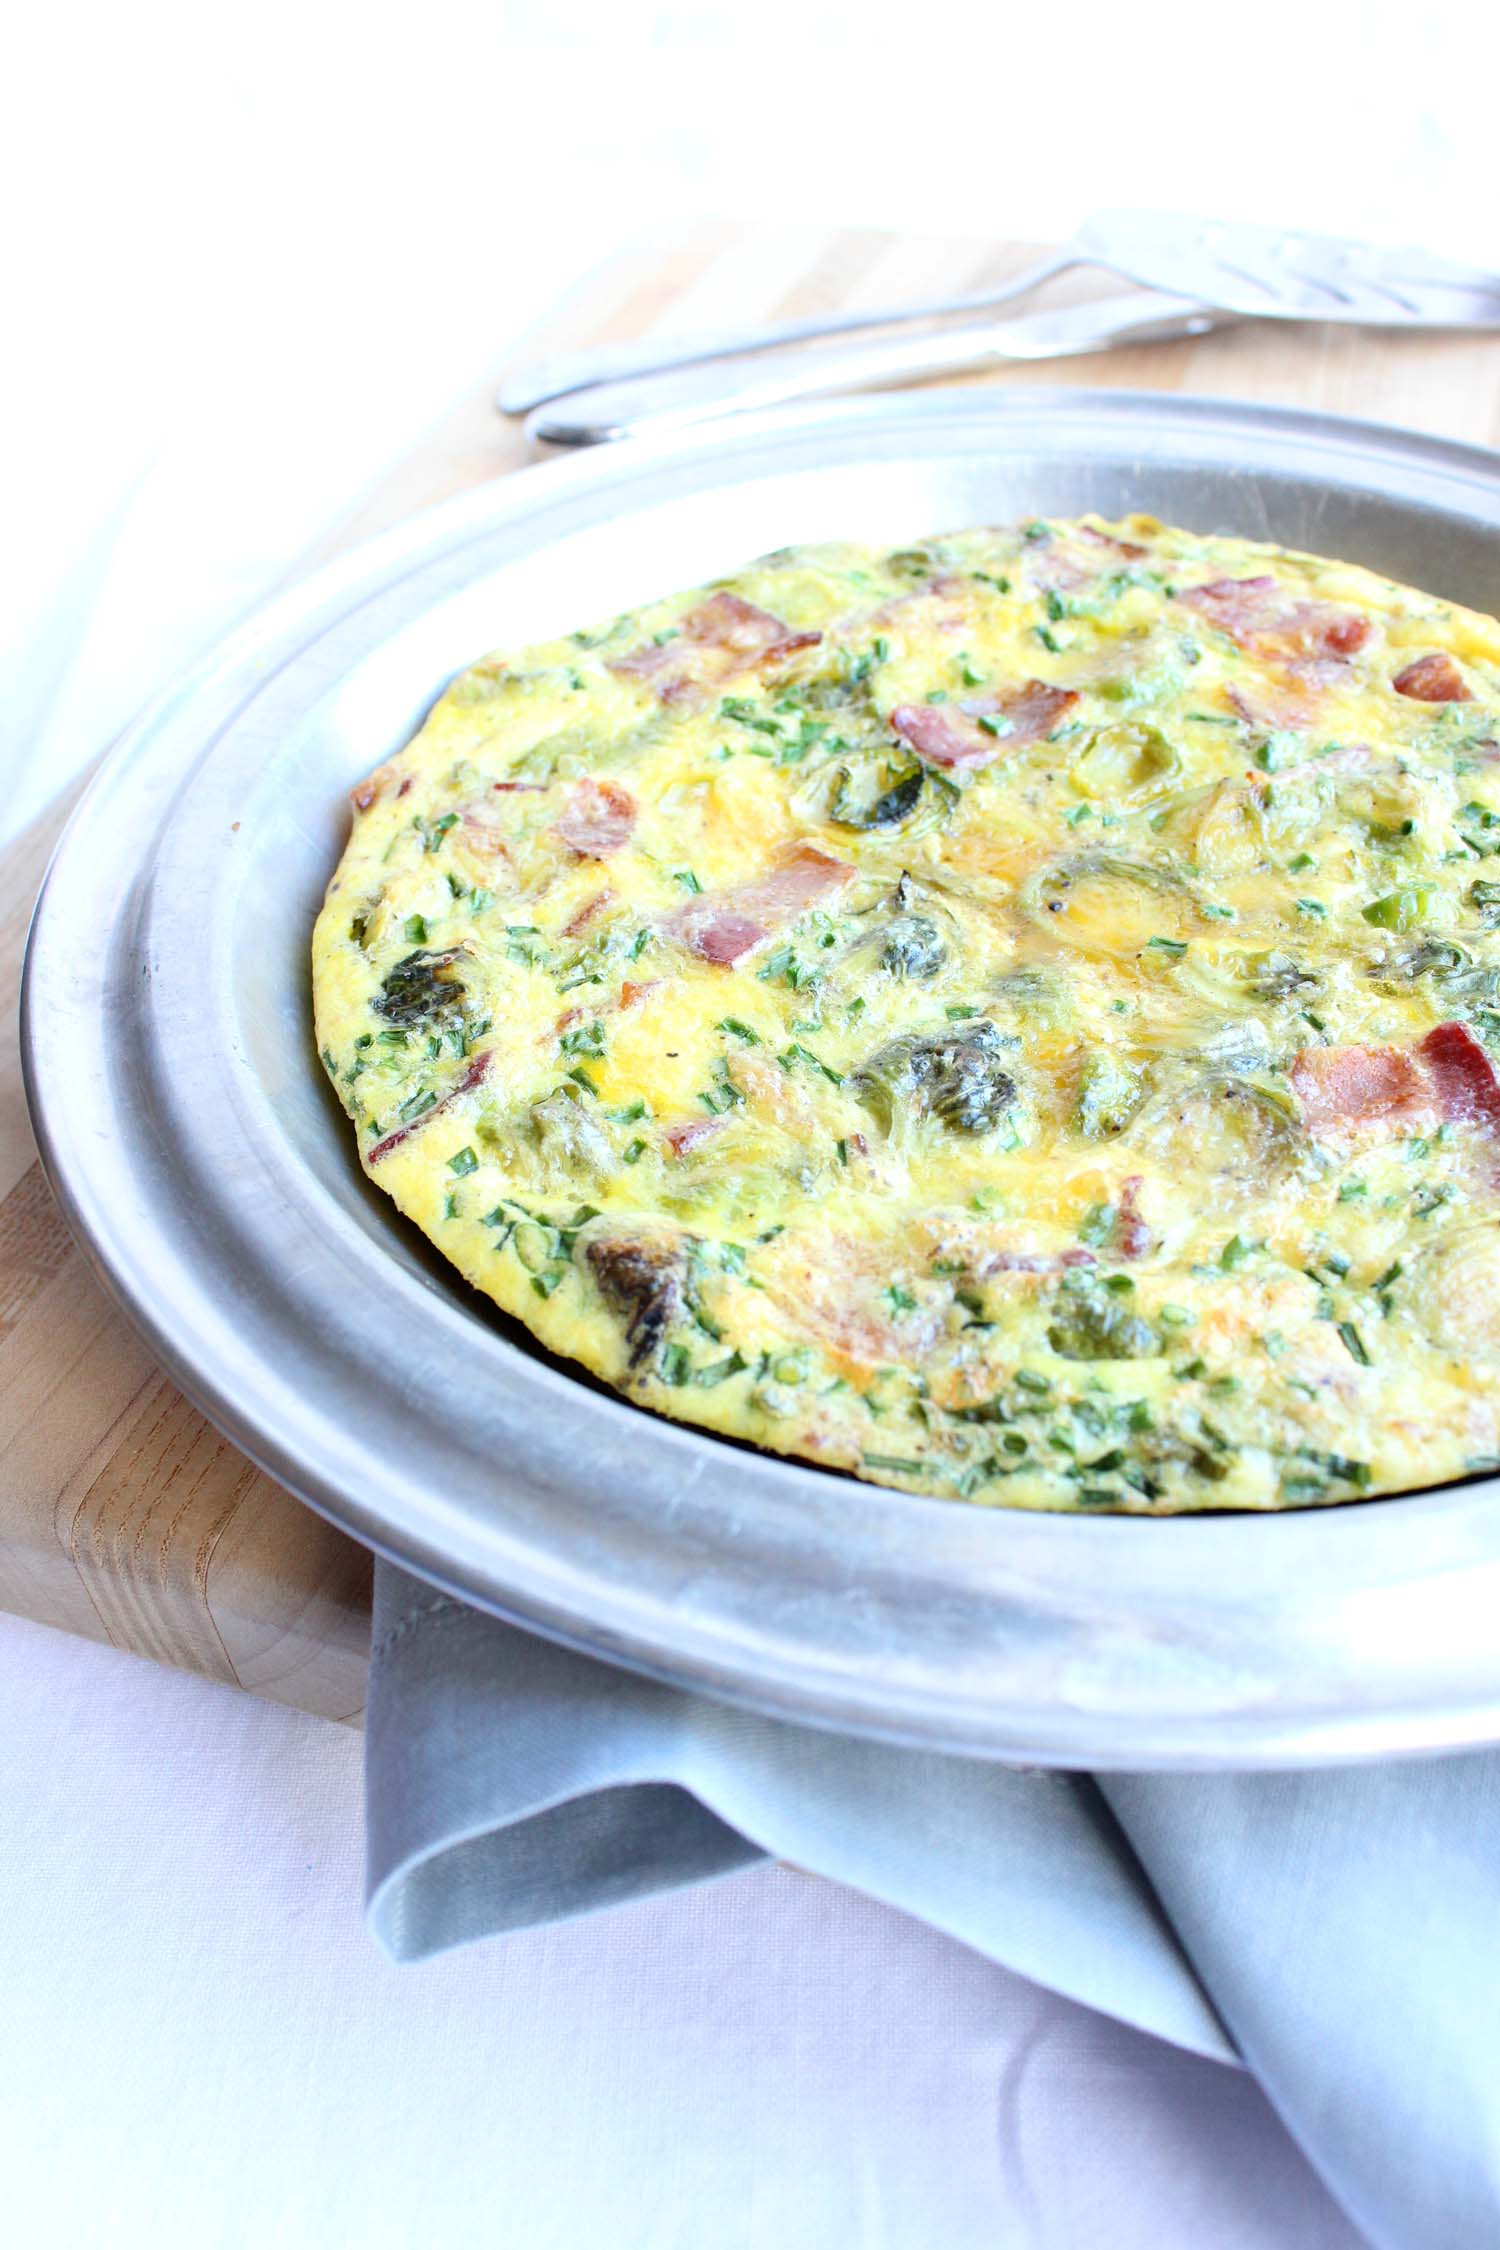
Brussels Sprout, Bacon & Gruyère Frittata

Brussels Sprout, Bacon & Gruyère Frittata | Image: Laura Messersmith

Brussels Sprout, Bacon & Gruyère Frittata | Image: Laura Messersmith

When I first spotted this frittata from Food + Wine magazine on Pinterest I knew immediately that I had to make it for Mike. Its combination of Brussels sprouts, bacon, and Gruyère cheese is nearly all of his favorite foods in one convenient (and easy!) recipe.

If you’re like me and never seem to have an oven-safe skillet quiiite large enough to hold the veggies and the eggs, then my adaptation which requires no skillet at all will hopefully be a Godsend. The outcome is the same and possibly even better due to the magic of the roasted sprouts and the lack of spattering stovetop bacon grease, always a win in my book.

This recipe is just begging to be made some hairy weeknight when dinner requires a dish both comforting and sustaining. Or, for Sunday brunch when something slightly more elegant than classic scrambled is called for, and you’re looking to incorporate some leafy greens under a welcoming blanket of egg and cheese.

Brussels Sprout, Bacon & Gruyère Frittata | Image: Laura Messersmith

Brussels Sprout, Bacon & Gruyère Frittata | Image: Laura Messersmith

Brussels Sprout, Bacon & Gruyère Frittata (serves 4-6) 

Ingredients:
1/2 pound (5 strips) thick-cut bacon
3/4 pound brussels sprouts, halved and sliced 1/4 inch thick
2 shallots, halved and thinly sliced
1 cup (1/4 pound) shredded Gruyère cheese
8 large eggs
2 tablespoons whole milk
1/4 cup snipped chives
Kosher salt
Freshly ground pepper
Extra virgin olive oil

Instructions:
re-heat the oven to 350 degrees F.

Prep the Brussels sprouts by trimming the ends and slicing them vertically in 1/4 pieces. Line a rimmed baking sheet with parchment paper and spread the Brussels sprouts in a single layer. Drizzle with 2 teaspoons extra virgin olive oil and sprinkle with 1/2 teaspoon kosher salt and 1/4 teaspoon black pepper. Roast in a 350 degree oven for 10 minutes, then turn with a spatula and add in the thinly sliced shallots. Continue to roast for another 7-10 minutes until the sprouts are crisp-tender and just beginning to brown and the shallots are softened.

Meanwhile, line a second rimmed baking sheet with foil and lay the strips of bacon in a single layer. Bake in a 350 degree oven for 20-25 minutes turning halfway through until the bacon is crisp. Drain and cool on a paper towel-lined plate, then roughly chop into 1/4 inch strips.

In a large bowl, beat the eggs with the milk, 1 teaspoon of salt and 1/4 teaspoon of pepper. Stir in the shredded gruyere and snipped chives.

Lightly coat an 8” pie plate with non stick spray. Layer the Brussels sprouts and bacon, then pour the egg mixture over the top. Bake the frittata for 25-30 minutes, until the center is just set. Run a rubber spatula around the edge of the frittata and slide it onto a serving plate, then cut it into 6 pieces and serve.

Re-written and adapted from Food + Wine’s Brussels Sprout, Bacon and Gruyère Frittata by Justin Chapple.

Brussels Sprout, Bacon & Gruyère Frittata | Image: Laura Messersmith

Brussels Sprout, Bacon & Gruyère Frittata | Image: Laura Messersmith

Small Kitchen Friendly?
100%. All you need is two rimmed baking sheets (you can get away with one if necessary by lining it with parchment and re-using it  for the bacon), a medium cutting board, chef’s knife, 8” pie plate, medium mixing bowl, dinner plate, rubber spatula, liquid measuring cup, and measuring spoons. Aluminum foil, parchment paper, and paper towels will make clean up much simpler.

The Verdict:
The number one way I can tell if Mike likes something is when he’s willing to eat it more than one day in a row. The other mark of success is when I wish I had thought of it first, hat tip to you Mr. Chapple. In that case Brussels Sprout, Bacon and Gruyère Frittata is a total winner. The sprouts are perfectly complimented by the creaminess of the egg and cheese mixture, and the crunchy salty bacon. Definitely keeping this one in mind as winter approaches and sprouts become a go-to menu item.

Brussels Sprout, Bacon & Gruyère Frittata | Image: Laura Messersmith

Brussels Sprout, Bacon & Gruyère Frittata | Image: Laura Messersmith

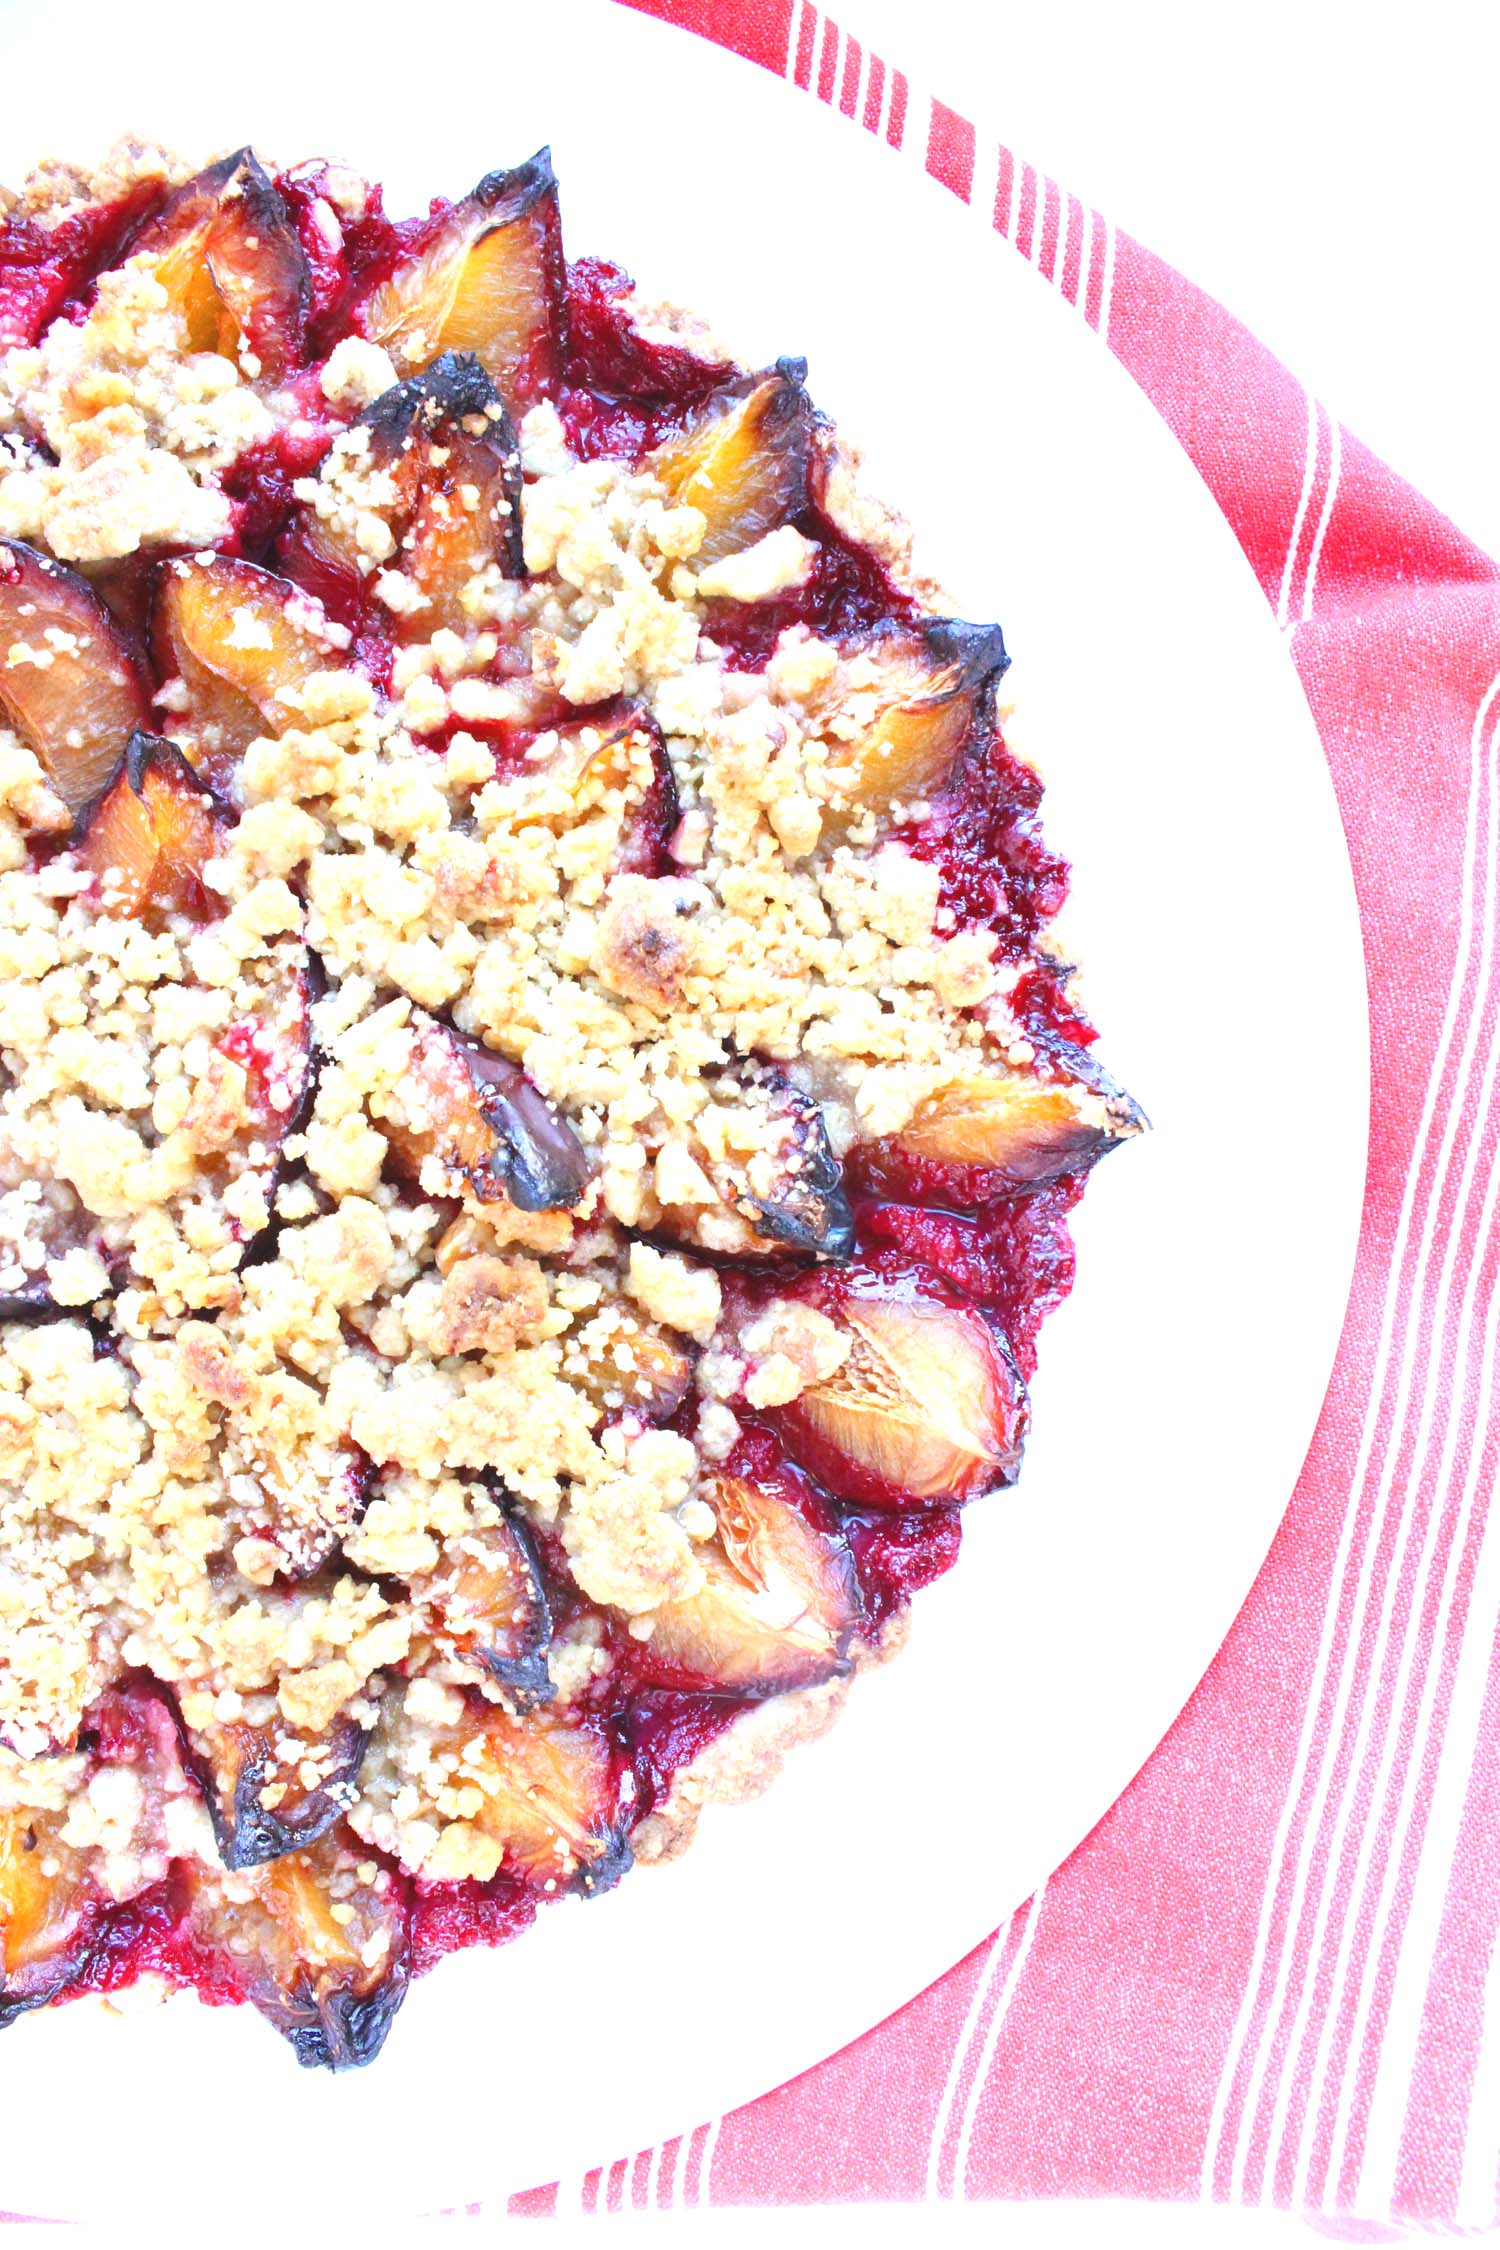
Plum Tart

Plum Tart | Image: Laura Messersmith

Plum Tart | Image: Laura Messersmith

Each week I follow along with Ina Garten (aka the Barefoot Contessa) and attempt to recreate one of her dishes in my tiny New York City kitchen. The catch? This is my version of cooking school and I’m making these recipes for the first time. I’ll share both my successes and um, challenges, along the way and we’ll see if I can keep up with the Contessa!

Episode: “Long Distance Dinner”

The Set-up: Ina’s cooking a dinner party menu that will be delivered to a friend’s daughter in the city.

The Menu: Filet of Beef Bourgignon, Zucchini Gratin, Plum Tart

0:34 – Ina says this dinner is for her friends’ daughter Genevieve as a post-med school exam treat. This is one legit motivator.

1:20 – First up is dessert, a Plum Tart with a walnut crust, which just has to be pressed into the pan. No rolling involved, you say…?

2:16 – The crust mixture is compared with a typical crumble topping – butter, sugar, finely chopped walnuts, etc. and Ina is setting some aside to put over the top of the plums.

3:42 – Pro Tip #1: Use a metal measuring cup to press the crust into place and create a sharp corner where the bottom and sides meet. Pro Tip #2: Flour the measuring cup if it sticks.

4:11 – Ina says she likes to use Italian Prune Plums when they’re in season, but today it’s just regular black plums in a lotus pattern. Basically, concentric circles of fruit wedges.

5:05 – I just realized that Ina didn’t peel the plums, 100 points in favor of fruit that doesn’t require peeling!

6:33 – Instructional Phone Call Alert! Genevieve requires guidance on flowers and wine to go with the dinner and Ina says – one color, one type of flower, and lots of them. For wine – another burgundy or similar to pair with the wine in the dish. Sounds simple enough…

9:07 – Now it’s time to work on the Zucchini Gratin which Ina particularly likes because it’s an easy way to make a vegetable dish in advance.

10:18 – So, I’ve been watching Ina on the regs for a while now and I still don’t know why nutmeg is a traditional gratin spice.

11:34 – Ina is not messing around with this gratin, cheese, breadcrumbs, and little dots of butter are in the topping. G’s party guests are going to need a post dinner walk!

12:26 – Speak of the devil: Genevieve is on the hunt for flowers, oh so casually dropping in that her “friend Ina” recommended… she walks out with $30 worth of hyacinths flown in from Holland.

13:41 – Main course time: Filet of Beef Bourgignon. I guess the fancy flowers aren’t going to be out of place since I think Ina has about $100+ worth of beef.

14:15 – Fun Fact: Ina started making this recipe when she was catering as a way to make a more rustic dish “really special.” Which is probably code for “my clients needed to impress their guests.”

18:30 – Okay, so the beef has been sliced into filets and seared, next bacon is crisped. Now for the garlic to get a quick sauté before deglazing the pan with the burgundy wine.

19:23 – Stop the presses! Ina says you don’t have to make your own beef stock, so you can free up that Saturday afternoon dedicated to the process.

20:38 – Pro Tip: Cut your vegetables on the diagonal to make a prettier shape.

21:52 – Over to Genevieve who appears to be picking up bottles of wine at random before giving up and asking the shop keeper for assistance. After hearing the menu he suggests an aligoté for white and pinot noir for red.

22:07 – Back to Ina who is thickening the sauce with a paste of flour mixed into softened butter which she recommends for thickening gravy too since it prevents lumps. Naturally, the French have a term for this it’s beurre manié.

23:59 – Stray thought… I usually try to sauté all the vegetables before adding wine, stock, etc. but Ina is doing the reverse and adding the carrots and onions to the stock. Hmmm…

25:41 – Final steps on the Filet of Beef Bourgignon adding everything back into the pan – seared filet, crisped bacon. A montage of Genevieve lighting candles and putting her flowers in water while Ina packs up all the food in a gigantic cooler.

26:28 – PS: she appears to be lending an oval Le Creuset for the party. Oh, to have extra French ovens for loaning!

27:46 – The cooler is handed over – rather easily which gives me hope that some strapping lad from the TV crew helped haul it and this one is an empty stand-in – for the trip to the city.

28:53 – Cut to Genevieve taking the reheated Zucchini Gratin out of the oven and the beef off the stove. Full accent on the French pronunciations as dinner is served. It look a-mazing.

29:49 – The New Yorker and former Bostonian in me is pleased to see that the apartment looks like a totally normal walk-up and that G’s serving “platter” for the Plum Tart is a plastic cutting board. Ahh, my twenties.

Final Thoughts:
I need to think more about ways to take classic dishes and make them special a la Ina.

A masterful lesson in “make-ahead” dinner - side, entree, and dessert.

This episode was filmed in 2006, loving the flip phone thank-you “selfie” G sends to Ina.

Plum Tart | Image: Laura Messersmith

Plum Tart | Image: Laura Messersmith

Lessons Learned:
I know I’ve just made a plum-related dessert, but we loved the Plum Cake Tatin so much that I had to try to fit in one more before Italian Prune Plums were out of season and try Plum Tart.

Fruit Selection – I personally liked the sharp tartness of the Italian prune plums, but if you want a more straightforward, sweet dessert then I’d use regular black plums, or pluots would work too especially if you’re finding other stone fruits hard to come by at this point in the fall.

Fruit Layout/Layering – This tart looks more dramatic when the points of the slices are emerging from the shell edges a bit which has the double benefit of giving you more space for a fourth ring of plums. I cut each plum into quarters (don’t forget your stone fruit lessons!) and started with the outer edge layering in toward the center. This is pretty forgiving and since the fruit cooks down a little I took the liberty of placing the slices in fairly snugly, and sneaking any extra slices I had at the end into spots that seemed like they could use a little more fruit.

Tart Shell – The shell is comprised of a similar concoction to your typical dutch apple pie crumb topping. The butter is cold to begin with, but warms and softens a little as you work the flour, sugar and walnuts into it. Mine seemed a bit dry at first and I worried that it wouldn’t hold together, but I kept mixing and pressing the ingredients with a rubber spatula until there was only a slight haze of flour visible, and it all turned out fine.

Shell/Crumble Ratio – The recipe suggests pressing 2/3 of the crumble into the tart pan and reserving the remaining 1/3 for crumbling on top. I’d revise that to 3/4 in the pan, 1/4 crumbled on top – there were a few places in the shell where I was having trouble getting good coverage and then it seemed like I couldn’t find enough places for all the topping to go.

Baking – I placed the tart pan on a rimmed baking sheet while it was in the oven, which turned out well since the fruit juices did bubble over a bit. The time was spot on, and once it had cooled the tart lifted easily out of its outer ring and off the base onto a cake plate.

Storage – The fruit has a lot of moisture in it, so if you have one of those old-fashioned pie safes, now is the time to bust it out. Barring that, if you can stand to leave it uncovered or just very lightly with parchment paper your crust will stay crisp and firm.

Plum Tart | Image: Laura Messersmith

Plum Tart | Image: Laura Messersmith

Small Kitchen Friendly?
Yes, completely. I used a 9” tart pan with removable base, a medium mixing bowl, small cutting board, chef’s knife, rubber spatula, measuring cups and spoons. A parchment lined baking sheet will be helpful in catching crumble & fruit juice.

The Verdict:
I actually wasn’t sure whether I would like the combination of walnuts and plums in the Plum Tart since I sometimes find walnuts a bit sharp, but in this case they add a lovely toasty mellowness and crunch to the crust. Despite the plums being essentially unseasoned – no tossing in sugar or spices – the tart still manages to be rich in a way that sneaks up on you. Just a small slice with a little scoop of vanilla ice cream is perfect. This is the perfect recipe for company, it looks so elegant but only you need to know how simple it is.

Plum Tart | Image: Laura Messersmith

Plum Tart | Image: Laura Messersmith