Bruléed Grapefruit Tart

Bruléed Grapefruit Tart | Image: Laura Messersmith

Bruléed Grapefruit Tart | Image: Laura Messersmith

It’s citrus season again and the produce section is once more bursting with oranges, pink lemons, and my favorite: grapefruits. When I was younger the only way I could eat bracingly tart grapefruit was with heaping spoons of sugar. I admit, this pretty much defeats the purpose of consuming fruit in the first place, but that’s neither here nor there. As my taste buds matured I needed less and less sugar and today I sip freshly squeezed grapefruit juice without wincing.

My mood needs the bracing boost of sharp citrus. But for folks still on the fence, this bruléed grapefruit tart strikes a happy medium between lovely sweetness and teeth aching acidity by combining the milder ruby red or pink grapefruit variety with just the lightest sprinkle of toasted sugar and a simple, crisp crust.

Now, if it just tasted delicious I’d be sold, but this dessert has the extra benefit of also looking impressive. Elegant, concentric overlapping circles of grapefruit segments glistening under the melted sugar fooled my friends into thinking it came from a bakery. High praise. Imagine my enjoyment when I revealed that the entire process took place entirely in my own kitchen.

Bruléed Grapefruit Tart | Image: Laura Messersmith

Bruléed Grapefruit Tart | Image: Laura Messersmith

Bruléed Grapefruit Tart (serves 8)

 Tart Shell Ingredients:
10 tablespoons (1 1/4 sticks) unsalted butter at room temperature
1/2 cup granulated sugar
1/2 teaspoon pure vanilla extract
1 3/4 cups all-purpose flour
Pinch salt
3-4 tablespoons cold water

Filling Ingredients:
4 large ruby red or pink grapefruits
1/4 cup orange or citrus marmalade
1/3 cup finely crushed butter cookies or honey graham crackers
6 tablespoons coarse sugar

Instructions:
In a large bowl, combine the butter and sugar together with an electric hand mixer. Add the vanilla. Add the flour and salt and mix on low speed until the dough starts to come together.

Press the dough into a 9 inch round false-bottom tart pan making sure that the finished edge is flat and the corner between the sides and bottom is sharp. Refrigerate until firm, about 1-2 hours.

Meanwhile, preheat the oven to 350 degrees F.

Prick the bottom of the chilled tart shell all over with a fork, then line with parchment paper and fill with dried beans or pie weights. These steps will prevent the shell from puffing up. Bake for 20 minutes. Allow to cool slightly before removing the paper and beans.

Increase the oven temperature to 425 degrees F.

To prep the filling, cut a thin slice from both ends of each grapefruit. Place the cut end on a cutting board and cut away the peel and the white part of the rind. Slip the knife along the sides of the membrane dividing the segment to remove the slice of grapefruit.

Spread the marmalade over the partially baked crust. Sprinkle with the crushed cookies or graham crackers. Arrange the grapefruit slices over the crust in concentric circles starting from the outer edge. (You probably won’t use every single piece.) Sprinkle 3 tablespoons of the coarse sugar over the grapefruit.

Bake at 425 degrees F for 15-20 minutes or until crust is lightly browned. Remove tart from oven; turn on broiler (or pull out your kitchen torch). Sprinkle tart with the remaining 3 tablespoons sugar. Broil for 2 to 3 minutes or until sugar is lightly browned and the edges of the grapefruit just begin to singe.

Let cool to room temperature before slicing and serving.

Re-written and adapted from Better Homes and Garden’s Broiled Grapefruit Tart and Ina Garten’s Lemon Curd Tart.

Bruléed Grapefruit Tart | Image: Laura Messersmith

Bruléed Grapefruit Tart | Image: Laura Messersmith

Small Kitchen Friendly?
Yes, indeed. I used a medium mixing bowl, an electric hand mixer, measuring cups and spoons, a rubber spatula, a 9 inch false bottom tart pan, a medium cutting board, a serrated utility knife, and a kitchen torch. Parchment paper and dried beans, uncooked rice, or pie weights round out the equipment.

Bruléed Grapefruit Tart | Image: Laura Messersmith

Bruléed Grapefruit Tart | Image: Laura Messersmith

Parisian Roasted Chicken and Tiny Potatoes

Parisian Roast Chicken with Tiny Potatoes | Image: Laura Messersmith

Parisian Roast Chicken with Tiny Potatoes | Image: Laura Messersmith
I’ve had this page in the Smitten Kitchen cookbook flagged with a post-it note for about 2 years and I am absolutely kicking myself that I just made it this fall for the first time. It has everything to recommend it – simple, short ingredient list; minimal equipment, classic French flavors – and yet I think I was intimidated by the process of spatch-cocking a chicken.

What that means in a nut-shell is removing the backbone so that a whole chicken can be cooked flat; reducing the total cook time. A slightly gruesome project, but one that is over and done with in less than five minutes presuming you have a sharp knife, or set of kitchen shears at your disposal. I recommend using the paper towel to keep the bird from skidding around on the cutting board while you undertake this process. But then it’s over and the more typical seasoning and roasting commence.

I called this chicken “Parisian” because Deb Perelman, the recipe’s author, tells the story of eating a similar dish on a trip to France and it reminded me of an Ina Garten recipe inspired by her own experiences in the City of Light. One bite and it’s clear why this dish makes a lasting impression.

The results are beautifully golden crisp skin – no need for oil or butter to accomplish it, just a few more paper towels for patting dry – juicy meat, and potatoes** that have absorbed all those amazing chicken-y flavors. Since there’s only a small roasting pan to contend with there’s still space for a sheet tray of Brussels sprouts or asparagus in the oven and dinner hits the table in under an hour.

Parisian Roast Chicken with Tiny Potatoes | Image: Laura Messersmith

Parisian Roast Chicken with Tiny Potatoes | Image: Laura Messersmith

Parisian Roasted Chicken with Tiny Potatoes (serves 4)

Ingredients:
2-3 pounds ping-pong sized Yukon gold potatoes, peeled**
3 1/2 - 4 pound whole chicken
2-3 tablespoons kosher salt
1 tablespoon black pepper
2 tablespoons olive oil
2 tablespoons fresh thyme leaves
1 lemon

Instructions:
Pre-heat the oven to 450 degrees F.

Wash and peel the potatoes, then spread them in the bottom of a small roasting pan.

Place a layer of paper towel on a medium cutting board and prop the chicken up on its base with the back facing you. Use a chef’s knife to cut vertically along each side of the backbone to remove. (Or place the chicken breast side down and remove the backbone with sharp kitchen shears.) Discard the backbone or save for making chicken stock.

Turn the chicken breast side up and press along the breastbone to flatten. Pat the entire chicken dry - inside and out - with paper towels and sprinkle liberally with kosher salt and black pepper.

Drizzle the olive oil over the potatoes and toss together with kosher salt and pepper. Place the chicken on top of the potatoes, breast side up, using the vegetables as a makeshift roasting rack.

Roast the chicken in the hot oven for 45-50 minutes, tossing the potatoes and rotating the chicken halfway through. The chicken is done when an instant read thermometer reads 165 degrees F when inserted into the thigh. Allow the chicken to rest for 5-10 minutes.

Place the potatoes on a large serving platter. Then cut the chicken into pieces placing the legs, thighs, breasts and wings over the potatoes. Sprinkle the platter with the thyme leaves and a squeeze of lemon juice. Serve immediately with a simply cooked vegetable like roasted Brussels sprouts.

**Side Note: A note on the photos - I liked the rustic look of leaving the skins on and honestly peeling teeny potatoes is annoying, so I tested leaving the potato skins on and the results are good, but not amazing. Peeling or at least cutting the potatoes in half makes a BIG difference and allows the great chicken-y flavors to permeate, so it’s 100% worth it. If using a larger potato cutting them in small pieces achieves the same results.

Re-written from Deb Perelman’s Flat Roasted Chicken with Tiny Potatoes in The Smitten Kitchen Cookbook (pg. 173 – 174)

Small Kitchen Friendly?
Absolutely. I used a 9x13 metal roasting pan, a medium cutting board, chef’s knife, a vegetable peeler, and paper towels. That’s it!!

Parisian Roast Chicken with Tiny Potatoes | Image: Laura Messersmith

Parisian Roast Chicken with Tiny Potatoes | Image: Laura Messersmith

Parisian Roast Chicken with Tiny Potatoes | Image: Laura Messersmith

Parisian Roast Chicken with Tiny Potatoes | Image: Laura Messersmith

Basil Chicken Salad Tartines

Basil Chicken Salad Tartines | Image: Laura Messersmith

Basil Chicken Salad Tartines | Image: Laura Messersmith

I first tasted a version of this salad when I was living in Cambridge and working near Beacon Hill. Occasionally we’d walk over to a café on Charles Street called Panificio for lunch where their Chicken Tarragon Salad quickly became my favorite menu item. The addition of the grapes; the chopped fresh herbs made it special and elegant – a daring flavor combination to my newly awakening palate.

Since ten dollar salads on the regular weren’t really in the budget at the time I began making tarragon chicken salad for myself at home and even relied on it to impress Mike the first time I cooked for him. I worked all morning carefully slicing the grapes, washing the greens and trying to make everything perfect. We wedged ourselves in at the black and white table – an old counter top from my grandparent’s farmhouse transformed by a thrifty uncle – and began a tradition of connecting over a meal.

It’s been an awesome 8 years since that lunch. Our current kitchen is different, but still tiny, the black and white table is still with us, and I’m still making our favorite chicken salad. This time with a small refresh using basil in place of the tarragon. Why mess too much with a good thing?

Basil Chicken Salad Tartines | Image: Laura Messersmith

Basil Chicken Salad Tartines | Image: Laura Messersmith

Basil Chicken Salad Tartines (serves 4)

Ingredients:
3 pounds (4 split) bone-in, skin-on chicken breasts
Kosher salt
ground black pepper
1/3 cup light mayonnaise
3 tablespoons chopped fresh basil leaves
1 cup seedless green grapes
4 slices multigrain bread
2 cups mixed baby greens or spinach

Instructions:
Pre-heat the oven to 400 degrees F.

Pat the chicken breasts dry with paper towels and sprinkle both sides generously with salt and black pepper. Place the chicken skin side up on a rimmed baking sheet and roast in the oven for 40-50 minutes or until the internal temperature reaches 160 degrees on an instant read thermometer. Set the roasted chicken aside to cool.

Meanwhile, finely chop the basil leaves and slice the grapes in half. When the chicken is cool enough to handle, carefully remove the meat from the bones and cut the chicken into bite sized pieces. Place the chicken in a medium mixing bowl; add the mayonnaise, basil and grapes. Season to taste with kosher salt and black pepper. Stir to evenly combine.

Toast the slices of bread and top with the greens and the basil chicken salad. Serve immediately.

Adapted and re-written from Ina Garten’s Chicken Salad Veronique inspired by Panificio's Tarragon Chicken Salad.

Small Kitchen Friendly?
Since day one. I used a rimmed baking sheet, medium mixing bowl, medium cutting board, chef’s knife, measuring spoons, and a rubber spatula.

Basil Chicken Salad Tartines | Image: Laura Messersmith

Basil Chicken Salad Tartines | Image: Laura Messersmith

Basil Chicken Salad Tartines | Image: Laura Messersmith

Basil Chicken Salad Tartines | Image: Laura Messersmith

Spring Omelet with Asparagus and Peas

Spring Omelet with Asparagus and Peas | Image: Laura Messersmith

Spring Omelet with Asparagus and Peas | Image: Laura Messersmith

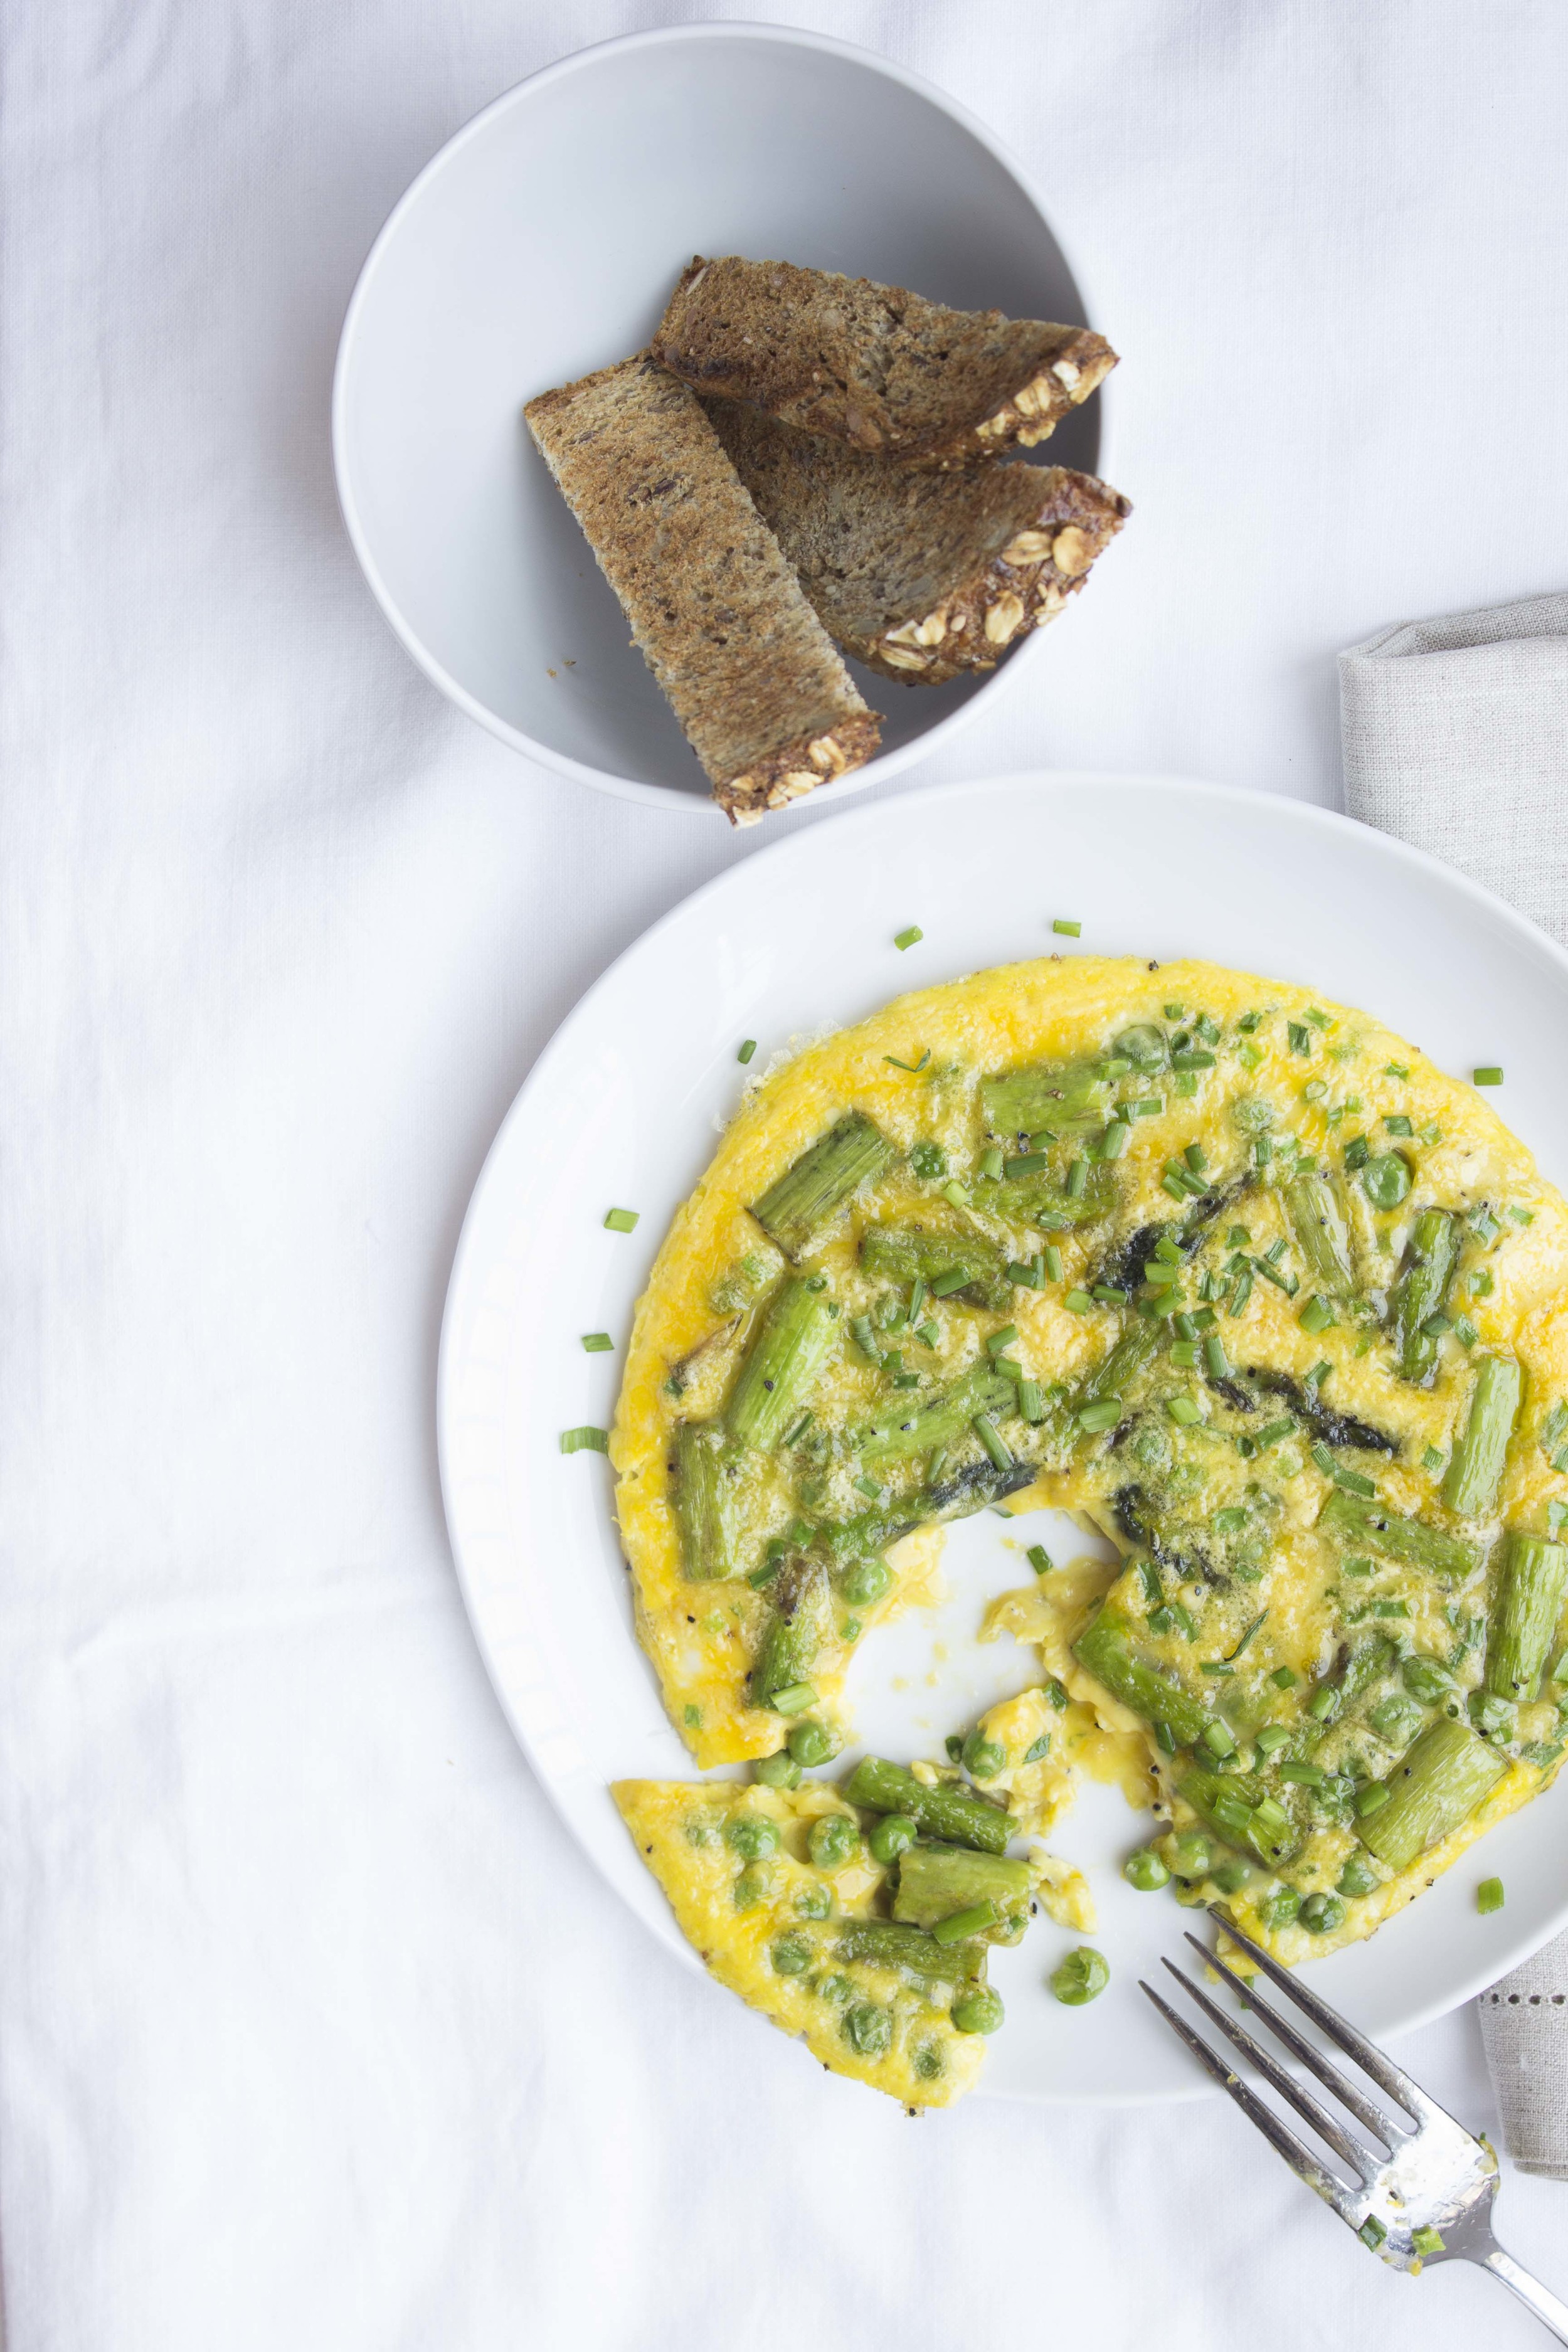
When life picks up its pace and it seems like there isn’t a moment to spare in between packing and unpacking for the next adventure there’s still an important question to answer: what’s for dinner? Lately the answer has been eggs – plain scrambled, fried on avocado toast, and when the planets align to make a trip to the grocery store also this Spring Vegetable Omelet.

Thank the good Lord for a main dish that can be on the table in less than 20 minutes, and still checks all the boxes for fresh, delicious, and healthy. Serve with a slice or two of whole grain – cut into golden toast soldiers if you please – and this could be breakfast, lunch, dinner or any meal in between.

Spring Omelet with Asparagus and Peas | Image: Laura Messersmith

Spring Omelet with Asparagus and Peas | Image: Laura Messersmith

Spring Omelet with Asparagus and Peas (serves 2)

Ingredients:
8 stalks asparagus
1/2 cup English peas, shelled
2 tablespoons unsalted butter
2 tablespoons olive oil
5 eggs
3 tablespoons whole milk
1 tablespoon grated parmesan cheese
2 tablespoons minced chives
kosher salt
black pepper

Instructions:
Pre heat the oven to 350 degrees F.

Cut the asparagus spears into 1/2 inch lengths discarding the tough, woody ends. In a medium oven-safe sauté pan (8 or 10 inches), melt the butter and olive oil together. Add the asparagus and peas and cook over medium heat for 3-4 minutes until the asparagus is tender. Season with salt and pepper.

While the vegetables cook, whisk together the eggs and milk in a medium bowl, finely mince the chives, and grate the parmesan cheese.

Using a slotted spoon, remove the vegetables from the pan and set aside leaving the remaining butter and olive oil in the pan. Turn off the heat and pour the eggs into the warm pan. Scatter the parmesan cheese and half the minced chives over the eggs along with a sprinkle of salt and pepper.

Spread the asparagus and peas over the top of the eggs and immediately move the pan to the hot oven. Bake for 7-8 minutes until the eggs are firm at the edges, but the center of the omelet remains soft set.

Use a fish spatula to loosen the omelet from the pan and serve immediately with topped with a sprinkle of the reserved chives.

Inspired by Ina Garten’s Country French Omelet and Saveur Magazine’s Brown Butter Peas and Mint Omelette

Small Kitchen Friendly?
You know it. I used a medium oven-safe sauté pan, small mixing bowl, medium cutting board, chef’s knife, microplane grater, and a fish spatula. That’s it!

Spring Omelet with Asparagus and Peas | Image: Laura Messersmith

Spring Omelet with Asparagus and Peas | Image: Laura Messersmith

Spring Omelet with Asparagus and Peas | Image: Laura Messersmith

Spring Omelet with Asparagus and Peas | Image: Laura Messersmith