Lemony Artichoke Heart Stuffed Shells

Lemony Artichoke Heart Stuffed Shells | Image: Laura Messersmith

Lemony Artichoke Heart Stuffed Shells | Image: Laura Messersmith

Between magazines, Pinterest, Instagram, and cookbooks at any given time I feel like there are about 1,000 recipes I’m dying to make. I try to be organized, but somehow there’s a notepad on my phone for those moments when inspiration strikes on the go (or as I’m drifting off to sleep), a Word document roughly organized by month/season, and of course multiple Pinterest boards all collecting ideas.

If I’m lucky I cook the recipe straightaway, but others I’m saving for the right occasion when the dish and the eaters are just meant for each other. That was the case here. I’ve been meaning to make this recipe from the Smitten Kitchen cookbook for nearly six months, rather a long time to wait.

As much as I love baked pasta dishes it’s tough when there are only two people to eat it, so there I am: waiting to make this recipe until the stars aligned and we could lure some folks to the neighborhood for dinner. Thank goodness too, because this dish is everything I hoped it would be - like homemade mac and cheese taken to a grown-up place by the addition of lemon, white wine, and sautéed artichokes. If that's not reason enough, how about this: you can completely assemble the dish up to a day in advance and bake it when you're ready to eat. A make ahead dish that feels special enough for company? Yes, please!

Lemony Artichoke Heart Stuffed Shells | Image: Laura Messersmith

Lemony Artichoke Heart Stuffed Shells | Image: Laura Messersmith

Lemony Artichoke Heart Stuffed Shells (serves 4-6)

Shell Ingredients:
25-30 jumbo pasta shells (about a 12-ounce box, I used Barilla)
3 tablespoons unsalted butter
1 to 2 tablespoons olive oil, divided
1 large onion, chopped small
18 ounces frozen artichoke hearts, thawed and patted dry
1/4 cup dry white wine
1 cup (1 1/4 ounces) finely grated Romano cheese
1 cup (1 1/2 ounces) finely grated Parmigiano-Reggiano cheese
2 large egg yolks
1 tablespoon lemon zest
1 tablespoon freshly squeezed lemon juice
1 teaspoon salt
1/4 teaspoon ground black pepper

Sauce Ingredients:
4 tablespoons (1/4 cup) unsalted butter
1/4 cup all-purpose flour
2 cups whole milk
3 teaspoons (2-3 cloves) minced garlic
1/2 cup ricotta cheese
2 tablespoons freshly squeezed lemon juice
1 tablespoon lemon zest
1/2 teaspoon salt
Freshly ground black pepper to taste
2 tablespoons chopped flat-leaf parsley

Instructions:
Make the Filling:

Melt butter in a heavy 12-inch skillet and cook it until it turns nutty and brown, stirring occasionally to keep the solids moving on the bottom of the pan. Once it is a nice nutty brown, add 1 tablespoon olive oil, then the onions and cook them until they are lightly brown and caramelized, about 7 minutes. Add the artichoke hearts and cook them until they are softened a bit, about 5 minutes. Add the wine and cook it until it completely disappears.

Remove the pan from the heat and let it cool slightly, before transferring it to the bowl of a food processor. Add both cheeses, the egg yolks, lemon juice, salt and black pepper and pulse in the food processor until roughly chopped. You want a mixture with some texture, not a puree.

Note: If you don’t have a food processor, then make sure to cut your onions quite small and chop the artichokes on the fine side before cooking. Follow the instructions as written, then once the filling cools mix it in a large bowl.

Cook the Pasta:
Bring a large pot of salted water to a boil, and cook the shells just shy of al dente. Check the box to see if there are cook times for shells that will be baked - Barilla recommends 9 minutes, which was perfect. Drain and toss with a teaspoon or two of olive oil, to keep them from sticking.

Make the Sauce:
While the shells are cooking, melt the butter in a medium saucepan (or the wiped out pot you made the artichoke filling in, if you’re into spending less time scrubbing pots) over medium-high heat. Once melted, add the flour all at once and whisk it until smooth. Add the milk, a small glug at a time, whisking constantly so no lumps form. Once the mixture has reached a batter-like consistency, you can begin adding the milk in larger pours at a time, whisking the whole time. Once all the milk is added, add the garlic and bring the sauce to a boil, stirring frequently. Once boiling, it will immediately begin to thicken. Reduce the heat to medium and simmer for two to three minutes before stirring in the ricotta, lemon juice, salt and black pepper, and chopped parsley. Adjust salt, pepper and lemon to taste.

Assemble the Dish:
Preheat oven to 350 degrees. Layer about half the sauce in the bottom of a 9×13 baking dish. Press a generous tablespoon of artichoke filling inside each cooked shell – a cookie scoop will be useful – so that the shell is full, but the sides can still meet. I found that resting the pasta on a cutting board using one hand to hold the edges apart and the other to scoop worked best. Nest each pasta shell in the sauce, seam up. Spoon the remaining sauce over the shells. Cover the dish with foil and bake it for 30 minutes, then remove the foil and bake it for a final 15 minutes. Serve immediately.

Individual Servings – Divide about half the sauce among 6 oven safe baking dishes (I used 16 ounce ramekins), divide the stuffed shells (5-6 shells fit snugly) among each dish and top with the remaining sauce as above. Cover with foil and bake for 20 minutes at 350 degrees F, followed by 5 minutes uncovered.

Make Ahead – Assemble the dish (or dishes) and cover each in foil. Refrigerate up to 24 hours. Add 3-5 minutes to the original baking times.

Recipe re-written and slightly adapted from Deb Perelman’s Artichoke Stuffed Shells in the Smitten Kitchen Cookbook (pg. 125 ) link via Bon Appetit.

Lemony Artichoke Heart Stuffed Shells | Image: Laura Messersmith

Lemony Artichoke Heart Stuffed Shells | Image: Laura Messersmith

Small Kitchen Friendly?
Yes, with organization. I used one large sauce pan, one large, deep sauté pan, a medium food processor, 9x13” baking dish (or 6 individual - the dishes pictured are Corningware 16 ounce ramekins), a colander, and a medium cutting board.

For tools I used a chef’s knife, microplane zester, a liquid measuring cup, measuring spoons, 1 tablespoon cookie scoop, rubber spatula, whisk, and a ladle or large spoon.

The Verdict:
Considering how fantastic the flavors are I fervently hope your stars hurry up and get their ducks in a row, because no one (even the artichoke adverse) should have to wait long to eat this dish. I bumped up the lemon zest a bit and added the parsley to the sauce, rather than sprinkling it on top to give the dish a subtle fresh note and make sure it didn’t become too heavy. Seconds were had by all and some simply roasted Brussels sprouts made the perfect accompaniment. All in all, a successful mid-winter dinner!

Lemony Artichoke Heart Stuffed Shells | Image: Laura Messersmith

Lemony Artichoke Heart Stuffed Shells | Image: Laura Messersmith


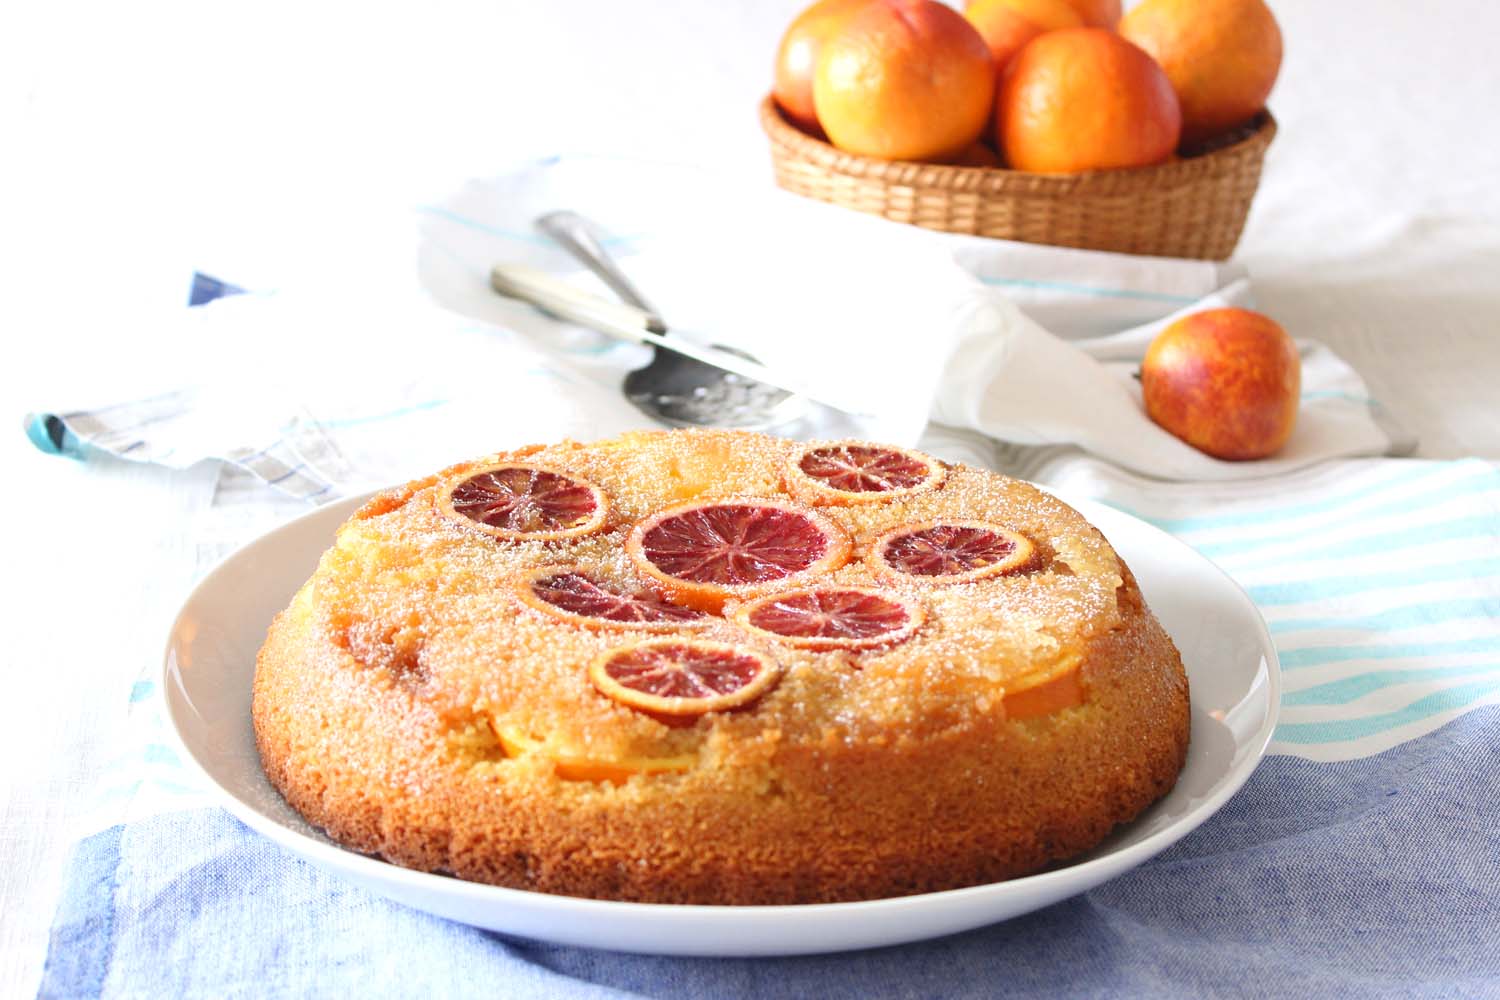
Blood Orange Polenta Cake

Blood Orange Polenta Cake | Image: Laura Messersmith

Blood Orange Polenta Cake | Image: Laura Messersmith

Are you a rule follower or a risk taker? In life I go by the book more than I should – I find myself teetering on the edge of a new adventure looking for reasons to step back; thinking of all the ways my plan could go awry when there’s no guarantee of success. A twist on the New Year’s Resolution I learned of recently is to choose a word – something like Family, Balance, or Health – and orienting your choices to support that goal. I’d like to dedicate this year to being Fearless.

I think that’s why I like cooking so much – even a misstep that ends in disaster is still a chance to learn. An under-baked loaf of bread, a pork tenderloin that is starting to burn but still hasn’t come up 140 internally, caramels that didn’t solidify and started to ooze on the plate. Frustrating? Sure. But, at worst they end up in the trash and I start again, at best they’re salvageable and end up as part of a funny story, which was the case the first time I made this cake.

No back up plan for our New Year’s Eve dessert just some homemade whipped cream to dress up a dry and relatively flavorless crumb despite plenty of butter and eggs. What happened?! I give our guests credit for pretending they liked it, but I could tell those were sympathy bites. Sorry, Joyce & Alex!

I loved the idea though and the cover photo on Citrus: Sweet and Savory Sun-Kissed Recipes by Valerie Aikman-Smith and Victoria Pearson was so beautiful, I had to go back to the drawing board. I went seeking guidance from no fewer than five other similar recipes the result: the cake I was actually dreaming of – rounds of glistening oranges, not too sweet, tender, and deeply citrusy. Totally worth the effort.

Blood Orange Polenta Cake | Image: Laura Messersmith

Blood Orange Polenta Cake | Image: Laura Messersmith

Blood Orange Polenta Cake (serves 6-8)

Ingredients:
1 1/2 cups sugar, divided
1/4 cup water
2 navel or Valencia oranges
2 blood oranges
1 1/2 cups flour
1/2 cup fine polenta
2 teaspoons baking powder
3/4 teaspoon kosher salt
1 cup (2 sticks) plus 2 tablespoons unsalted butter, room temperature
4 large eggs, room temperature
1 tablespoon orange zest

Instructions:
Pre-heat the oven to 350 degrees F.

Prepare a 9-inch solid cake pan or pie plate by brushing the bottom and sides generously with 2 tablespoons softened butter. Set aside.

In a medium sauce pan, combine 1/2 cup of the sugar and water and cook over medium high heat. Swirl the pan to help the sugar to dissolve without stirring. Boil for about 5 minutes until the syrup turns a light golden brown, 360 degrees on a candy thermometer. Remove from the heat and pour into the buttered pie plate to evenly cover the bottom.

Slice the oranges about 1/8 inch thick. Remove any seeds and arrange the slices in overlapping circles over the cooled syrup. Remember, the cake will be inverted later so the bottom layer of oranges will be the top of the cake. Set aside.

In a medium bowl, stir together the all purpose flour, polenta, and baking powder. In a separate large mixing bowl, beat together the remaining sticks of room temperature butter and 1 cup of sugar on medium speed for about 5 minutes or until light and creamy. Decrease the speed to low and add the eggs one at a time mixing well in between. Lastly, mix in the orange zest.

Add the polenta and flour mixture to the wet ingredients a little at a time mixing on low speed until almost combined. Scrape down the bowl in between additions, and finish mixing gently by hand with a rubber spatula to ensure the dry ingredients are completely integrated, but the cake isn’t over mixed.

Spread the batter over the orange slices and bake at 350 degrees F. for 45-50 minutes or until a toothpick comes out clean. Remove the cake from the oven and allow to cool for 15 minutes.

Run a knife around the edge of the cake to loosen before placing a large serving platter on top. Hold the two dishes together using oven mitts and invert the cake onto the platter. Dust with confectioner’s sugar and serve with whipped cream.

Re-written and adapted from Orange and Rosemary Polenta Cake (pg. 75) in Citrus: Sweet and Savory Sun-Kissed Recipes by Valerie Aikman-Smith and Victoria Pearson.

I received a promotional copy of this book via Blogging for Books, all opinions are my own.

Blood Orange Polenta Cake | Image: Laura Messersmith

Blood Orange Polenta Cake | Image: Laura Messersmith

Small Kitchen Friendly?
Yes! I used, small sauce pan, candy thermometer, 9 inch pie plate (or solid cake pan), medium cutting board, utility knife, two medium mixing bowls, a hand mixer, rubber spatula, microplane zester, measuring cups and spoons.

The Verdict:
If I were being entirely scientific the taste testers would have followed the metamorphosis of this cake through its various iterations culminating in the final gorgeous version. Instead, my parents were the beneficiaries when I baked the cake that finally delivered on it’s orangey, bright promise. I knew it was a hit when my mother passed up a bakery chocolate cake in favor of this one. I hope it has a similar effect when you make it too!

Blood Orange Polenta Cake | Image: Laura Messersmith

Blood Orange Polenta Cake | Image: Laura Messersmith

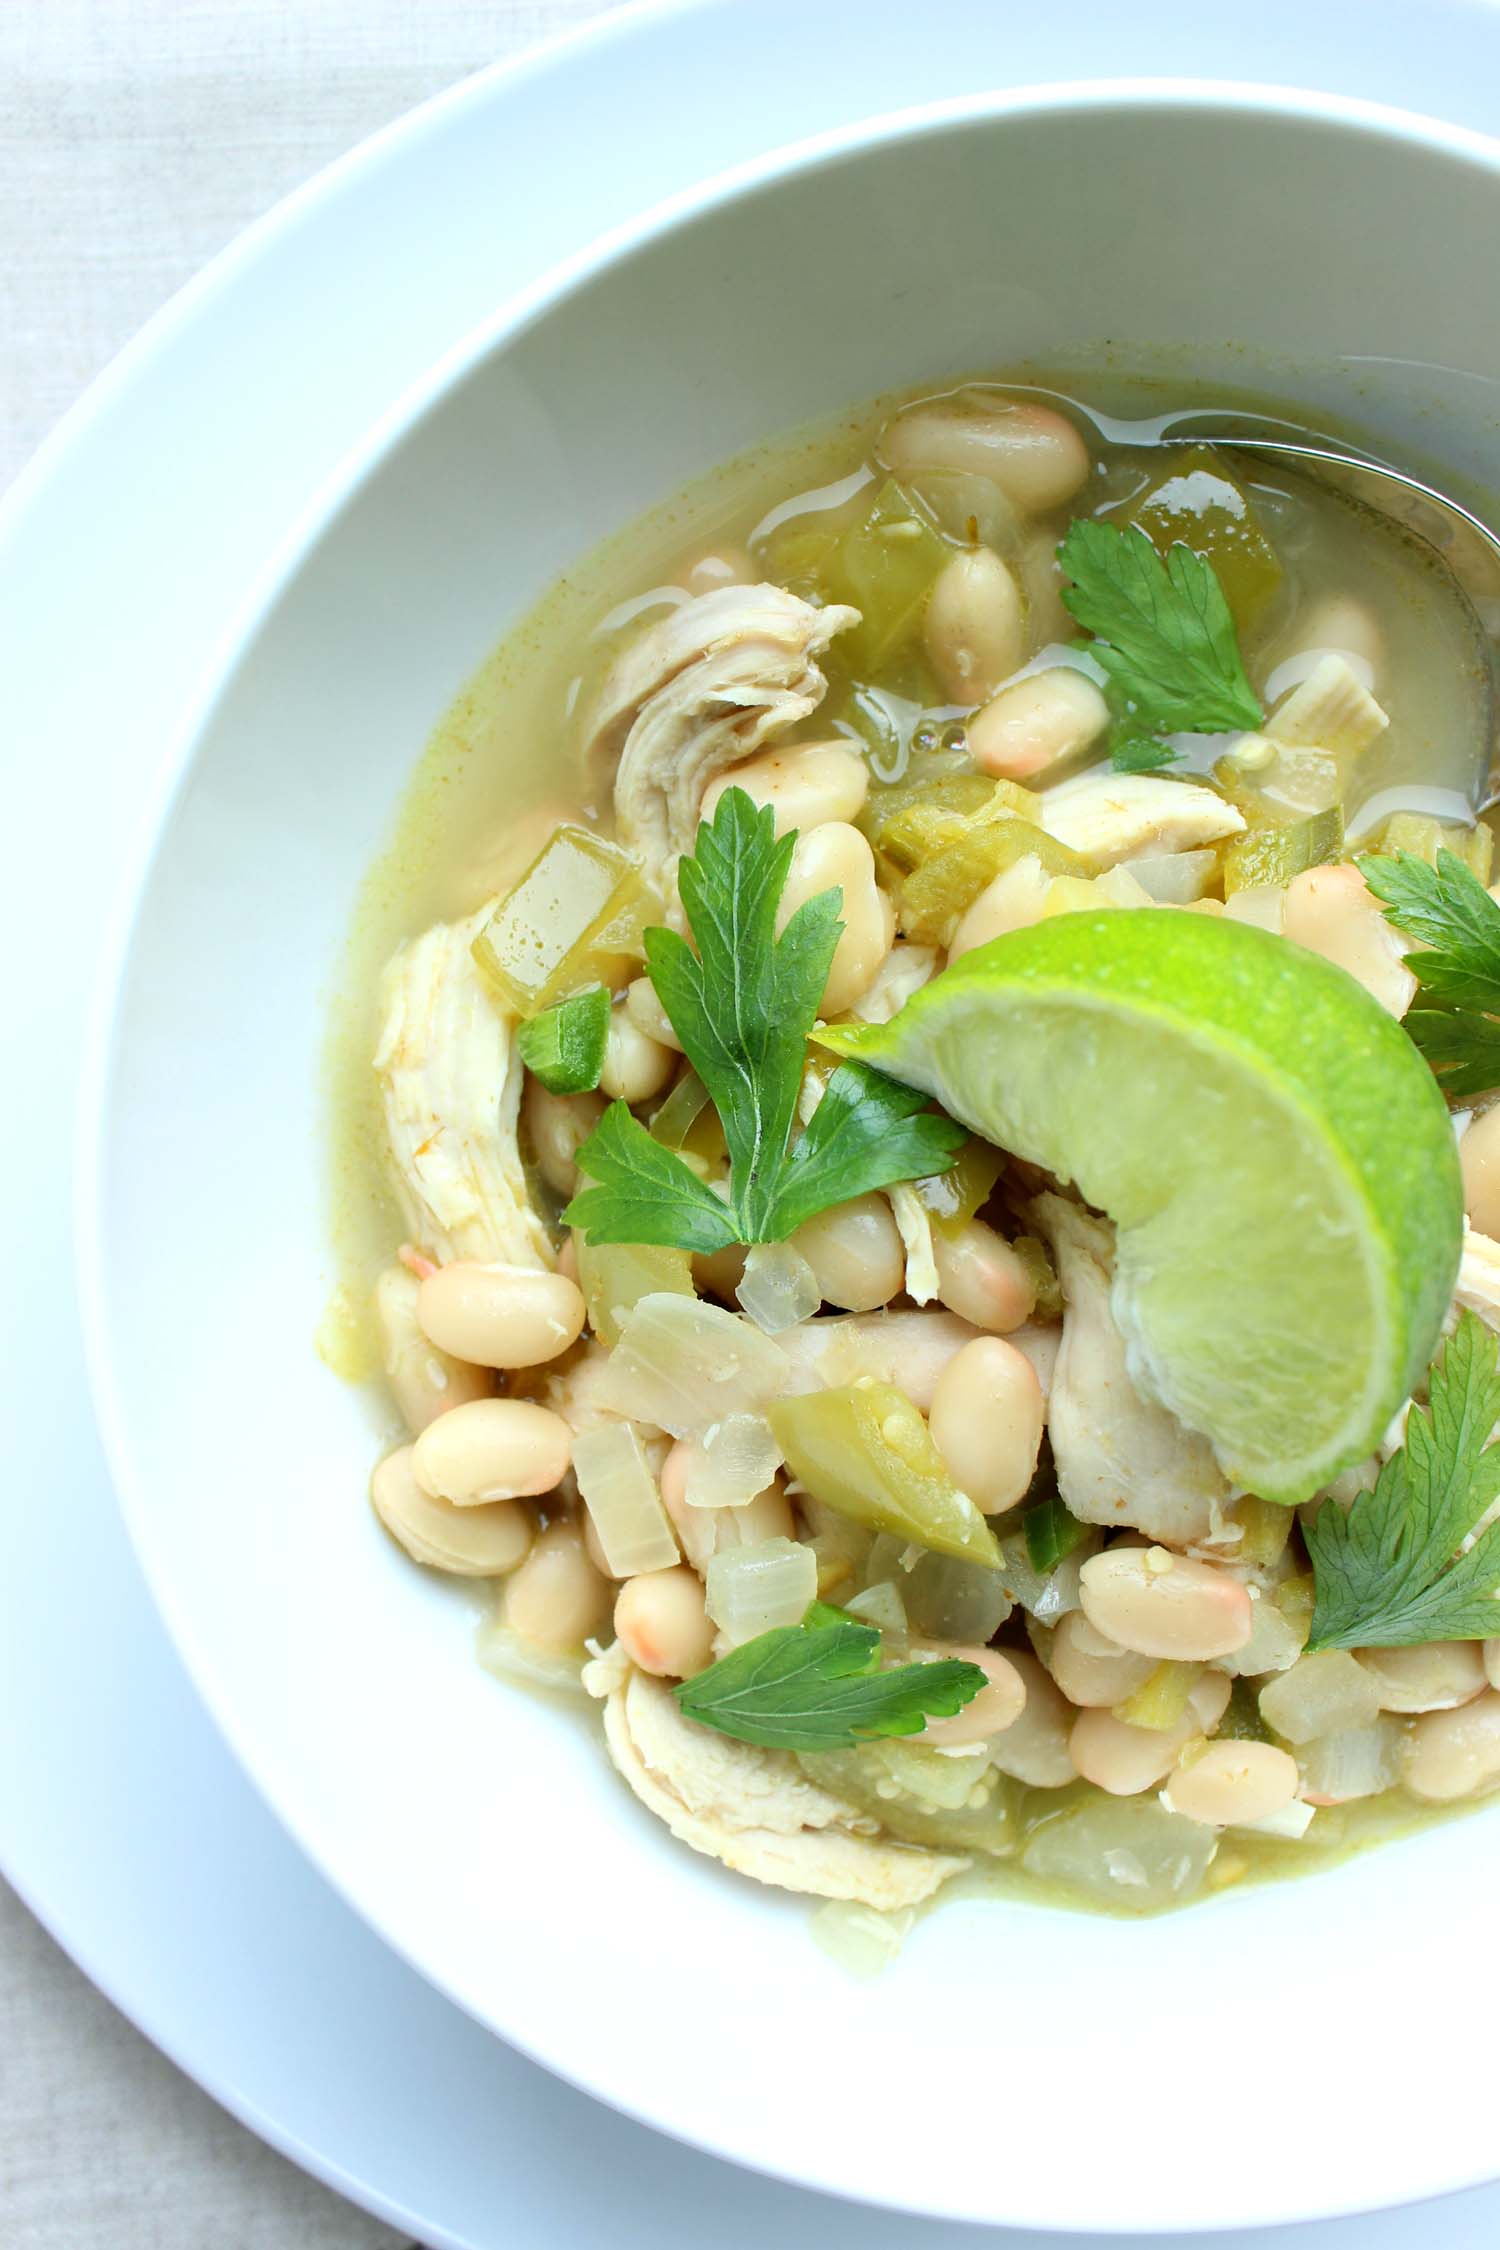
Chicken Chili Verde

Chicken Chili Verde | Image: Laura Messersmith

Chicken Chili Verde | Image: Laura Messersmith

When it’s freezing out there’s nothing more comforting than a pot of something delicious simmering away and chili is one of those easy, satisfying meals that just gets better and better the longer the ingredients hang out together. I love my classic Spicy Red Chili with bell peppers and ground beef in a tomato base, but I wanted to mix it up a little and develop a recipe that delivers that same comforting meal, but with a different set of flavors.

This recipe takes the cool greens of poblano peppers, jalapeños and tomatillos as inspiration with chicken broth as the base to make a lighter, brighter chili. In case it isn’t obvious I’ve been on a bit of a citrus kick lately and my mind is constantly whirring with ways to incorporate all the wonderful varieties that are available now. It’s amazing what a difference a bit of acid in a dish makes – the edge of lime here cuts through heavier texture of the white beans and wakes up the spice of the jalapeno.

Chicken Chili Verde | Image: Laura Messersmith

Chicken Chili Verde | Image: Laura Messersmith

Chicken Chili Verde with Lime (serves 4-6)

Ingredients:
2-2 1/2 pounds bone-in, skin-on chicken breast
2 cups (1 large) chopped Vidalia onion
2 1/2 tablespoons (4-5 cloves) minced garlic
2 teaspoons (1 small) minced jalapeño pepper
3 cups (12 ounces) diced tomatillos
8 ounces (2 small cans) diced green chilies
3 (15 ounce) cans Great Northern or Cannelloni beans, drained and rinsed
3 cups chicken broth
4 tablespoons olive oil, divided
4 teaspoons ground cumin
1 bay leaf
Kosher salt
Ground black pepper

For garnish: lime wedges, cilantro leaves, minced jalapeño

Instructions:
Pre heat the oven to 350 degrees F.

Place the chicken breasts on a foil-lined, rimmed baking sheet and lightly coat with 2 tablespoons olive oil. Sprinkle generously with kosher salt and ground black pepper. Roast at 350 degrees F. for 40-45 minutes or until the internal temperature reaches 160 degrees F. on an instant read thermometer. Remove the chicken from the oven and set aside to cool and rest. Reduce the oven to 200 degrees F.

While the chicken cooks, prep the vegetables.

Notes on Prep: for milder heat remove the ribs and seeds from the jalapeño. Tomatillos grow in a papery husk and have a slightly sticky coating. Remove the husk and rinse the fruit before de-stemming, similar to a tomato.

Heat the remaining 2 tablespoons olive oil over medium-low heat in a large dutch oven or heavy bottomed, oven-proof pot. Saute the chopped onion for 5-7 minutes until the pieces begin to turn translucent. Add the minced garlic and cook for 1 minute, stirring occasionally to keep the garlic from burning.

Next, add the minced jalapeño, the canned diced chilies and their liquid, as well as the diced tomatillos. Stir in the ground cumin and kosher salt. Continue to cook for 4-5 minutes to soften the tomatillos and form a thick sauce.

Stir in the drained, rinsed white beans, the chicken stock, and the bay leaf. Raise the temperature to medium and bring the mixture to a simmer. Cover the pot and place in the oven. Cook for 1- 1/2 hours at 200 degrees F. to allow the flavors time to combine.

If the chili is too thin in consistency, puree 1-2 cups of the chili in a food processor or blender and then return the puree to the pot.

Finally, remove the skin from the chicken and pull the meat into bite sized shreds. Add the chicken to the pot and stir. Bring the chili back up to temperature and serve with cilantro leaves, minced jalapeño and lime wedges.

Chicken Chili Verde | Image: Laura Messersmith

Chicken Chili Verde | Image: Laura Messersmith

Small Kitchen Friendly?
Yes, totally. I used a 5.5 qt French oven, a medium cutting board, chef’s knife, baking sheet, medium fine mesh sieve, wooden spatula, a liquid measuring cup, measuring cups and spoons. A food processor or blender will be helpful if you’d like a thicker chili.

The Verdict:
I initially worried as I developed this recipe that a chicken chili would be a pale imitation not worthy of the title. As it turns out I think we might even, just possibly prefer the bright, slightly sharp flavor of the tomatillos with the consoling warmth of the chicken and broth. I highly recommend serving it with a good squeeze of lime and a few leaves of fresh cilantro. Perfect for a cold winter’s day.

Chicken Chili Verde | Image: Laura Messersmith

Chicken Chili Verde | Image: Laura Messersmith

Orange Ricotta Scones with Vanilla Sea Salt

Orange Ricotta Scones with Vanilla Sea Salt | Image: Laura Messersmith

Orange Ricotta Scones with Vanilla Sea Salt | Image: Laura Messersmith

Winter has fully settled on New York and frankly it’s been a shock to my system. I’d love to go into hibernation mode and stay under the covers emerging only for BBC crime dramas on Netflix (we finished The Fall with Gillian Anderson and now I’ve moved on to Broadchurch. Slow build as we discover that many people in the small Dorset town have secrets!) and carb-based meals. Or Chipotle.

The next warmest option is to turn on the oven – a welcome blast of heat for my cold fingers – and bake something simple, comforting, and citrus based. For me that’s a batch of scones. They take enough effort so feel like I’m accomplishing something, but are so unfussy and rustic in presentation that they’re on the table in less than an hour.

I originally planned to re-create a wonderful lemon-ginger biscuit I had at the Ferry Terminal in San Francisco from Biscuit Bender (amazing with blueberry jam), but got side tracked thinking about other citrus + ginger combinations. I also realized I had a container of whole-milk ricotta in the fridge left over from another recipe and once I remembered the vanilla salt I made last month the wheels totally fell off that biscuit train.

Not to worry though, because these Orange Ricotta Scones totally deliver and because the biscuit train is never off the rails long around here.

Orange Ricotta Scones with Vanilla Sea Salt | Image: Laura Messersmith

Orange Ricotta Scones with Vanilla Sea Salt | Image: Laura Messersmith

Orange Ricotta Scones with Vanilla Salt (Yield: 12-16 Scones)

Ingredients:
2 1/2 cups all purpose flour
3 tablespoons granulated sugar
1 tablespoon baking powder
1/4 teaspoon salt
6 tablespoons cold butter, diced
1 large egg
3/4 cup whole milk ricotta, bought or homemade
1/4 cup whole milk
2 tablespoons orange zest, divided about 2 large oranges
1 1/4 cups confectioners sugar
2 teaspoons orange blossom honey
4-5 teaspoons orange juice
Vanilla Sea Salt (recipe here)

Instructions:
Preheat oven to 400 degrees F. Chill the baking sheets and ingredients in between steps.

In a large bowl combine the all purpose flour, granulated sugar, baking powder, and salt. Lightly toss the diced butter in the flour mixture to coat then using a pastry cutter, blend in the butter until the mixture resembles coarse crumbs. Set aside in the refrigerator.

In a large liquid measuring cup, combine 1 1/2 tablespoons of the orange zest with the egg, ricotta, and whole milk. Make a well in center of the flour mixture and add the ricotta mixture all at once, fork the wet and dry ingredients together until just combined. The dough will be a little shaggy at this point.

Turn the dough out onto a lightly floured surface. Gently fold the dough 8 to 10 times until dough pulls together. Pat into a rectangle about 1 inch thick and cut into squares or triangles.

Place the scones 2 inches apart on a parchment paper-lined baking sheet. Bake about 12-14 minutes or until lightly golden brown. Slide the parchment and scones onto a cooling rack.

While the scones are cooling, whisk together the confectioner’s sugar, honey, reserved orange zest and orange juice with a pinch of salt until smooth. Drizzle the icing over the cooled scones, sprinkle with a little vanilla sea salt, and serve!

Written with reference to Food + Wine’s Glazed Lemon Ginger Scones and Better Homes and Garden’s Strawberry Shortcake Scones.

Orange Ricotta Scones with Vanilla Sea Salt | Image: Laura Messersmith

Orange Ricotta Scones with Vanilla Sea Salt | Image: Laura Messersmith

Small Kitchen Friendly?
Yes, totally. I used a large mixing bowl, pastry cutter, 2 cup-size liquid measuring cup, dry measuring cups and spoons, a microplane grater, paring knife, and a dinner fork. I also needed a small bowl, small spoon, two rimmed baking sheets, a bench scraper, and parchment paper.

The Verdict:
These are definitively scones, not biscuits thanks to the ricotta and sugar, but are also just very lightly sweet when un-iced. During my experiments I tasted them plain, with a bit of honey, iced only, and iced + vanilla salt – all were delicious in their own way, so choose what you like best. The ricotta keep the dough tender and its very mild flavor allows the sweet orange come through as the elegant star of the whole affair. Pair with a cup of tea and an Agatha Christie novel.

Orange Ricotta Scones with Vanilla Sea Salt | Image: Laura Messersmith

Orange Ricotta Scones with Vanilla Sea Salt | Image: Laura Messersmith