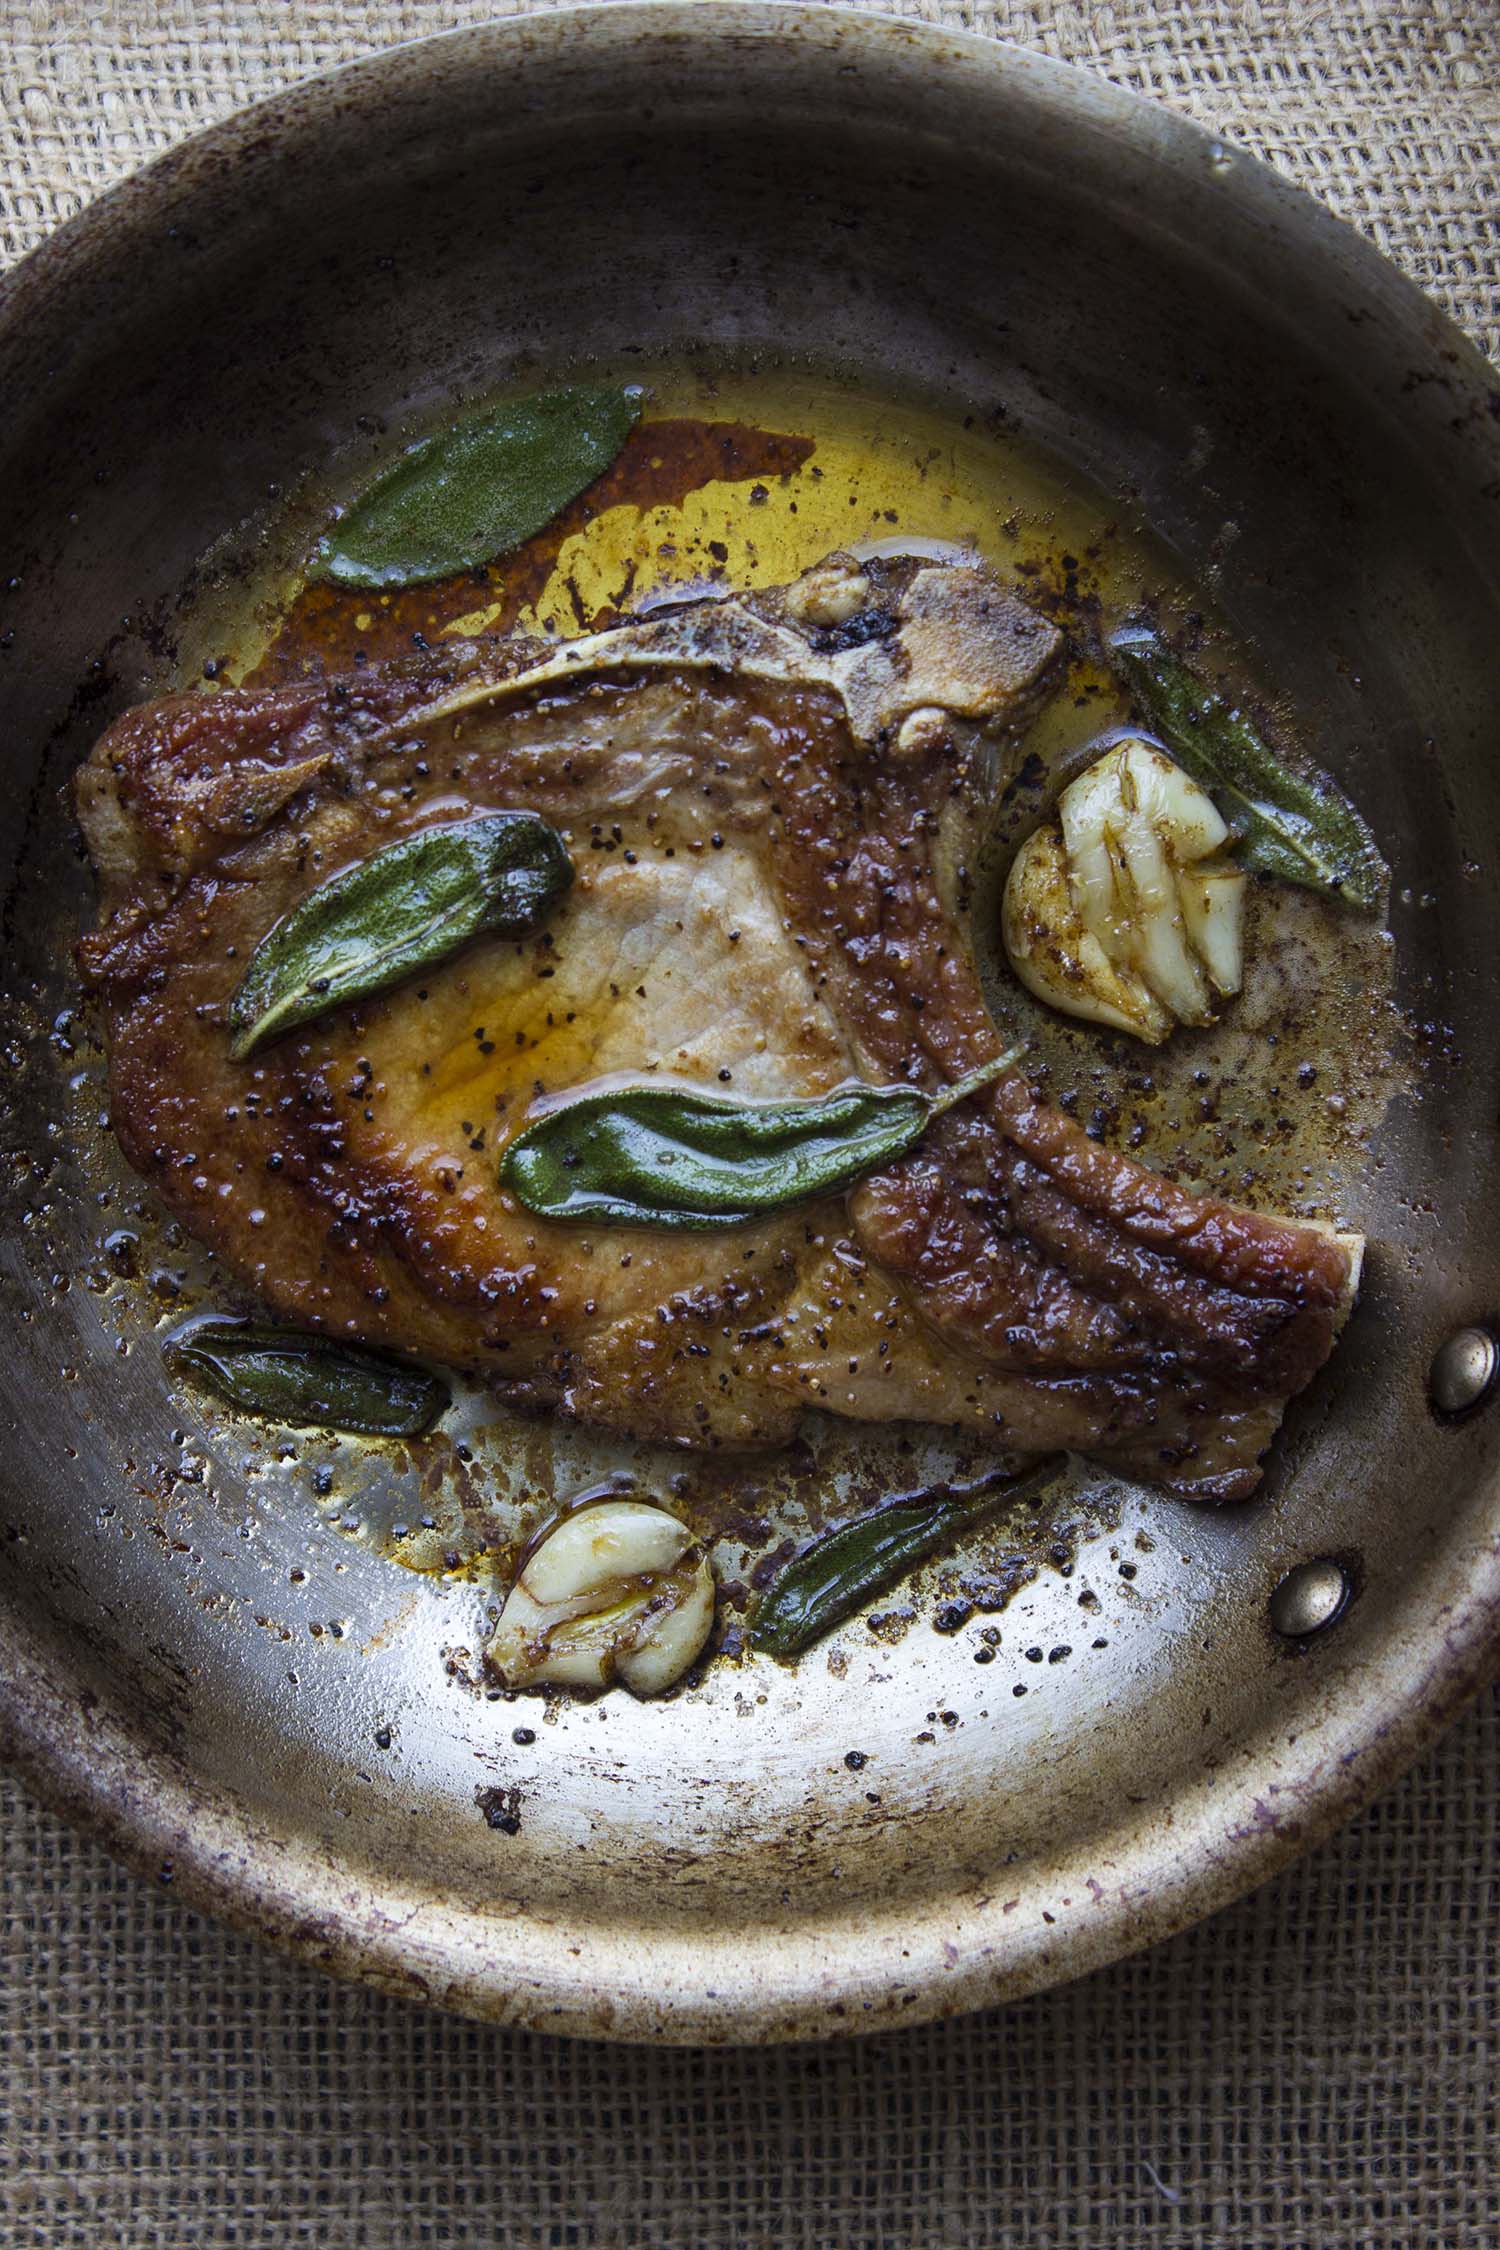
Cannellini Beans with Spinach

Cannellini Beans with Spinach | Image: Laura Messersmith

Cannellini Beans with Spinach | Image: Laura Messersmith

After an odd few days of 80 degree temperatures in New York we’re back to the weather I associate most with late October. Weather more in the vein of “a dark and stormy night” full of windy breezes that swirl the leaves and pulse with energy straight from Ghostbusters.

It’s days like today that absolutely call for something simple, warming, and earthy. A dinner that calls to mind the safety of hearth and home; simmering merrily on the stovetop through the afternoon then bringing family to gather around the table. As written this is a dish reminiscent of a Tuscan stew – creamy beans, bright lemon, leafy spinach – but with a bit more chicken stock could easily translate into a wintery soup. Even better? With just a quick swap in of vegetable stock for the broth you’ll have a fantastic main course that I’d be proud to serve to any vegetarian.

Cannellini Beans with Spinach | Image: Laura Messersmith

Cannellini Beans with Spinach | Image: Laura Messersmith

Stews always improve with a bit of time to think about what they’ve done, and so this is also a dish that I would absolutely make extras of and squirrel away in the freezer for use this winter when something cozy is just the ticket. Perfect with a slice of crusty bread toasted and rubbed with garlic or a sprinkle of parmesan melted on top.

Cannellini Beans with Spinach (serves: 8)

Ingredients:
1 1/2 cups dried cannellini beans
6 cups low sodium chicken broth
1 head of garlic, halved crosswise; plus 2 garlic cloves, crushed
3 sage leaves
6 tablespoons olive oil, divided, plus more for serving
1 teaspoon Kosher salt
1/2 teaspoon crushed red pepper flakes
2 bunches mature spinach, ends trimmed
1 tablespoon finely grated lemon zest
2 tablespoons fresh lemon juice

Instructions:
Place the dried beans in a large French oven or bowl and cover with double the amount of water. Cover and allow to soak for 16-24 hours at room temperature.

Drain the beans and return them to the pot. Bring beans, head of garlic, sage, 3 tablespoonsolive oil, and 6 cups chicken broth to a boil over medium heat. Reduce the heat, add 1 teaspoon kosher salt and simmer gently until beans are creamy all the way through but skins are still intact, 35–45 minutes. Some of the beans will break down slightly and thicken the broth. Let cool while you move onto the spinach.

Heat 3 tablespoons olive oil in a large deep sauté pan over medium. Cook crushed garlic and red pepper flakes, stirring, just until garlic is golden, about 1 minute. Working in batches, add spinach, letting it wilt slightly before adding more, and cook, tossing often, until leaves are just wilted, about 5 minutes; season with salt.

Using a slotted spoon, transfer beans to sauté pan with spinach and cook, tossing gently, until beans are warmed through. Add lemon zest, lemon juice, and 1/4 cup bean cooking liquid and toss, adding more cooking liquid if needed, until coated. The mixture should be closer to a sauce than a soup in consistency. Be careful not to over cook or the beans will begin to break down. Taste and season with salt as needed. Serve drizzled with oil and a slice of toasted crusty bread.

Do Ahead: Beans can be cooked 3 days ahead. Keep in cooking liquid; cover and chill. Cook spinach and seasonings when ready to serve.

Re-written and lightly adapted from Bon Appetit’s Cannellini Beans with Spinach by Rita Sodi & Jody Williams.

Cannellini Beans with Spinach | Image: Laura Messersmith

Cannellini Beans with Spinach | Image: Laura Messersmith

Small Kitchen Friendly?
Yes! I used a 6 qt. French oven, large deep sauté pan, fine mesh sieve, medium cutting board, chef’s knife, liquid measuring cup, slotted spoon, microplane grater, and measuring spoons.

Cannellini Beans with Spinach | Image: Laura Messersmith

Cannellini Beans with Spinach | Image: Laura Messersmith
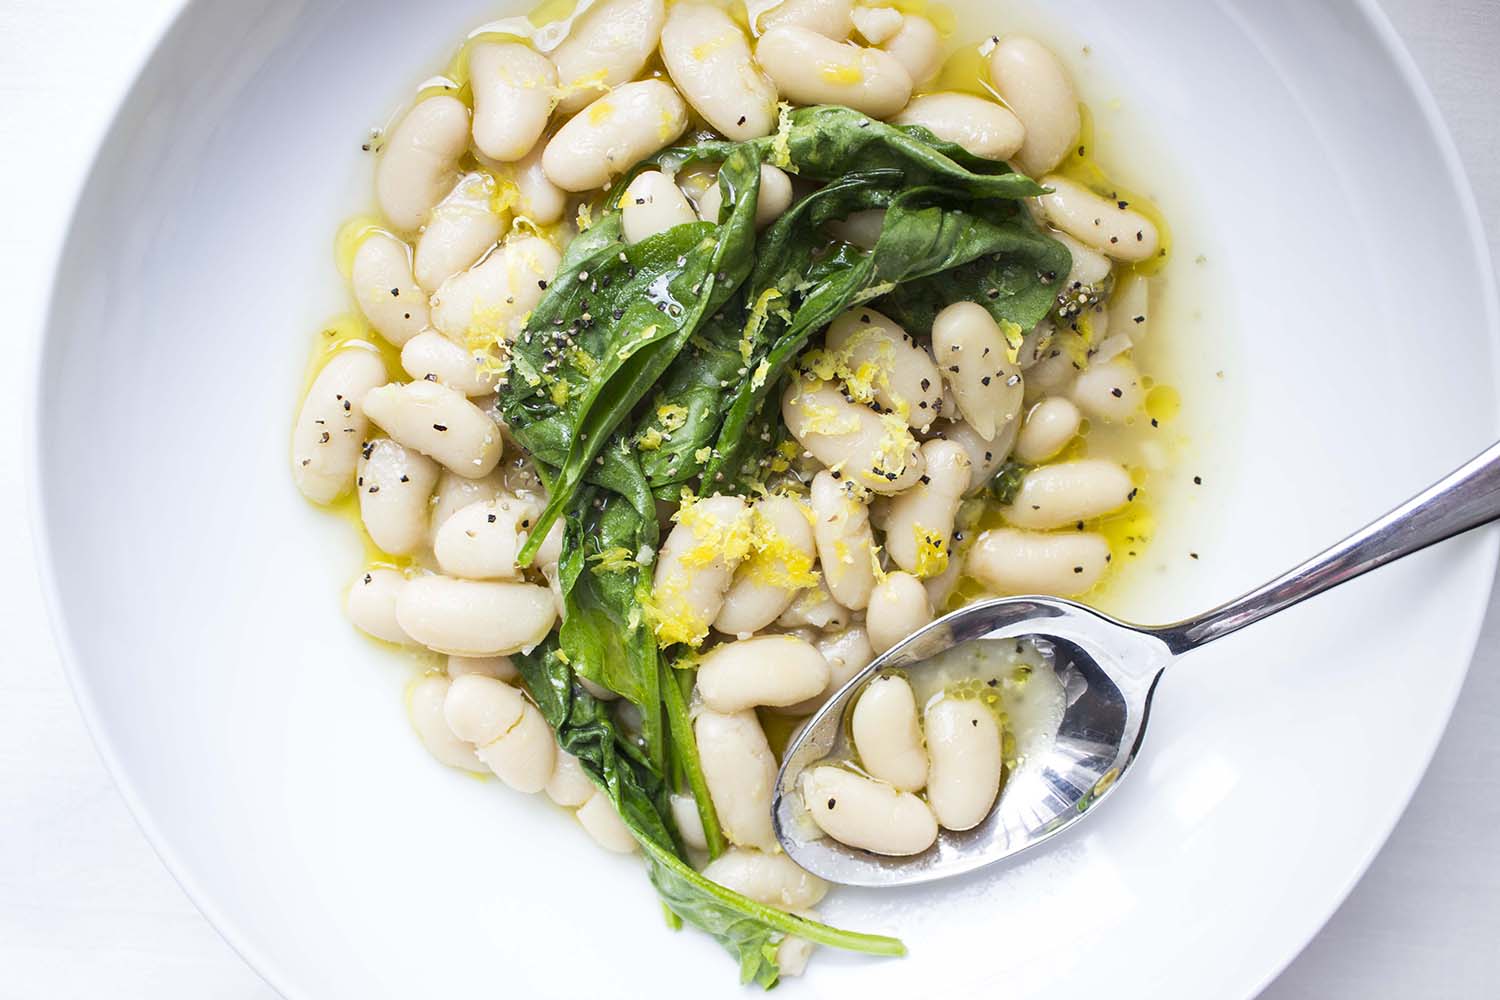
Pan-Seared Pork Chops with Garlic and Sage

Pork Chops with Garlic and Sage | Image: Laura Messersmith

Pork Chops with Garlic and Sage | Image: Laura Messersmith

Am I the only one who’s just now realizing how delicious (and frankly, super simple to make) pork chops are? They’re quickly becoming my favorite thing to make for quick weeknight suppers, special occasions, when guests are coming to dinner. In part that’s because they’re a little unexpected – not your standard chicken or obvious “fancy” steak. It’s also because when a pork chop, especially a really flavorful, bone-in cut, is prepared simply it’s greater than the sum of its parts.

Case in point, just read the ingredient list below – I’d be willing to bet that the only items not on hand are the meat and the herbs, everything else is almost certainly in the pantry already, just waiting to be called into action. But don’t be fooled – just because the recipe is brief doesn’t mean it’s ordinary or boring. In fact the results are deeply savory and satisfying – just right for a chilly October evening.

Pork Chops with Garlic and Sage | Image: Laura Messersmith

Pork Chops with Garlic and Sage | Image: Laura Messersmith

Pan Seared Pork Chops with Garlic & Sage (serves: 4)

Ingredients:
1 tablespoon olive oil
4 (6-8 ounce) thick-cut, bone-in pork chops
Kosher salt
ground black pepper
8 fresh sage leaves
2 garlic cloves, peeled, smashed
1 tablespoon unsalted butter

Instructions:

Heat the olive oil in a large skillet over medium-high. Pat the pork chops dry with paper towels and season generously on all sides with salt and pepper.

When the oil is hot and beginning to smoke, add the pork chops to the pan. Cook on one side until golden brown, about 1 minute. The turn and repeat the process on the other side, cooking for 1 minute. Continue to turn each minute for about 7–10 minutes until the chops are deep golden brown and an instant-read thermometer inserted into the thickest part registers 135 degrees F.

Remove pan from heat and immediately add the sage, garlic, and butter. Swirl together the juices and aromatics, then tilt the skillet and spoon the pan sauce over the pork chops – bone and fat cap included – for 2-3 minutes. Transfer pork chops to a platter and rest at least 5 minutes - the internal temperature will rise to 145 degrees F.

Serve immediately with juices from the pan spooned over the top.

Re-written and lightly adapted Bon Appetit’s Your New Favorite Pork Chop by Alison Roman.

Small Kitchen Friendly?
Yes! I used a large sauté pan, tongs, medium cutting board, large spoon, chef’s knife, and paper towels.

Pork Chops with Garlic and Sage | Image: Laura Messersmith

Pork Chops with Garlic and Sage | Image: Laura Messersmith

Pork Chops with Garlic and Sage | Image: Laura Messersmith

Pork Chops with Garlic and Sage | Image: Laura Messersmith

Honey Rosé Plum Cobbler

Honey Rosé Plum Cobbler | Image: Laura Messersmith

Honey Rosé Plum Cobbler | Image: Laura Messersmith

I adore fall and the smoky scent of leaves, the crisp brightness, the enjoyment of cool cheeks and a cozy sweater. I anticipate the energy change from the hot laziness of summer, but I also sort of dread it – the beginning of the all too rapid transition into full-on winter. Slushy side walks, cold fingers, wearing my duck boots nearly 24/7 – no thanks.

But let’s focus on the here and now – the blazing blue skies the last lingering summer produce. Who doesn’t need a great late-summer early-fall recipe to take advantage of the glorious wealth of plums that hit the markets in September and generously hang on until October? Definitely not a delicate berry, but a bit more tender-hearted than the sturdy apples and pears to come in oh like t-minus 1 week (not that I’m really complaining.)

Honey Rosé Plum Cobbler | Image: Laura Messersmith

Honey Rosé Plum Cobbler | Image: Laura Messersmith

Plums have the depth to stand proudly alongside other robust flavors and add their tart sweetness to the dry rosé. This cobbler topped with buttery dough – is waiting to grace your dinner table.

Honey-Rosé Plum Cobbler (serves 6)

Ingredients:
1 3/4 cups, plus 2 tablespoons all-purpose flour, divided
1/4 cup sugar
2 teaspoons baking powder
1/4 teaspoon salt
1/2 cup, plus 2 tablespoons whole milk, divided
1/3 cup olive oil
2/3 cup dry rosé wine
1/3 cup clover honey
2 1/2 pounds assorted plums, pitted and cut into 8 wedges each
2 tablespoons coarse sugar, aka sugar in the raw

Optional for serving: ice cream or whipped cream

Instructions:
Preheat oven to 400 degrees F. Brush 6 oven-safe ramekins with softened butter.

For the biscuits, combine the 1 3/4 cups flour, 1/4 cup sugar, baking powder, and salt in a medium bowl. Add 1/2 cup milk and olive oil to the flour mixture. Stir to combine. Cover with plastic wrap, and set aside.

For filling, combine the wine, honey in an extra-large skillet whisk in remaining 2 tablespoons flour. Stir in the plums. Cook and stir over medium-high heat about 8 minutes or until thickened and bubbly. Remove from heat; keep warm.

Unwrap dough and roll out to 1/2-inch thickness on a floured surface. Cut into rounds using a 1-inch round cutter. Divide plums among the ramekins filling nearly to the tops. Arrange the biscuits over the filling, slightly overlapping as needed. Brush with the remaining 2 tablespoons of milk and sprinkle the biscuits with the coarse sugar.

Bake for 15-20 minutes or until biscuits are golden. Place a baking sheet below the dish to catch an drips during baking.

Remove from oven and let stand 30 minutes before serving with a scoop of ice cream or whipped cream.

Adapted and lightly re-written from Better Homes and Gardens’ Honey Rosé Plum Cobbler by David Bonom.

Honey Rosé Plum Cobbler | Image: Laura Messersmith

Honey Rosé Plum Cobbler | Image: Laura Messersmith

Small Kitchen Friendly?
I used 6 (7 ounce) oven-safe ramekins, pastry brush, medium mixing bowl, measuring cups & spoons, liquid measuring cup, spatula, large skillet, whisk, chef’s knife, medium cutting board, small fluted biscuit cutter, and rimmed baking sheet.

Honey Rosé Plum Cobbler | Image: Laura Messersmith

Honey Rosé Plum Cobbler | Image: Laura Messersmith

Baked Green Falafel and Greek Salad

Baked Green Falafel and Greek Salad | Image: Laura Messersmith

Baked Green Falafel and Greek Salad | Image: Laura Messersmith

Before we even begin I should say that these are by no means authentic falafel. For one, I skipped the dried chickpeas (couldn’t be bothered) and for two, these guys get just the barest whisper of olive oil, no deep frying or sautéing required, and finally, for three: this is my favorite ratio of spices and herbs, but to be honest I’m not sure if any of them actually belong in falafel. So really these should probably just be called something generic like “spiced chickpea patties” and not falafel at all. But, since we’re rebellious around here and it’s a handy shortcut I’m sticking with falafel.

Baked Green Falafel and Greek Salad | Image: Laura Messersmith

Baked Green Falafel and Greek Salad | Image: Laura Messersmith

Shortcuts or laziness are the name of the game with this recipe since the previously mentioned points (canned chickpeas, no frying) save a ton of time, effort, and mess. When has that ever been a bad thing? The most important part though is that they taste incredible.

Tender and garlicky, pungent with cilantro, bright from the lemon juice and deliciously golden, these falafel make the perfect topping to a greek salad or wrapped up in a pita. They’re just the thing for these not-quite summer not-quite fall evenings and I personally love to make a big batch and freeze the extras (assuming there are any!) for an even easier dinner down the road.

Baked Green Falafel and Greek Salad | Image: Laura Messersmith

Baked Green Falafel and Greek Salad | Image: Laura Messersmith

Baked Green Falafel & Greek Salad (serves 4)

Falafel Ingredients:
2 cups fresh parsley leaves
1 cup fresh cilantro leaves
6 cloves garlic
4 lemons
1/2 teaspoon kosher salt
1/2 teaspoon black pepper
2 1/2 teaspoons cumin
28 ounces canned chickpeas, well rinsed and drained
1/4 cup whole wheat or oat flour

Salad Ingredients:
4 cups shredded lacinato kale leaves
2 cups cherry tomatoes, halved
2 cups diced hot house cucumber
8 ounces feta cheese, divided
1/2 cup hummus
4 pitas toasted
olive oil
kosher salt
black pepper

Instructions:
Place the parsley, cilantro, roughly chopped garlic, 1/3 cup fresh lemon juice, 1/2 teaspoon kosher salt, and ground cumin in the bowl of a large food processor and mix to combine. The texture will be similar to a thick pesto.

Rinse and thoroughly drain the chickpeas in a colander and add half to the herb mixture. Pulse the food processor a few times to combine and then add the remaining half of the chickpeas. Pulse again a few times until the chickpeas are mostly incorporated but some larger pieces remain and there are still traces of un-mixed herbs. You want to maintain some texture not end up with hummus.

Use a rubber spatula to transfer the chickpea mixture to a large mixing bowl and fold together to finish mixing in the herbs and seasoning. Sprinkle the whole wheat flour over the chickpeas 1 tablespoon at a time using the spatula to press the mixture together until a loose dough is formed. It should be firm enough to hold its shape when handled, think meatballs. Taste and adjust seasonings as needed.

Use a cookie scoop or measuring spoon to portion about 2 tablespoons of falafel mixture. Use your hands to form 12 flattened discs about 1/2 inch thick and 2 inches in diameter. Place on baking sheet and refrigerate or freeze for 15 minutes to firm up.

OPTIONAL STEP: I don’t bother with this, but for a little extra crust on the outside, before baking heat a large skillet over medium to medium-high heat and add 2 tablespoons olive or canola oil. Swirl to coat pan, then add falafel. Carefully flip once golden brown – about 3-4 minutes - and then cook on the other side until golden brown as well  – 3-4 more minutes.

In the meantime, line a second rimmed baking sheet with foil and place in the oven while you pre-heat to 375 degrees F. When the oven is hot, remove the sheet (oven mitt!) and lightly coat it with non-stick spray or olive oil. Place the falafel on the warmed sheet and bake on one side for 20-25 minutes then turn and bake for another 10-15 minutes. Both sides will be lightly browned. The longer you bake them, the firmer they’ll get! While the falafel bake, prepare the kale, tomatoes, cucumber and feta.

Toss together kale leaves, tomatoes, cucumbers and feta. Serve the falafel alongside with the toasted pita and hummus. The falafel can be refrigerated, layered with parchment paper in an airtight container, for several days. Freeze to keep longer.

Small Kitchen Friendly?
Yes! I used a medium food processor, small cutting board, fine mesh sieve, medium mixing bowl, rubber spatula, cookie scoop, and two rimmed sheet trays.

Baked Green Falafel and Greek Salad | Image: Laura Messersmith

Baked Green Falafel and Greek Salad | Image: Laura Messersmith